Showing posts with label interactive Card. Show all posts

Thursday, November 11, 2021

Light Up Christmas Card with i-crafter Dies and Pear Blossom Press Halo Lights

 Hello again friends,

It's Rachel here showing off my take on the new i-crafter Christmas Treat Lantern Add-On die set! I wanted to light this die set up since I first saw it. Since I just did a light up lantern, I thought it would be fun to create a Christmas card instead this time. 

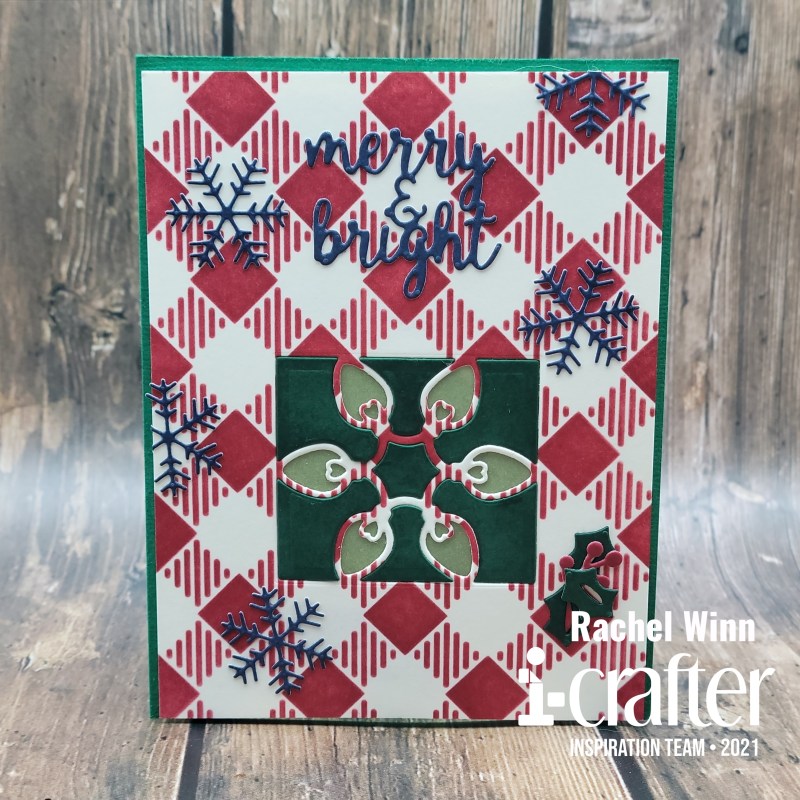
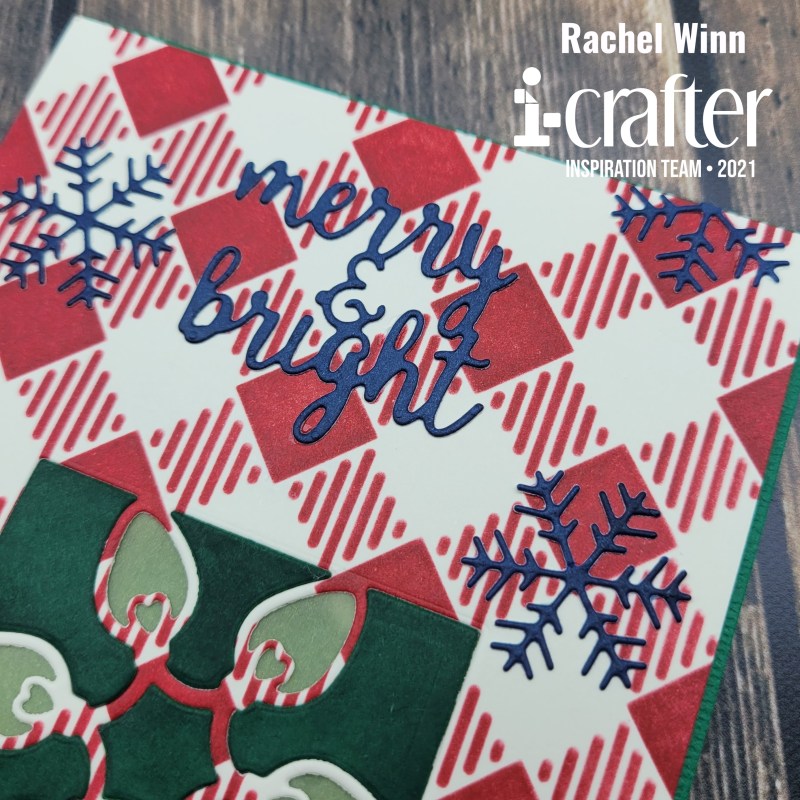
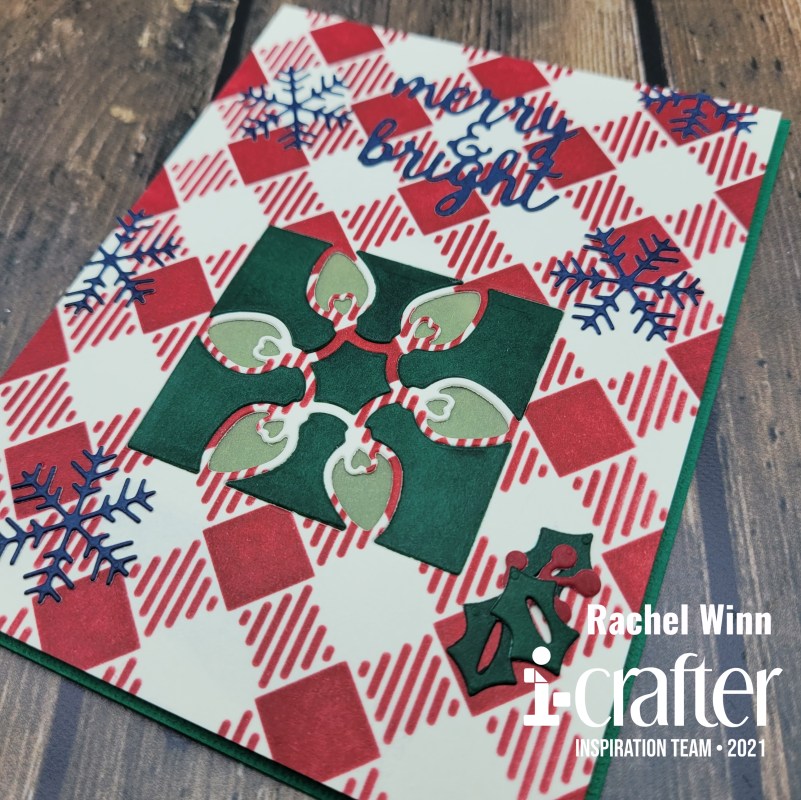
I started with the i-crafters's Buffalo Plaid Stencil and used Catherine Pooler's Cranberry Fizz ink over a vanilla cardstock. Next, I used the lights die from the Christmas Treat Lantern Add-On die set in the bottom center of the panel that I stenciled on. Used Catherine Pooler's Deck the Halls ink on the vanilla cardstock and ink smooshed the pad directly onto the cardstock, then used the lights die again to get the center pieces of the image. To create a yellow glow for the lights, I ink smooshed Catherine Pooler's Chiffon, a bright yellow ink onto vellum and glued it the back of the plaid panel. Once that was glued down, I added the green center pieces back into the image.

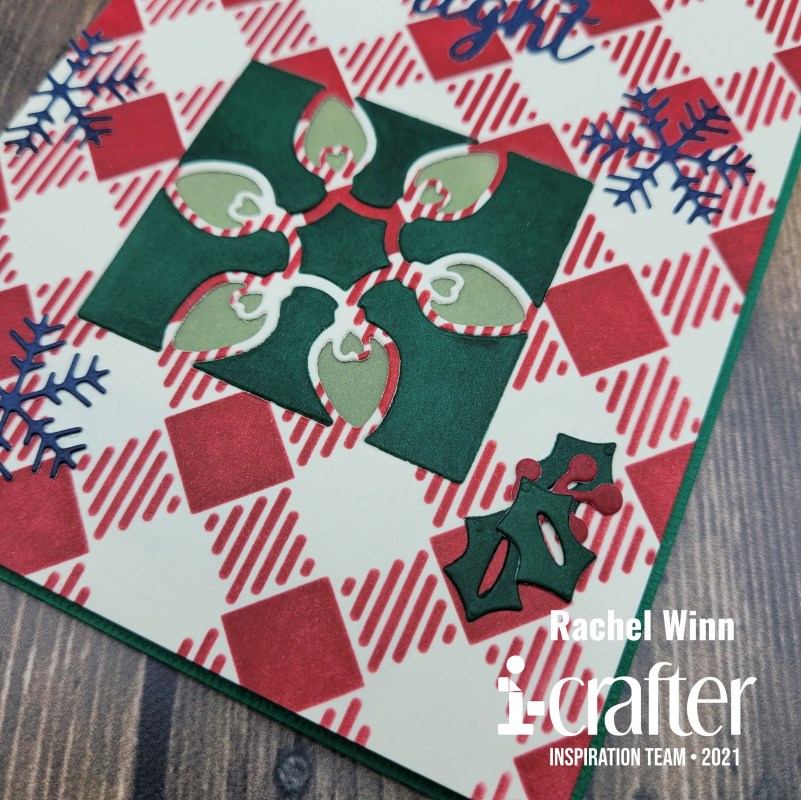
 I used the "Merry & Bright" word dies and the snowflake from the i-crafters's Holiday Dovetail Card die set to decorate the card. Again, I ink smooshed Catherine Pooler's Juniper Mist ink directly onto the vanilla cardstock. I cut out the words and five snowflakes. I cut two down so that I could position them on the edges.

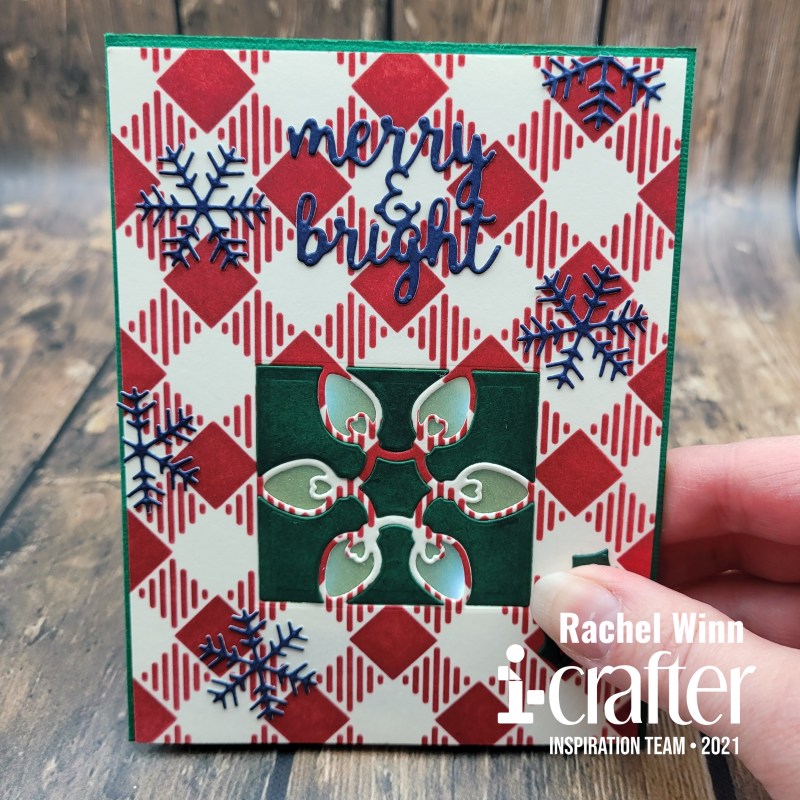
I then took the holly and berries from the i-crafters's Christmas Treat Lantern Add-On die set and positioned them over the button to my Pear Blossom Press Halo Lights, which is what I used to light up the card. I should have taken a picture of the back of the panel before I glued it down. I wanted something quick and easy and the Pear Blossom Press Halo Lights were perfect, they have 4 built in LED lights. I positioned the lights so they hit the corners of the box instead of positioning it straight up and down.

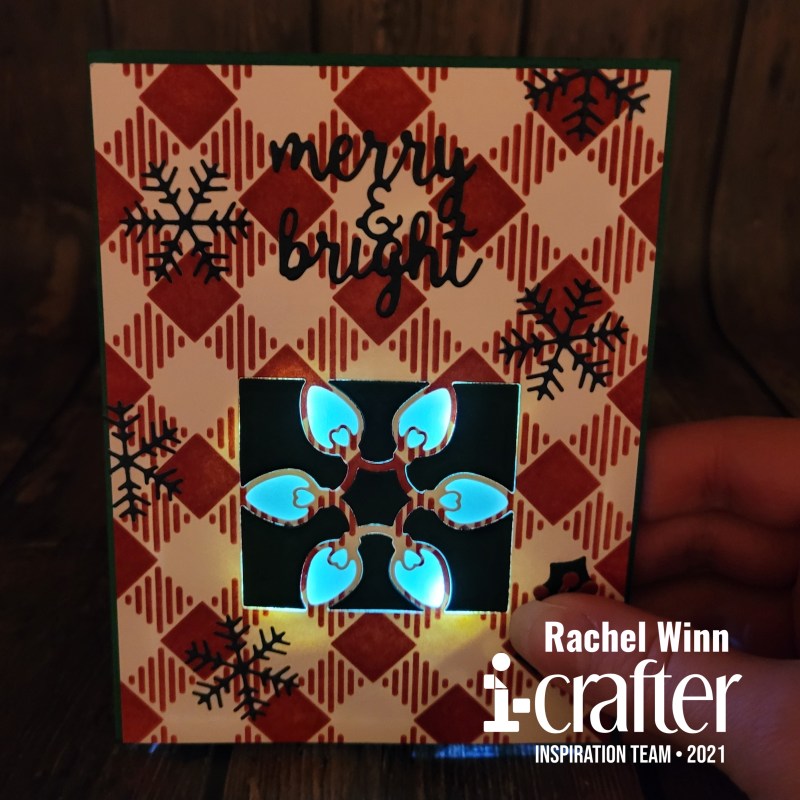
You cane see how perfectly the lights from the Pear Blossom Press Halo Lights worked with the box when it's lit up.

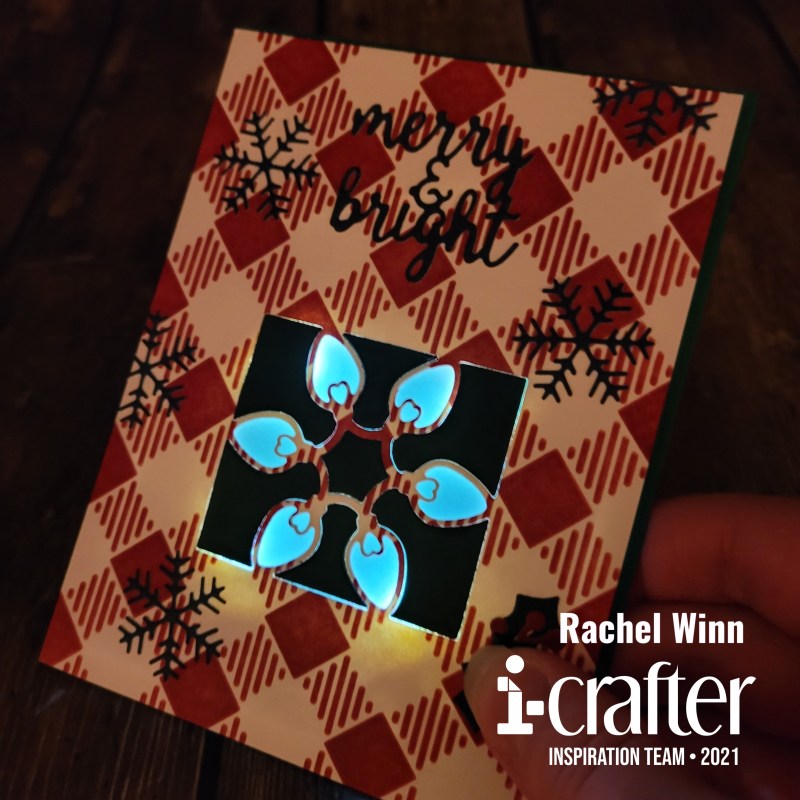
I couldn't be happier with how it turned out!

Here is a short video with the card in action! I hope that you enjoy it as much as I do!

If you’d like to see more of my projects, you can follow me here: Instagram, and Facebook page.

 
Until next time,
Rachel
 
For more inspiration, updates, and news make sure to check out these awesome places!
 
 
Thank you so much for stopping by today!

Sunday, August 1, 2021

i-crafter August Release

It's release times for i-crafter! I played with the new Mason Jar Box Card by Lori Whitlock dies and had so much fun doing it. You know my love for using up scraps right? Well all of this card was cut from my scrap stash. 

I started my jar using a light blue cardsock. The front panel of the jar I shaded with Copic markers and stamped the "Thank you" sentiment from i-crafter's Thankful Sentiments stamp set in the center. I left the back panel blank without shading so that it can be used to write a message on.

I tried to use some Cool Gray Copics on the lid but it didn't work out as well since the surface is so reflective. Once the lids were glued to the front and back pieces, I used twine to add a little bit of a rustic feel to the card. To do this, I added glued the back of panel and wrapped it a few times. The front piece, I tied a simple knot on the front, the back panel I tied it in the back so it appears to be wrapped around both pieces without a break. Next, I added two side panels and two bridge or center pieces that I cut out in that same light blue to keep that jar look intact.


For the flowers, I cut out all of the flower dies from each the set from several colors. I really love the look of the biggest flower with two petal layers. I added Copic shading to the center of the three largest petal sizes. I probably added a few more flowers than were needed... but I was having SO much fun!


After shading the larger flowers, I used the i-Press Burnisher and Pad to create some real dimension for the flowers. Here is a short tutorial showing what I did:


I also used the added some color depth with Copics then used the i-Press on the long leafy pieces of greenery. This gave them a slightly curled look. I burnished the front of one stem and the back of the other stem, I loved the way they looked when I finished.


Ok, because I'm obsessed with the end results, you get a ton of photos from all angles!


The back is just as pretty as the front!


The neat thing about this style of card is that it can be folded flat (I would have needed to burnish my sides a little more for it to stay on its own.) Had I not added flowers quite so far to the side, I could have slide it into an A2 envelope easily, but I think this one may need a 5.5"x5.5" envelope instead!


I hope that you have enjoyed my project for today and can't wait to see how you use the Mason Jar Box Card by Lori Whitlock die set in the future!

Until next time, 
R. Winn

For more inspiration, updates, and news make sure to check out these awesome places!


Thank you so much for stopping by today!

Friday, June 18, 2021

EZ-Lights Creating Bright Days with Catherine Pooler

Hello friends,

Welcome to the Catherine Pooler Designs x Pear Blossom Press Collab Hop! We're sharing fun, interactive cards to brighten your day! They feature awesome new stamps and dies from Catherine Pooler Designs, and with help from Pear Blossom Press, they all really light up! Be sure to hop along with us for loads of inspiration; our designers have come up with some brilliant cards.


We got to play with Pear Blossom Press EZ-Lights with the new Catherine Pooler Bright Days stamp and die set. I think they are a match made in crafty heaven! I created a mini slimline for the hop. I started by stamping the light fixture and light switch out using Midnight Ink on to Catherine Pooler Premium Paper.


Next, I used a Tombow Blender Pen to watercolor the light fixture using Limoncello ink for the light bulb, Cove Blue ink for the top and bottom pieces of the fixture, and Tranquil ink for the glass. The light switch was also colored with a Tombow Blender Pen, for the plate I used Sea Glass ink, for the switch I used Bay Breeze ink. I added some of the illumination lines from the Bright Days stamp to the light bulb and the wall in the Limoncello ink.


I used the light fixture die to cut a hole in the Happy Hearts Patterned Paper that I selected, I wanted it to look like it could be a wall and I thought the pretty diamond grid pattern could be used for that. Once the hole was cut, I fit my colored piece into it and flipped it over to add my EZ-Lights. I used the Narrow Double Thick Foam Tape carried by Pear Blossom Press to create a pocket around the lights (which I gathered at the center of the light bulb) to trap the light in the area I wanted it to be seen. I added the foam tape all over the back of the card, using washi tape to wrangle the wires and glue dots to adhere the lights to the paper.


I added some light blue glittery ribbon to the bottom of the card where I wanted to place my sentiment, then adhered the card front to my card base. Then I got to start building the card front! I added the light switch over the power button for my EZ-Lights, I thought it was clever. The final piece was the sentiment, I selected the yellow hearts Happy Hearts Patterned Paper to stamp on. I love the sentiments in this stamp set and selected the "thank you for brightening my day" to stamp in Bay Breeze ink and used a die cut from my stash to cut in out in a pretty shape. I popped this up on a thin foam tape and centered it over my ribbon.


Here is a short video showing my card "in action".


Every good hop has prizes, right? So Catherine Pooler Designs, and Pear Blossom Press are each giving away a $25 store credit! Comment on this post by June 25, 202 to be entered to win. Winners will be announced on June 28th. Be sure to continue hopping for additional inspiration and entries into the giveaway!

Your next stop on the hop is:

Here is the full line up if you missed anyone:


Rachel Winn (You are here)


Thank you for stopping by today!

Until next time,

R. Winn

Saturday, September 12, 2020

Pear Blossom Press & Pink & Main Collaboration


Today's card is part of a collaboration with Pear Blossom Press and Pink & Main! I am superrrrrr excited to share my card!

I started by stamping out the mugs on Pink & Main's Need to Venti stamp set and cutting them out with the matching die set. I stamped with Ink On 3 Black Out ink and colored with Copic markers.


Next, I used the Pink & Main Leafy Slim Line Die with a Sparkle Sheet in Construction, I backed this with vellum. I also cut the Leafy Slim Line die out with a deep blue card stock, I filled in the exterior pieces surrounding the leaves with these.


After that, I worked on getting the "guts" built. I started by laying out the EZ-Lights, I back them and the Power Pack base with Glue Dots. In order to keep the wires from showing through the vellum, I used a black washi tape to mute the colors and secure the wires, of course! 


I used the Double Thick Foam Tape that Pear Blossom Press carries (life changing!) to back the card, normally I use it as is, but because the lines of this die are SO thin, I cut it down into super skinny strips. In order to kinda trap the light in the areas I wanted them, I also enclosed each area so that no light escaped.


Next, I stamped the little leaves from Need to Venti out in a dark yellow ink, on a lighter yellow cardstock and die but them. I also stamped out the sentiment "Thanks a latte" (so cute!) on The Stamp Doctor's Tag #1 Stitched Dies in a brown ink. I stamped out "Push Here" from a Lawn Fawn stamp set on the yellow cardstock and used one of the small leaf dies to cut it out too!


Tada! I'm obsessed!


Lit up with the lights on!


Lit up with the lights off!


I move the card part way through the video so I apologize!

Thank you for hopping along with us for the Pink and Main & Pear Blossom Press Collab Hop! For more inspiration, check out all of the stops in the hop!

Rachel Winn (You are here!)

~R. Winn


Saturday, June 20, 2020

Pear Blossom Press and HAI Supply Light Up Hop!

It's time to get inspired with Pear Blossom Press EZ- Lights and all sorts of goodies from HAI Supply!  HAI Supply has all sorts of amazing Washi Papers from Japan and fun new embellishments.  We are pairing them up with EZ-Lights today to really help them shine (pun intended!)


I decided to do an anime inspired card, so I began by coloring up "Moon Girl" from The Sassy Club using Copic Markers and stamped in Ink on 3's Fadeout Ink for a No Line colored image. I fussy cut around her and added a bit of Nuvo Glaze to the "button" on her backpack. She was set aside and I started building other pieces of the card. 

I had this vision of making i-crafter's Cherry Blossom Bursts light up, so I die cut the cherry blossoms twice, once from HAI's Japanese Handmade Washi paper, I chose a gorgeous blue sheet for my cherry blossoms. The second was from a scrap of red cardstock backed by i-stik adhesive. I also used HAI's Japanese Handmade Washi paper for the center's of the Cherry Blossoms, this time a soft yellow sheet and backed this with i-stik as well.  

After I built the Cherry Blossoms, I punched a hole in the center of each flower so that my lights could shine through. I used these holes to mark where I wanted to hole punch the background and where I wanted my EZ-Lights to be placed on the card base. Next, I put down glue dots to hold my EZ- Lights in place, and put my switch down at the bottom. I actually had to switch the way my switch was facing after I took this picture so that the battery can be swapped without killing the card completely. 


I used washi tape from HAI Supply to hold my wires in place. Then started using doubled up foam tape to build up around my cardbase so that I can place my background next. 


I did have to grab some washi tape that was a bit more heavy duty because my wires were being unruly. Before I adhered my background to the cardbase, I used a sheet of washi paper from the HAI Summer Cranes pack on the bottom part of the background sheet to give a separation from the top where my cherry blossoms would be. These washi sheets are smaller 4"x4" but are adhesive backed which is super handy!

I carefully lined up my pre-punched holes at the top of my base and firmly pressed my background on to the cardbase. Next, the colored up Moon Girl when in the bottom right of the corner. Over the button that controls the light switch, I used this amazing clay rainbow piece from HAI's Clay Rainbows and Clouds embellishment pack. The clay star that rests at the end of the rainbow wasn't quite big enough for me to stamp on (I tried) so I punched out a small star, stamped "Press Here" from Heffy Doodle's Interactively Your's stamp set on it and glued it on top of the existing star. I lined the star up over the switch and made sure it worked to turn my lights on and off, then used large glue dots to glue it down.


I added a sentiment from The Sassy Club's Moon Child which I added a bit of color to the moon and stars, die cut, covered in clear Wink of Stella, and added a bit of Nuvo Glaze to the moon. 

Then I took my Cherry Blossoms and curled ends of the patterned petals up and pressed the red pieces down after peeling the i-stik backing off and lining the punched holes over the holes in my background. Next, I added a yellow gem from HAI's Rainbow Sunbursts to the center of each Cherry Blossom.


My card was now fully built! I loved a certain anime when I was younger and was really inspired to mesh these gorgeous Japan Washi Papers with a girl who reminded me of the show. Then, lighting up the cherry blossoms reminded me of the magical elements that are in the show. I am in love with how it turned out!


All lit up! I waited until nighttime to take this picture so you can really see how well the the EZ-Lights really light up and shine through the gems!


Click here to try EZ-Lights, use coupon code EZSHIP4 for $4 off $25 or more!

https://pearblossompress.com/ez-light/?wpam_id=3


Finally, a little video to give the full effect of the lights!


Thank you for hopping along on the HAI Supply & Pear Blossom Press Collab Hop! For more inspiration, check out all of the stops in the hop...

Rachel Winn - you are here
Julie Ebersole - next stop

*** PRIZES ***
Hops are always more fun when there are prizes, right?? Four prizes will be awarded to four separate winners, chosen at random, from comments left on participating blogs and videos. Prizes include $25.00 gift codes from Pear Blossom Press, and $25.00 gift codes from HAI Supply. No purchase necessary. Comments must be posted by 11:59 pm PST on June 27, 2020. Only one comment per blog or video will be counted, but you can comment on multiple blogs and videos in the hop for additional entries. (This is to prevent spam.) Contest open internationally to participants over 18 years of age. Void where prohibited by law. Any personal information collected will only be used for the purposes of contacting winners, your information will never be shared or sold. Comments left on YouTube videos must not violate community guidelines. This contest is not sponsored by YouTube. Winners will be announced on July 6, 2020 at pearblossompress.com and prizes must be claimed within thirty days of announcement, or new winners will be drawn.

*** DISCOUNTS ***
One code, two stores! Enter discount code EZSHIP4 at checkout on Pear Blossom Press and HAI Supply for $4.00 off your total, on orders over $25.00 (before tax and shipping), valid until June 27, 2020. 


Until next time,
R. Winn

Wednesday, March 18, 2020

Playing with EZ Lights

I am SO excited to share with you my project using Pear Blossom Press's new EZ Lights; I absolutely LOVE these little guys and think you will too! Pear Blossom Press invited me to participate in a blog hop to help introduce EZ Lights, and I was completely honored and thrilled!


The EZ Lights, are a set of 3 pre-strung LED lights attached to the base of the Power Packs by Pear Blossom Press. They make doing a light up card so simple, and they last for such a long time.

I started my card by blending some Catherine Pooler inks, focusing on a dusk/sunset palette, after I had it blended I used a hole punch to create a space for the lights to shine through. I wanted lots of layers on this card, I used die cut trees directly on top of my dusk sky and added grass die cuts to the bottom. 

I mapped out my EZ Lights after punching the hole, a simple pencil mark on the card base so I know where the lights go, then deciding where the best space for my button is. It's almost error proof, honestly. 


For my images, I used the Kindred Stamps "Kindred Camping" stamp set and colored up the tent, campfire, and two of the campers using Copics.  I wanted a scene that would be beautiful on it's own, and stunning lit up.

The awesome thing about the EZ Lights is how powerful they are, they shine bright even though I don't have any transparent vellum or acetate to help them.  My campfire is on XPress It Paper which is a nice heavy cardstock, then my campfire is colored with Copics, adding another layer. As you can see below, the lights still shine through perfectly, lighting up the campfire! In fact, the light shines through in the background as well, giving my dusk sky, a bit of a more realistic feel and look.


I stamped my sentiment onto a scrap of kraft cardstock using Ink On 3's Juicy Clear Embossing Ink. I heat embossed in a nice dark brown embossing powder. I arranged my girls and the tent onto my card and added the sentiment to the top right. My EZ Light button is on the top left, so I used a Lawn Fawn stamp that says "Push Here" stamped in a dusky blue to mark it.

Now... Who wants to win an awesome prize from Pear Blossom Press?? Two prizes will be awarded to two separate winners, chosen at random, from comments left on participating blogs and videos. 
No purchase necessary. Comments must be posted by 11:59 pm PST on March 25, 2020. Only one comment per blog or video will be counted, but you can comment on multiple blogs and videos in the hop for additional entries. (This is to prevent spam.) Contest open internationally to participants over 18 years of age. Void where prohibited by law. Any personal information collected will only be used for the purposes of contacting winners, your information will never be shared or sold. Comments left on YouTube videos must not violate community guidelines. This contest is not sponsored by YouTube. Winners will be announced on April 1, 2020 at pearblossompress.com and prizes must be claimed within thirty days of announcement, or new winners will be drawn.

Make sure to visit the rest of the hop for more chances to win, and to see some pretty amazing projects!

Rachel (You are here!)
Your next stop is Erin

Thank you for visiting me today, I can't wait to see what you dream up with EZ Lights!

Until next time,
~R. Winn