Showing posts with label Ink Blending. Show all posts

Thursday, October 14, 2021

Thinking of You With Chrysanthemums

Hi all! I have a beautiful card to share with you today! I used the new i-crafter Chrysanthemum Blossom die set for a multi-purpose "Thinking of you" card.

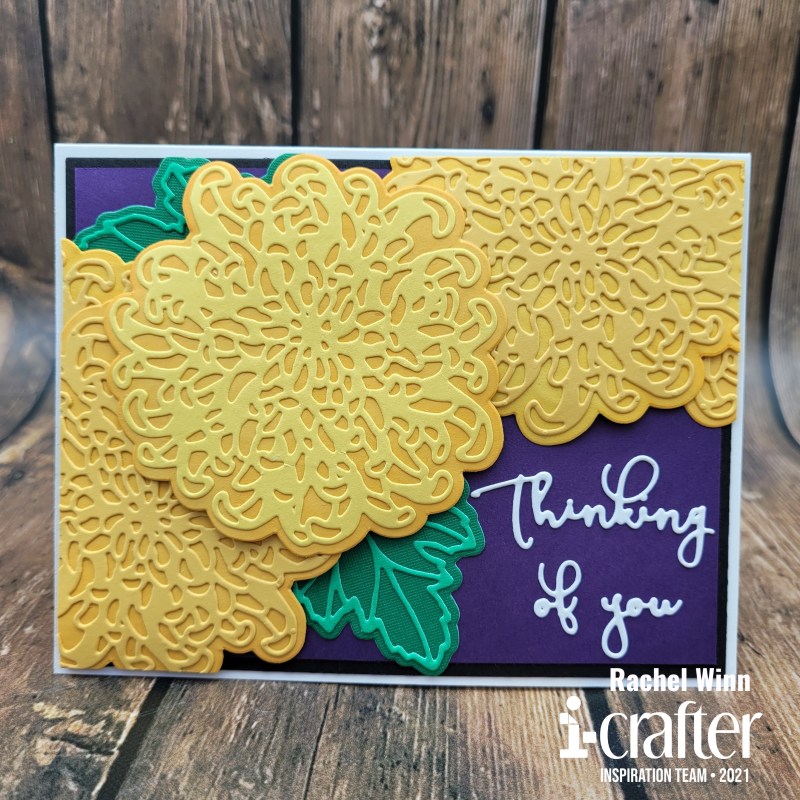
I started by cutting out 3 flowers and 3 backers using 2 shades of yellow cardstock, 1 of each from a light yellow, 2 of each from a darker, warm yellow. Next I used my i-brush Blender Brushes to add a light coat of Mango Madness Hybrid Ink to the backers to create a two tone effect to the flowers once they were layered together. I used a fine tip, liquid glue to adhere the flowers to the backers.

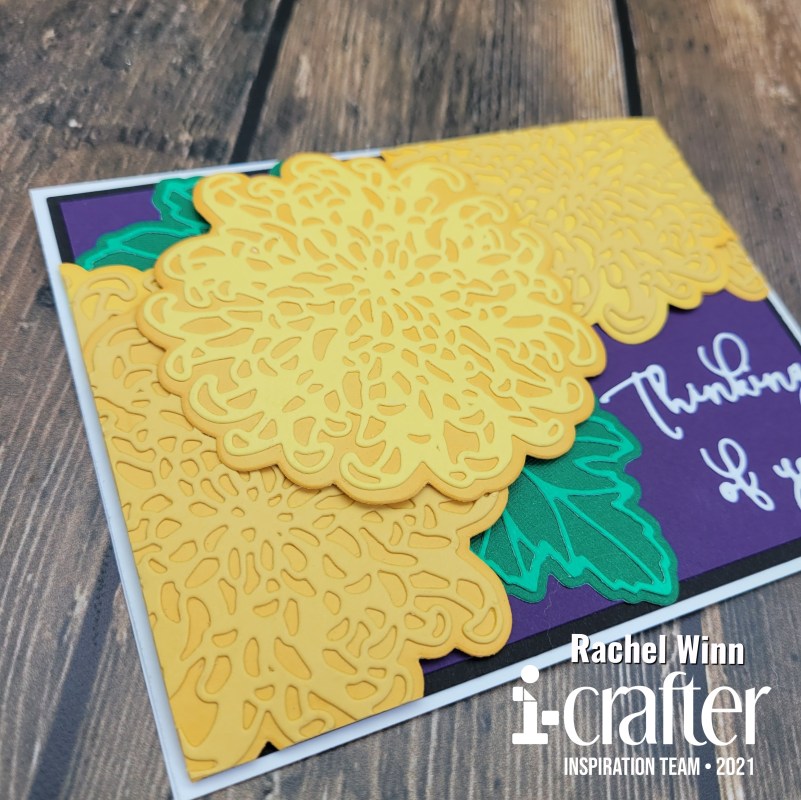
Once they were glued together, I used the round end of the i-Press Burnisher and Pad to create some depth and curve in the Chrysanthemum Blossom flowers. Next, I layered purple cardstock over black to create the card front. I placed the first two Chrysanthemum Blossom flowers on the corners where I wanted them using foam adhesive, this gave extra dimension and allowed the curves I had created to have room to fall down to the card front. I placed the Chrysanthemum Blossom flowers hanging slightly off card front then I used my guillotine trimmer to cut the extra off parts of the flowers that were past the edges of the black cardstock.

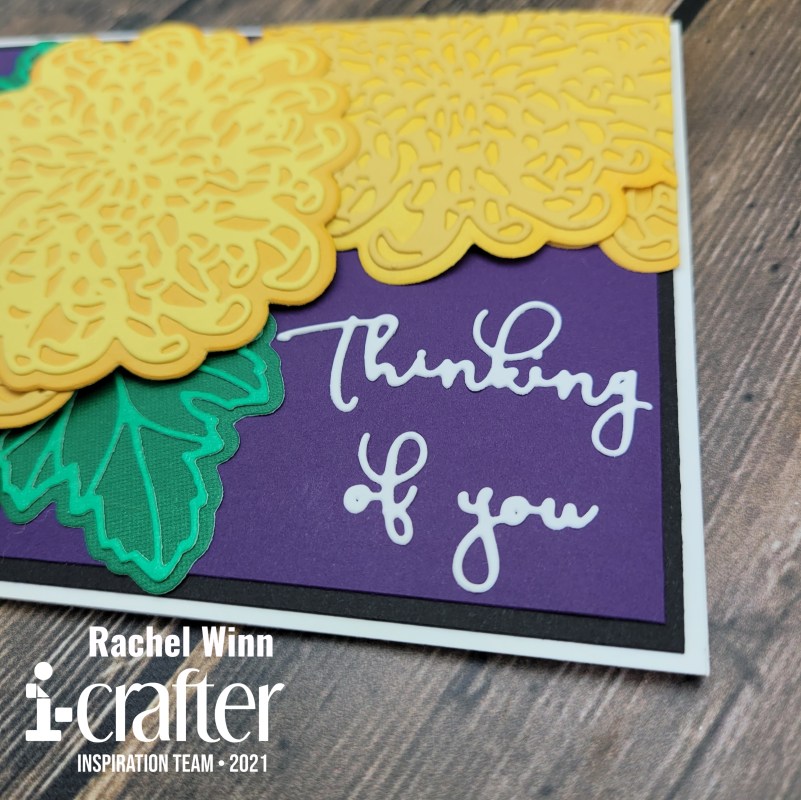
Once the first two Chrysanthemum Blossom flowers were in place, I added the third to the top, between them again using foam adhesive. Next, I tucked my Chrysanthemum Blossom leaves in beneath the Chrysanthemum Blossom flowers. I only cut out 2 Chrysanthemum Blossom leaves, I chose to go with a lighter green for the outline vines and a darker for the body. Next, I took a few of the pieces of the Chrysanthemum Blossom flowers that had been trimmed off and added them back in strategic positions under the 3 flowers to fill out the Chrysanthemum Blossom flowers. I glued them using liquid adhesive, laying flat beneath the other flowers added more depth to the card.

Finally, I cut out the beautiful "thinking of you" that is in the Chrysanthemum Blossom die set from white cardstock and glued it in the open space that I had left for it and added the card front to a solid white card base. I love that this could be a "Just Because" card, or is thoughtful enough to use for a "Get Well" or "Sympathy" card too. These types of cards typically are difficult for me but this took me very little time and I enjoyed the process a lot!

I hope that you’ve enjoyed my project! If you’d like to see more of my projects, you can follow me here: blogInstagram, and Facebook page.
 
Until next time,
Rachel
 
For more inspiration, updates, and news make sure to check out these awesome places!
 
 
Thank you so much for stopping by today!

Thursday, July 22, 2021

Christmas in July Light-Up Box Pops Card

Hello again friends!

I am so excited to share with you the Christmas in July Light-Up Box Pops Card that I created today! I played with i-crafter's Box Pops, Holiday Truck Add-On die set and decided that I wanted to do something a little different by lighting it up with EZ-Lights.

I started by die cutting white shimmery cardstock using the Box Pops, Oval Base twice. Once cut, I placed one piece into my MISTI 2.0 and covered it with my Fern Berries stencil. I used Catherine Pooler Cranberry Fizz ink and ink blended it onto the base front and bottom sections of my Oval Base using my red i-Brush Blender Brush. I love these brushes, especially for fine, detailed stencils like this one. Next, I stamped the "Have yourself a merry little Christmas" sentiment from the Christmas Sentiments stamp set to one of the halves, making it my front half.


Next, I cut out the pieces for my truck and trees from the Holiday Truck Add-On set. For my truck, I used a black base and then used a thin shiny paper (almost wrapping paper in thinness that I picked up secondhand) for the bumpers and tire hub caps. The tree that I wanted to light up, I backed with vellum that I colored with Copics because we like colored lights in our house!

 
I glued my colored vellum to the back of one of the three green Christmas trees that I had cut out. I added some Narrow Double Thick Foam Tape to the back of this tree to trap my light in when I built my card.

I was a bit silly and did the next steps in the wrong order, in order to avoid confusion I am going to tell you what I should have done rather than what I did. I should have creased all of the fold lines on my Oval Base pieces using my i-Press, then glued the individual pieces together so that I had my two halves of the base. I should have added the little stand piece that would eventually hold the two front trees that I hid my EZ-Lights base/switch piece in. 

Next, I should have glued my Holiday Truck die cut to the front half of my base and punch hole in the bottom so that I could weave my lights through. I had already punched a hole in the tree on top of the truck. I got snow happy and used a Snow Marker too early so ignore that for now, I promise to come back to it!


I slid my three LED lights from my EZ-Lights through the front slit, then pulled them through the hole punched in the bottom back and back to the front through the hole punched in the tree. Most of my wires hid in the bottom half of the card. 


I cut out two extra trees from the truck outline and simply cut them off the truck. I tested to see where to position them in order to allow me to hide the battery holder/switch on them. Once my wires were threaded, I mounted the battery holder to my tree backs using glue dots. Then I glued the two halves of the base together.


I then backed the two additional trees that I had cut out previously with more green cardstock since I didn't want to add lights to these. Once I had built them, I glued them together and used more Narrow Double Thick Foam Tape to adhere them to the two black glued together trees and the battery holder/switch.


I positioned my EZ-Lights LEDs to the tree on the truck using glue dots. I covered this with my original tree backed with colored vellum. 


This is when I should have broke out my Snow Marker and went snow happy. I hit the base, several parts of the truck and even the trees with my Snow Marker. There were sections that I added snow to after the fact, I had to be super careful so that my EZ-Lights didn't get affected or melted.


Now, the only downfall to this card is that because of how close to the base I put the EZ-Light battery/switch the card does not fold up, so it's more of a home decor piece than it is a card. Otherwise, I am completely obsessed with how this card came out and was pleasantly surprised with how few hick-ups I had creating it, even with doing several things out of order so to speak!


You can see here that I used black foam adhesive squares to bump the tires out from the truck body.


This side angle shows how much Snow Marker I really did use (I'm obsessed). It does mask the white of the foam tape nicely as well.


To add a frosted look to the truck windows, I added a small vellum piece to the back side of the truck.


Here she is all lit up! I like to take these pictures in the dark to really show how well the lights shine.


Here is a short clip of the card lit up in the light and in the dark!

I hope that you’ve enjoyed my cards and that you feel inspired to go create! Be sure to join the i-crafter Facebook Fan Club! We love seeing all of your creations using the i-crafter products so don’t forget to tag us or use #icrafter when you share!

Until next time,
Rachel

For more inspiration, updates, and news make sure to check out these awesome places!


Thank you so much for stopping by today!

Thursday, October 29, 2020

Highlander Travels through Standing Stones

Hello friends!


I am excited to show off the new Kindred Stamps Highlander Travels Stamp Set. This is such a fun set and the people are so fun to color up. I colored each of them up with a combination of PrismaColor and Chameleon colored pencils. I don't use gamsol like a lot of folks, but I do occasionally use a PrismaColor Blender pencil.


The first gentleman, I turned into a English Captain with the fun hat that is included in this set. Next, I used the Kindred Stamps Distress Brick Stencil with Catherine Pooler Twilight and Black Jack Inks. For this card, I used i-crafter's Flip Card, Dashed Circle die. I used the small circle to die cut a piece of the brick paper. 


I used a sheet of paper that has text on it for one side of the flip and then for the other side a sheet that looked like a fancy wallpaper. Next, I added the word "legendary" on the front.


My final touch was a sentiment from Kindred Stamps Villainous Sentiments underneath the flap.


My next card is a little simpler, I used a fancy oval die to cut out the new Kindred Stamps Standing Stones Craft Die then ink blended using Catherine Pooler Inks. I added a second oval out of a dark blue patterned paper that looks a night sky. I stamped and heat embossed "dinna fash" from the Kindred Stamps Highlander Travels Stamp Set which means "don't stress" or "don't worry".


My last card had this beautiful family from the Kindred Stamps Highlander Travels Stamp Set in front of the Kindred Stamps Standing Stones Craft Die

I created a blue sky with fluffy clouds using The Stamp Doctor's Cloud Dies and green grass using their Grass Edger Dies. All of this was layered over a sheet from an Echo Park paper pad that reminded me of burlap. 


My last touch for the card was stamping the "Anything is Possible with Family" sentiment from Kindred Stamps Highlander Travels Stamp Set on the same burlap looking paper, and layering that with the same green from the grass for the interior of the card!


The entire Kindred Stamps October release will be available Friday, October 30 at 8am PST/11am EST. Be sure to subscribe to the Kindred Stamps blog to see a daily line up of sneak peeks from our amazing Design Team and see the full product release on Friday! Come join the Fan Club and release event to be part of the release fun, and you may just win some Kindred Stamps credit!!

Thank you for visiting today, I hope that you enjoyed my take on this set.

~R. Winn

Thursday, July 23, 2020

Pixie Dust

It's release week at Kindred Stamps and I have 3 cards that I am so excited to share with you! 

My first card shows off the new Pixie Dust Slimline Stencil paired with the Kindred Stamps Happily Ever After Glitter Gloss. I used Pixie Spray to hold my stencil down while I added the Glitter Gloss which allowed me to easily reposition the stencil from the top edge to the bottom edge. 

I used Catherine Pooler Blue Suede Shoes ink to stamp a sentiment from the new Pixie Dust stamp set and placed it in the center of the trails of pixie dust. 


For the adorable fairy from the Pixie Dust stamp set, I colored her up with Copic markers and added blue Wink of Stella to her wings which made them SO sparkly! I stamped out the "I believe in you" sentiment onto dark blue paper, and heat embossed it with gold embossing powder. Then I added the "pixie dust" above that and mixed a sparkly embossing powder with WOW Opaque Bright White powder. I positioned my fairy over the dust.


Next, I started to build my TV using the amazing new TV Time Die from Kindred Stamps. I began by blending brown ink over a burgundy piece of card stock to darken the paper to a "cherry wood" color. Then I used a darker brown ink smudged into a Tim Holtz 3D Woodgrain Embossing folder and put it through my die cut machine. I was REALLY happy with the end results.

Next, I used roughed up some gold foiled paper to make it look aged. I used this for the "dials" and other details of the TV. For the TV antenna, I pushed the ball end of the i-press in small circles on the back which made the paper kinda rounded like an old timey antenna! I went a head and repeated that process the entire TV, 


I wanted this to pop up on the inside of the card the i-crafter Hello Sunshine wiper die and mounted the TV to the front of it.


Next, I used these two adolecents from "Pixie Dust" for a slimline card using the Kraftgali Stitched Scallop Slimline dies I created a starry sky using Color Burst Powders and Crafter Companion glittery watercolors for them to fly off into.


For my last card, I paired the Kindred Stamps Dragon Scale Stencil with the crocodile from the Pixie Dust stamp set. To start, I dry embossed a bright green cardstock using the Dragon Scale stencil, then ink blended 2 darker shades of green over top.


I colored the crocodile from the Pixie Dust stamp set using Copic markers and put him on a circle die cut from The Stamp Doctor. I layered this over a 1.75" strip of dark brown that I had heat embossed "after a while crocodile" from the Pixie Dust stamp set.


I wrapped a bit of plain white twine around the brown strip. To finish the card off I used a few Hazelnut DoubleClickSkittles sprinkled across the stenciled scales!

The entire Kindred Stamps July release will be available Friday, July 24 at 8am PST/11am EST.  Be sure to subscribe to the Kindred Stamps blog to see a daily line up of sneak peeks from our amazing Design Team and see the full product release on Friday!  Come join the Fan Club and release event to be part of the release fun, and you may just win some Kindred Stamps credit!!

I hope you enjoyed my cards as much as I enjoy this set! See you next time.

~R. Winn

Wednesday, April 22, 2020

En Pointe!

Hello again friends! 

I'm so excited to show you the light up box card that I made using Kindred Stamps new "En Pointe" stamp set! This set is full of the cutest little critters doing ballet!

I started by coloring up the ballerinas in realistic colors using Copics. I gave them each their own colored tutus, and for the unicorn, I went with bright bold colors. After they were colored I used Ink on 3 Liquid Pixie Dust painted on with a small paintbrush to accent their tutus, headbands and shoes.

I decided that I wanted to make a box card using The Stamp Doctor's A2 Card in a Box #2 die set to make a stage for my dancing cuties.  I started with a tan cardstock and cut 3 of the panels for the card using it. Then I cut the 4th out of black cardstock.

I built my card and used a champagne bokeh (I think that's how it's spelled!) scrapbook paper to create panels on the 3 outward facing tan panels. For the front top panel I stamped the "Dance Your Heart Out" sentiment from "En Pointe."


For the inside, I used the Kindred Stamps Woodgrain Stencil, I ink blended Catherine Pooler Sand Castle and Over Coffee inks to create a wood floor for the stage. I did this on the 3 tan panels for their inner facing side. I added the same scrapbook paper to the 3 inner facing tan panels too. I used the stencil on the 3 strips I was  placing my ballerinas on too.


For the back of the stage, I sprayed Tonic Nuvo Mica Mist in Fog on the black cardstock. After the card was built, I decided I wanted to make it light up so I took a second layer of the black card stock and sprayed it. Then I used a star hole punch and punched out a few stars in the second layer. 


I used Pear Blossom Press EZ Lights that come pre-wired with 3 led lights. I chose where to put the lights and fed them through the back of the box securing them with glue dots and the wires with washi tape. The Power Pack battery holder and button for the EZ-Lights is secured in the bottom of the back half of the card using larger glue dots. I covered this with another panel of the tan woodgrain stenciled cardstock. I marked the button with a "Press here" stamp from Heffy Doodle's Interactively Yours stamp set.


For the back, I cut down a piece of white cardstock and used i-crafter Candy Coated ink to stamp the "I hope your birthday is" and "en pointe" sentiments from "En Pointe" leaving space for the card to be written on as well.


The entire Kindred Stamps April release will be available Friday, April 24 at 8am PST/11am EST. Be sure to subscribe to the Kindred Stamps blog to see a daily line up of sneak peeks from our amazing Design Team and see the full product release on Friday! Come join the Fan Club and release event to be part of the release fun, and you may just win some Kindred Stamps credit!!

Until next time,

~R. Winn


Friday, April 17, 2020

#spreadjoynotgerms


Hi friends!

I'm extremely pleased to be joining this MEGA blog hop that Catherine Pooler and Hedgehog Hallow put together to help inspire cardmakers to send out some of the cards we all stash in order to make another person SMILE in the midst of the crazy world we find ourselves in. 

Today, I am showing off products from some of my favorite companies, Pear Blossom Press, I-Crafter, and The Greeting Farm, who are all sponsoring this hop.  I knew that I wanted to make a light-up card using Pear Blossom Press's EZ- Lights. I love how easy they make creating stunning projects.

The Greeting Farm put out these fun digis of delivery drivers and their truck. I chose to color the male driver and the truck in shades of brown. We have a favorite delivery man at our house, he works for UPS and he walks up our rather long driveway fairly frequently. I thought rather than sending this card off in the mail, we would Social Distance deliver this card to him "in person." I used Copics to color both up, then moved onto my background.

I used I-crafter's i-brush Blending Brushes and Hybrid Inks to ink blend a background. These inks are smooth, blend beautifully, and are rich in color! The brushes are small, but mighty and SO soft!


Next, I used my PenBlade and a hole punch to cut out the head and top lights on the delivery truck that I wanted to light up. Using a pencil, I traced the place on my background these would line up with so I could cut through for the lights to shine through.


After cutting the holes in the background, I used my pencil to mark where the lights should lay and chose where I wanted my base to lay and outlined it with the pencil as well.


I used thin glue dots on the bottom of my base, and small glue dots on the locations that my lights needed to lay.


 Next, I used washi tape to keep the wires all in place. There are 3 lights pre-wired on each EZ-Lights, which was perfect for this. One for each headlight, and one for the top bar.


I used doubled up foam tape and made boxes around each light. Then I went a little foam tape crazy and made sure that the card is propped up REALLY well.


After that... I got to put my masterpiece together! It took 2 tries to get the back on correctly, because foam tape is stickyyyy. Once that was there, I put down my truck, making sure to line up headlights and top lights that are backed with vellum that I colored with Copics, and topped with Nuvo Glaze to give a glassy look. I also used the Glaze on the truck windshield.


Next, my delivery driver was backed with a single layer of foam tape and put on the crease where my "grass" and "street" met.  I used I-crafter "Tropical Pool" ink and "Hushed Darkness" ink with stamps from Heffy Doodle's Interactively Your's set to create a "Push Here" arrow that I fussy cut and glued on. Finally, I added "Thanks" to the top left using I-crafter's Pop-Up Wiper Insert die set.


I'm pretty pleased, I can't wait to give it to our driver with the gift card for a favorite local sub sandwich shop inside, as an extra token of our appreciation. 

This blog hop is huge, so in order to enter for the prizes, all you have to do is comment, and each blog you comment on adds up so don't stop here! You can comment now through April 24th.

Next in the line up is Stephanie Beauchemin with The Greeting Farm! 

Be sure to also visit my friends at I-crafter who has donated a $20 Gift Certificate and Pear Blossom Press who has donated a $25 Gift Certificate that are up for draw in the giveaway! 


The winners of over 40 prizes will be announced on Catherine Pooler and Hedgehog Hollow's blogs on April 27th. Be sure to leave some love for these bloggers who have joined us and rack up those chances to win!

Until next time,
~R. Winn

Wednesday, March 18, 2020

Playing with EZ Lights

I am SO excited to share with you my project using Pear Blossom Press's new EZ Lights; I absolutely LOVE these little guys and think you will too! Pear Blossom Press invited me to participate in a blog hop to help introduce EZ Lights, and I was completely honored and thrilled!


The EZ Lights, are a set of 3 pre-strung LED lights attached to the base of the Power Packs by Pear Blossom Press. They make doing a light up card so simple, and they last for such a long time.

I started my card by blending some Catherine Pooler inks, focusing on a dusk/sunset palette, after I had it blended I used a hole punch to create a space for the lights to shine through. I wanted lots of layers on this card, I used die cut trees directly on top of my dusk sky and added grass die cuts to the bottom. 

I mapped out my EZ Lights after punching the hole, a simple pencil mark on the card base so I know where the lights go, then deciding where the best space for my button is. It's almost error proof, honestly. 


For my images, I used the Kindred Stamps "Kindred Camping" stamp set and colored up the tent, campfire, and two of the campers using Copics.  I wanted a scene that would be beautiful on it's own, and stunning lit up.

The awesome thing about the EZ Lights is how powerful they are, they shine bright even though I don't have any transparent vellum or acetate to help them.  My campfire is on XPress It Paper which is a nice heavy cardstock, then my campfire is colored with Copics, adding another layer. As you can see below, the lights still shine through perfectly, lighting up the campfire! In fact, the light shines through in the background as well, giving my dusk sky, a bit of a more realistic feel and look.


I stamped my sentiment onto a scrap of kraft cardstock using Ink On 3's Juicy Clear Embossing Ink. I heat embossed in a nice dark brown embossing powder. I arranged my girls and the tent onto my card and added the sentiment to the top right. My EZ Light button is on the top left, so I used a Lawn Fawn stamp that says "Push Here" stamped in a dusky blue to mark it.

Now... Who wants to win an awesome prize from Pear Blossom Press?? Two prizes will be awarded to two separate winners, chosen at random, from comments left on participating blogs and videos. 
No purchase necessary. Comments must be posted by 11:59 pm PST on March 25, 2020. Only one comment per blog or video will be counted, but you can comment on multiple blogs and videos in the hop for additional entries. (This is to prevent spam.) Contest open internationally to participants over 18 years of age. Void where prohibited by law. Any personal information collected will only be used for the purposes of contacting winners, your information will never be shared or sold. Comments left on YouTube videos must not violate community guidelines. This contest is not sponsored by YouTube. Winners will be announced on April 1, 2020 at pearblossompress.com and prizes must be claimed within thirty days of announcement, or new winners will be drawn.

Make sure to visit the rest of the hop for more chances to win, and to see some pretty amazing projects!

Rachel (You are here!)
Your next stop is Erin

Thank you for visiting me today, I can't wait to see what you dream up with EZ Lights!

Until next time,
~R. Winn