Showing posts with label Die Cut. Show all posts

Thursday, October 14, 2021

Thinking of You With Chrysanthemums

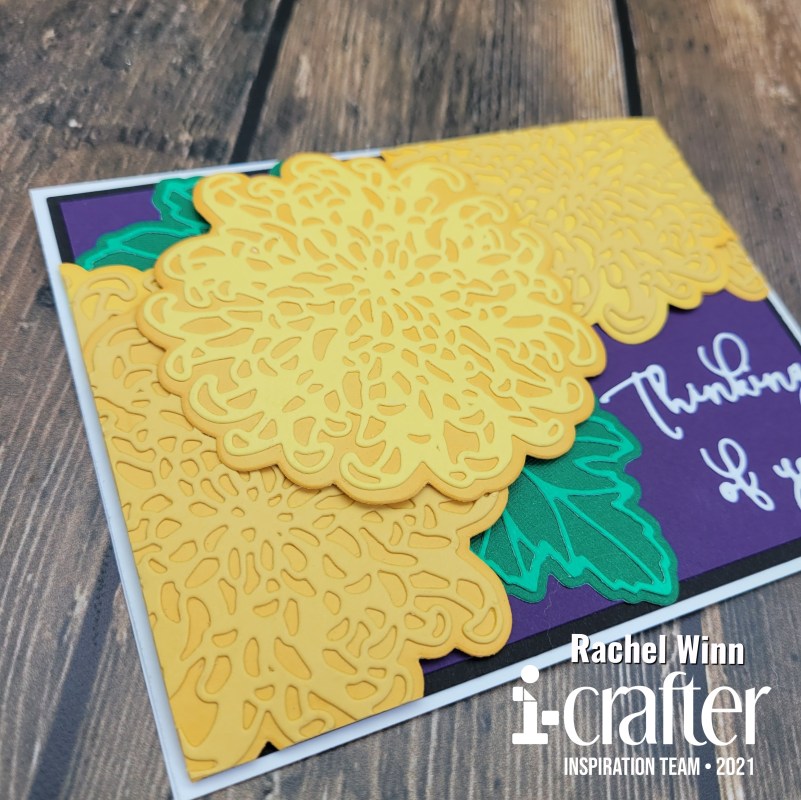
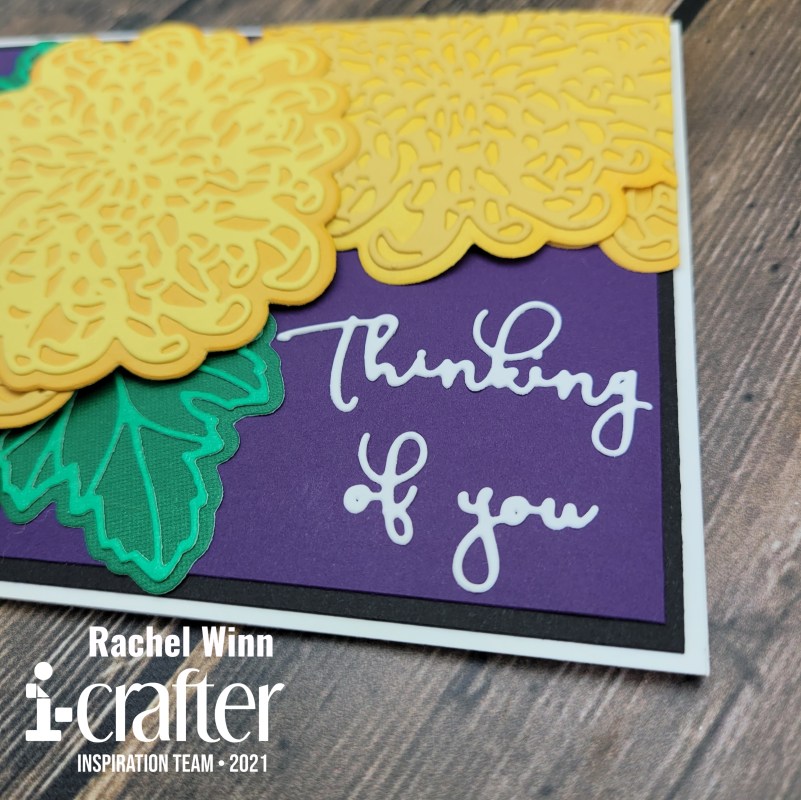
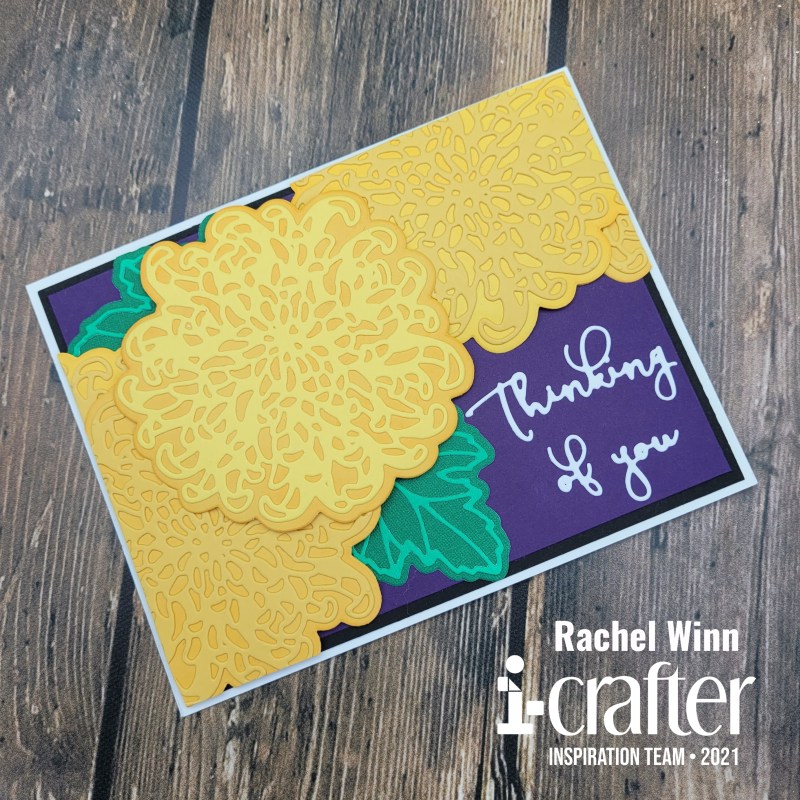
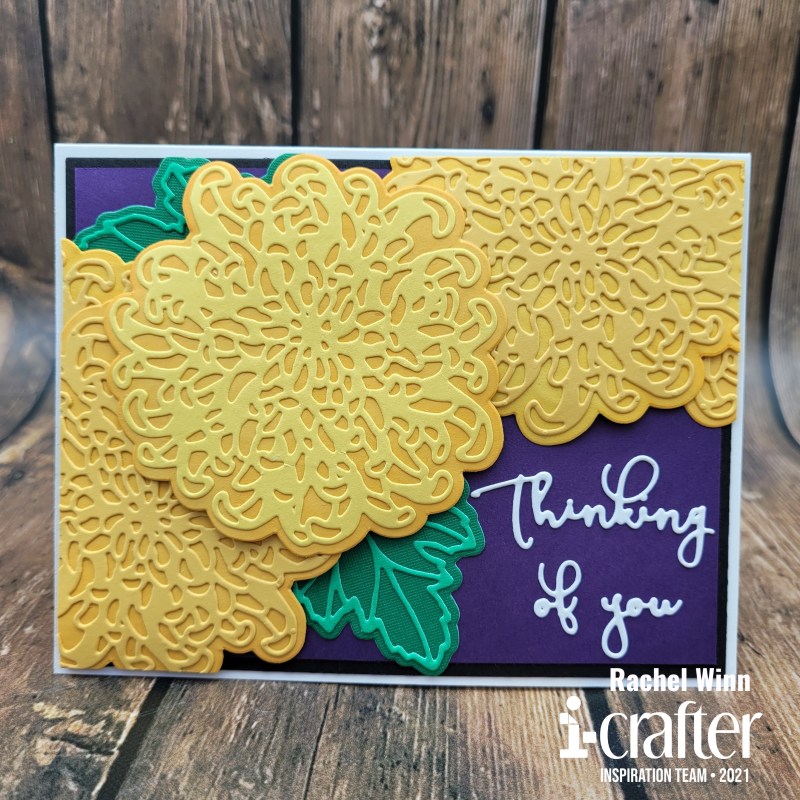
Hi all! I have a beautiful card to share with you today! I used the new i-crafter Chrysanthemum Blossom die set for a multi-purpose "Thinking of you" card.

I started by cutting out 3 flowers and 3 backers using 2 shades of yellow cardstock, 1 of each from a light yellow, 2 of each from a darker, warm yellow. Next I used my i-brush Blender Brushes to add a light coat of Mango Madness Hybrid Ink to the backers to create a two tone effect to the flowers once they were layered together. I used a fine tip, liquid glue to adhere the flowers to the backers.

Once they were glued together, I used the round end of the i-Press Burnisher and Pad to create some depth and curve in the Chrysanthemum Blossom flowers. Next, I layered purple cardstock over black to create the card front. I placed the first two Chrysanthemum Blossom flowers on the corners where I wanted them using foam adhesive, this gave extra dimension and allowed the curves I had created to have room to fall down to the card front. I placed the Chrysanthemum Blossom flowers hanging slightly off card front then I used my guillotine trimmer to cut the extra off parts of the flowers that were past the edges of the black cardstock.

Once the first two Chrysanthemum Blossom flowers were in place, I added the third to the top, between them again using foam adhesive. Next, I tucked my Chrysanthemum Blossom leaves in beneath the Chrysanthemum Blossom flowers. I only cut out 2 Chrysanthemum Blossom leaves, I chose to go with a lighter green for the outline vines and a darker for the body. Next, I took a few of the pieces of the Chrysanthemum Blossom flowers that had been trimmed off and added them back in strategic positions under the 3 flowers to fill out the Chrysanthemum Blossom flowers. I glued them using liquid adhesive, laying flat beneath the other flowers added more depth to the card.

Finally, I cut out the beautiful "thinking of you" that is in the Chrysanthemum Blossom die set from white cardstock and glued it in the open space that I had left for it and added the card front to a solid white card base. I love that this could be a "Just Because" card, or is thoughtful enough to use for a "Get Well" or "Sympathy" card too. These types of cards typically are difficult for me but this took me very little time and I enjoyed the process a lot!

I hope that you’ve enjoyed my project! If you’d like to see more of my projects, you can follow me here: blogInstagram, and Facebook page.
 
Until next time,
Rachel
 
For more inspiration, updates, and news make sure to check out these awesome places!
 
 
Thank you so much for stopping by today!

Sunday, August 1, 2021

i-crafter August Release

It's release times for i-crafter! I played with the new Mason Jar Box Card by Lori Whitlock dies and had so much fun doing it. You know my love for using up scraps right? Well all of this card was cut from my scrap stash. 

I started my jar using a light blue cardsock. The front panel of the jar I shaded with Copic markers and stamped the "Thank you" sentiment from i-crafter's Thankful Sentiments stamp set in the center. I left the back panel blank without shading so that it can be used to write a message on.

I tried to use some Cool Gray Copics on the lid but it didn't work out as well since the surface is so reflective. Once the lids were glued to the front and back pieces, I used twine to add a little bit of a rustic feel to the card. To do this, I added glued the back of panel and wrapped it a few times. The front piece, I tied a simple knot on the front, the back panel I tied it in the back so it appears to be wrapped around both pieces without a break. Next, I added two side panels and two bridge or center pieces that I cut out in that same light blue to keep that jar look intact.


For the flowers, I cut out all of the flower dies from each the set from several colors. I really love the look of the biggest flower with two petal layers. I added Copic shading to the center of the three largest petal sizes. I probably added a few more flowers than were needed... but I was having SO much fun!


After shading the larger flowers, I used the i-Press Burnisher and Pad to create some real dimension for the flowers. Here is a short tutorial showing what I did:


I also used the added some color depth with Copics then used the i-Press on the long leafy pieces of greenery. This gave them a slightly curled look. I burnished the front of one stem and the back of the other stem, I loved the way they looked when I finished.


Ok, because I'm obsessed with the end results, you get a ton of photos from all angles!


The back is just as pretty as the front!


The neat thing about this style of card is that it can be folded flat (I would have needed to burnish my sides a little more for it to stay on its own.) Had I not added flowers quite so far to the side, I could have slide it into an A2 envelope easily, but I think this one may need a 5.5"x5.5" envelope instead!


I hope that you have enjoyed my project for today and can't wait to see how you use the Mason Jar Box Card by Lori Whitlock die set in the future!

Until next time, 
R. Winn

For more inspiration, updates, and news make sure to check out these awesome places!


Thank you so much for stopping by today!

Thursday, July 8, 2021

How about Hanukkah in July?

Hello again!

Today I am showing off the new i-crafter Holiday Words dies paired with the i-crafter Snowflake Border die set on two cards.

I wanted to my cards today to have a Hanukkah theme rather than Christmas. There are plenty of other holidays celebrated in December that we can begin to prepare a card stash for now, plus I happen to know some amazing folks who celebrate Hanukkah, I will be sending these cards to them!

To start my first card, I began by cutting some Erin Lee Creative Holographic Cardstock down to 4"x 5.25" & then die cut my "Happy Holidays" out of the center. I angled the dies slightly to add a touch of whimsy. For this card, I used the negative space created by cutting out the words, I set my words to the side to use in my second card. I trimmed some blue scrapbook paper down to fit on my card base, leaving it slightly larger than the Holographic Cardstock so there would be a nice layered look when I finished.


Next, I backed the Holographic Cardstock with foam tape to add some dimension to the card. Once this was placed, I used the center bits of the words to fill some of the negative space and make it easier to read.


I die cut snowflakes using a blue glitter cardstock. The snowflakes are a mix of the extra dies in both the Holiday Words and the Snowflake Border die sets, along with the smallest 3 snowflakes being negatives from the border die itself.

My second card also pairs the i-crafter Holiday Words and Snowflake Border die sets. I chose a 5.5"x5.5" white card base for this project. I die cut the snowflakes from each die set using Holographic Cardstock to match the words that had been set aside from the first card.


Next, I took the same blue glitter cardstock as I used in my first card and cut it down to 5.5"x5.5". I should have laid my words down and made sure that I was happy with the fit first, instead I eyeballed it and as a result my words are closer together than I would have liked and "Holidays" dips into the snowflake border a bit.

A "pro tip" when using the Snowflake Border, this die is so intricate that some of the pieces take a extra passes through the machine or even a precision cutting plate if you have on, which I don't instead I run it through twice with the die facing sideways, then another two times with the die facing up and down.

I glued everything together flat with no foam tape and no extra embellishments other than the snowflakes that I had die cut. Even with the "imperfections" in these cards, they are absolutely gorgeous and I am so excited to send them this Winter!

I hope that you’ve enjoyed my cards and that you feel inspired to go create! Be sure to join the i-crafter Facebook Fan Club, then follow us on Instagram, and Pinterest too! We love seeing all of your creations using the i-crafter products so don’t forget to tag us or use #icrafter when you share!

Until next time,
R. Winn

Thursday, April 1, 2021

Slimline Fun with i-crafter

It's release day at i-crafter! I am showing off 2 ways to use the new i-crafter Slimline Windows die set. I wanted to play with some alcohol inks because I have so many mediums that just don't get enough love! Since the Yupo paper that I have is too short for a slimline card, I used glossy photo paper instead. I picked a Brea Reese Slate ink, then Tim Holtz purple and green inks. I was trying to create a dark contrast, it's definitely not perfect, but it worked beautifully when cut out using the Slimline Windows die. I used a dark teal paper for the frame, again cut from the i-crafter Slimline Windows die. I added the alcohol ink rectangles and squares to the teal frame.

Next, I cut the "Hello" and "Friends" dies out 3 times, two backed with the i-stik adhesive sheets. I stacked the cut outs and created some depth on the card. I went over stacks with a black Wink of Luna brush pen and the words have a nice shimmer to them!

Next, I cut out the cute little heart die, 3 times. I used a bright white and a hot pink for the hearts. These, I popped up with foam tape. Finally, I finished the card off with 3 of the arrow dies from the Slimline Windows die set, this was cut out of scraps of silver glitter paper.


Next, I used the Slimline Windows die set to create a fun coffee themed shaker card. I am trying to used colors that I don't normally reach for, and picked a mustard colored cardstock for the background, then a grass green for the frame. I backed my frame with acetate. 

Next, I used a skinny foam tape to back the frames and create a solid space to put my shaker bits. I decided to do 3 of the square windows for mini shaker sections. I used some coffee themed shaker bits in the squares, then took the coffee mug die from the Slimline Windows dies set and created one more shaker section at the bottom of the card with 3 of the mugs.


I finished the card off with a white "Hello" from the Slimline Windows die set, this I glued on top of the acetate in one of the rectangles.

Head over to i-crafter to get the new Slimline Windows die set, and check out the other wonderful new release items too! Be sure to join the i-crafter Facebook Fan Club, then follow us on Instagram, and Pinterest too! We love seeing all of your creations using the i-crafter products.

Until next time,
R. Winn

Wednesday, February 17, 2021

Making Faces with i-crafter's Hello Flower

Hello friends!


Today, I am showing off a really fun pairing of i-crafter's new Hello Flowers die set and their Making Faces die set! I wanted to make something bright and playful with these sets.


When I first started cardmaking, I can remember going to a class that we did a card by stamping "happy birthday" over and and over with different colors, like a waterfall. I though that this "Hello" die would be fun to mimic that technique with. I am a little extra though so I used scraps of glitter paper for my "Hello"s and went from light to dark, layering them just slightly. I backed them in a dark purple cardstock to give some contrast.


Next, I started making my faces! The Making Faces die set has a ton of fun options, I used a sandy colored cardstock, for the two faces. Then I used fun, lightly colored patterned paper for the hair. For the bow and glasses, I used the same yellow glitter paper from the middle "hello". Faces without eyes kinda freak me out so I used a thin marker to add closed eyes to the girls.


My last piece was making a few of the rosettes from the Hello Flower die set. I didn't add the leaves underneath because I wanted to keep them simple. It was a bit of trial and error but I ended up with 3 of varying size and they finished the card off nicely.


I think it is a nice addition to my card stash. I hope that you enjoy it as much as I do!
If you’d like to follow me, here is my blog, Instagram, and Facebook page. Be sure to join the i-crafter Facebook Fan Club, then follow us on Instagram, and Pinterest too! We love seeing all of your creations using the i-crafter products.

Until next time,

Rachel

Monday, February 1, 2021

Unicorn Pop-Up Oval Card with i-crafter New Release

I absolutely LOVE the card I am sharing with you today! i-crafter has a fantastic new release today, I am showing off the new Box Pops Oval Base die and Box Pops Unicorn Add-On!

These fun dies fit into a normal A2 envelope and can be combined in so many neat ways.


I started by die cutting the unicorn out from Sweet Sentiment's white paper, it's got a faint shimmer to it and is Copic friendly, so it lends well to coloring a unicorn! I chose shades from the Violet family of Copic markers to color the unicorn. I used a silver marker to color the horn. I used a fabric backed sheet of glitter to cut out the unicorn's mane and tail.


Next, I built my base, the Box Pops Oval Base die got cut out twice, from this adorable cloud paper that I wish I could remember the brand of. I thought it would be super cute for the unicorn to be walking on clouds and this paper was perfect for that.


As I assembled the box, I added the star inserts from the Box Pops Unicorn Add-On to the the base. The stars were cute from white glitter paper. I saved the little stars that ended up as a by product of the inserts to add around the sentiment.


I used the "stay magical" sentiment dies from the Box Pops Unicorn Add-On die set for the sentiment and cut it out of some silver mirrored cardstock. I finished the card off by adding several large silver mirrored cardstock stars and little white glitter paper stars using the Box Pops Unicorn Add-On die set.


Personally, I think this creation is straight up magical! I hope that you think so too! Head over to i-crafter to get the new Box Pops Oval Base and Box Pops Unicorn Add-On die sets, and check out the other wonderful new release items too! Be sure to join the i-crafter Facebook Fan Club, then follow us on Instagram, and Pinterest too! We love seeing all of your creations using the i-crafter products.

Until next time,
R. Winn

Sunday, January 3, 2021

Koi Pillow Boxes by Rachel Winn

 Hello friends,

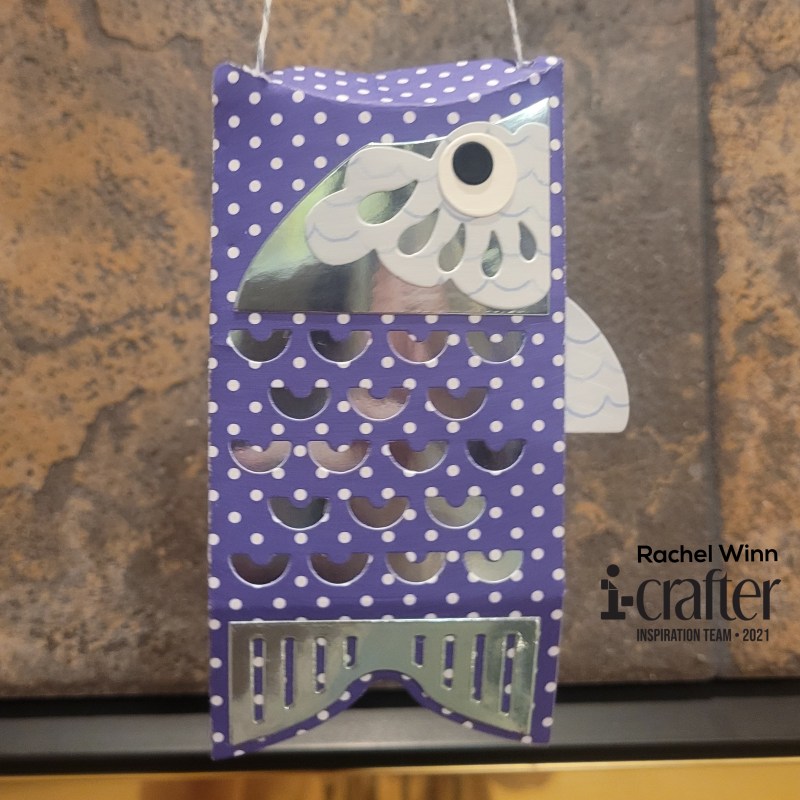
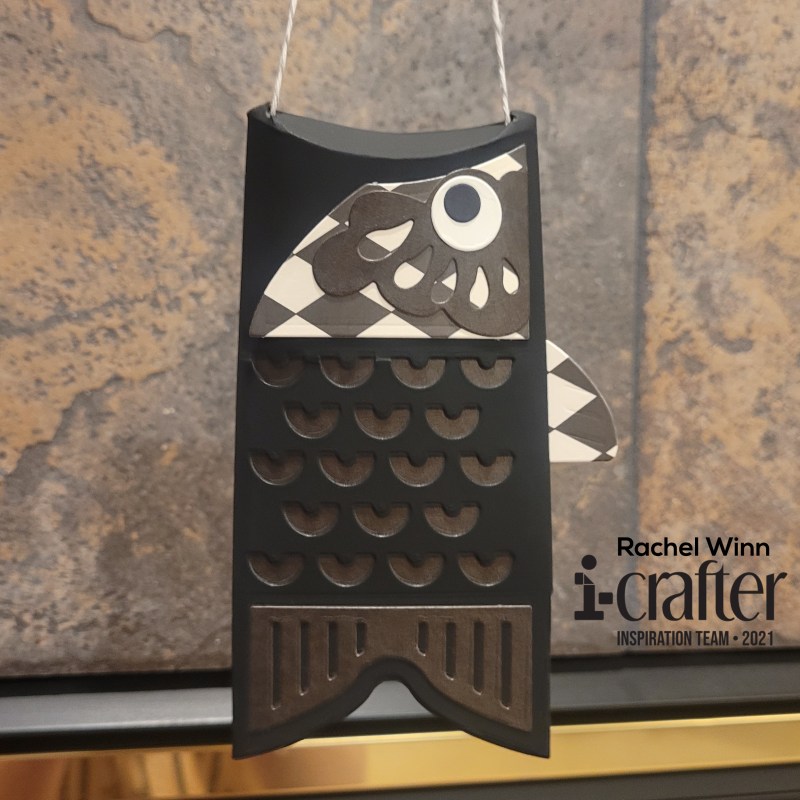
I am excited to be joining the i-crafter Inspiration Team! Today, I am showing you my take on the new i-crafter Koi Pillow Box die set! I spent some time researching what different colors meant in Japanese culture, and used that as the inspiration in the colors I used. I settled on creating fish that were blue, black, and gold.

I started with the blue Koi Pillow Box, blue representing peace and tranquility, seemed like an excellent hidden meaning to a gift. I decided on using a combination of patterned papers, and a pretty shiny metallic paper. For the body, I used a 6"x6" dotted patterned paper. I decided that I wasn't a fan of the gills being open, so I backed the gills with a piece of the metallic paper. I used the same metallic paper for the back of the face and the tail fin. For the top fin and front, kinda frilly piece of the face, I used a paper that looked like waves to me. I finished with plain white paper for the eyeball, and plain black for the pupil.

My next Koi Pillow Box is black, which represents overcoming an obstacle, which is another excellent time to receive a gift. I started with a black chalkboard cardstock, this cardstock has a bit of a smooth, soft texture to it, and is really nice and thick. Next, I used a cardstock that was black on kraft paper for behind the gills, the top of the face, and the tail fin. The back of the face and the top fin, I used a black and white diamond patterned paper, I chose this to break up the black a touch since I didn't have 3 different shades of black papers to use. I used the same white for the eyeball and black for the pupil as on the first fish.

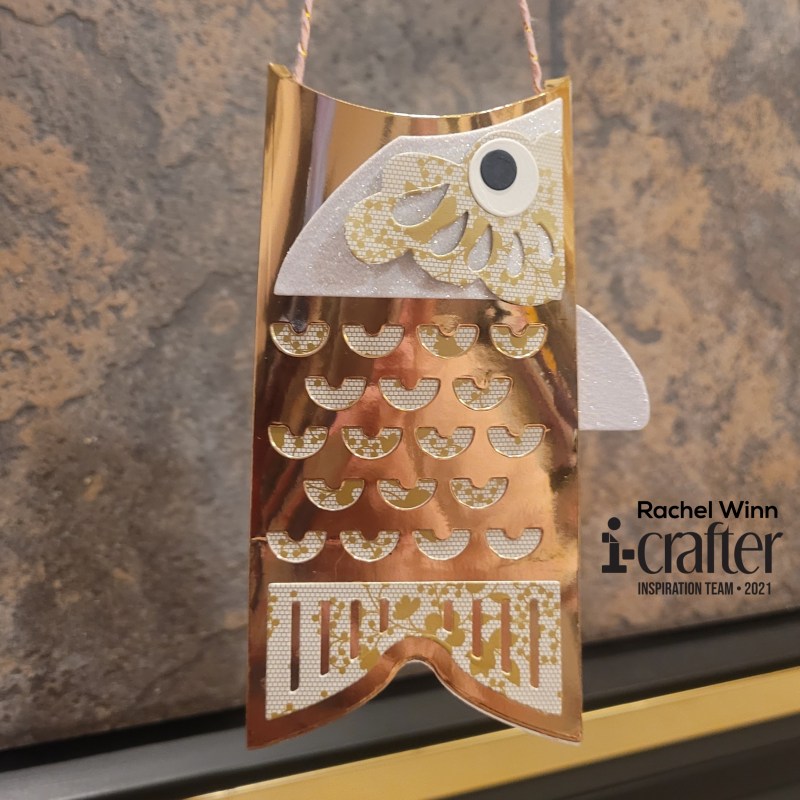
My final Koi Pillow Box is gold, which represents wealth and fortune. For this, I used a metallic gold cardstock for this one, it is thicker and would handle a little more weight than the regular cardstock fishies! I found a gold lace/floral patterned paper to use behind the gills, top face piece, and tail fin. For the bottom face piece and top fin, I used a white glitter paper. I finished this one up with the same white eyeball and back pupil.

I hope you've enjoyed my take on this fantastic die set and look forward to seeing how you create some fishes! If you'd like to follow me, here is my blog, Instagram, and Facebook page. Be sure to join the i-crafter Facebook Fan Club, then follow us on Instagram, and Pinterest too! We love to see your creations using the i-crafter products.


Until next time,

Rachel

Monday, June 8, 2020

Scrap buster with i-crafter Hummingbird Happiness

Hello friends!

I have a card up on the i-crafter blog for the first time today! 

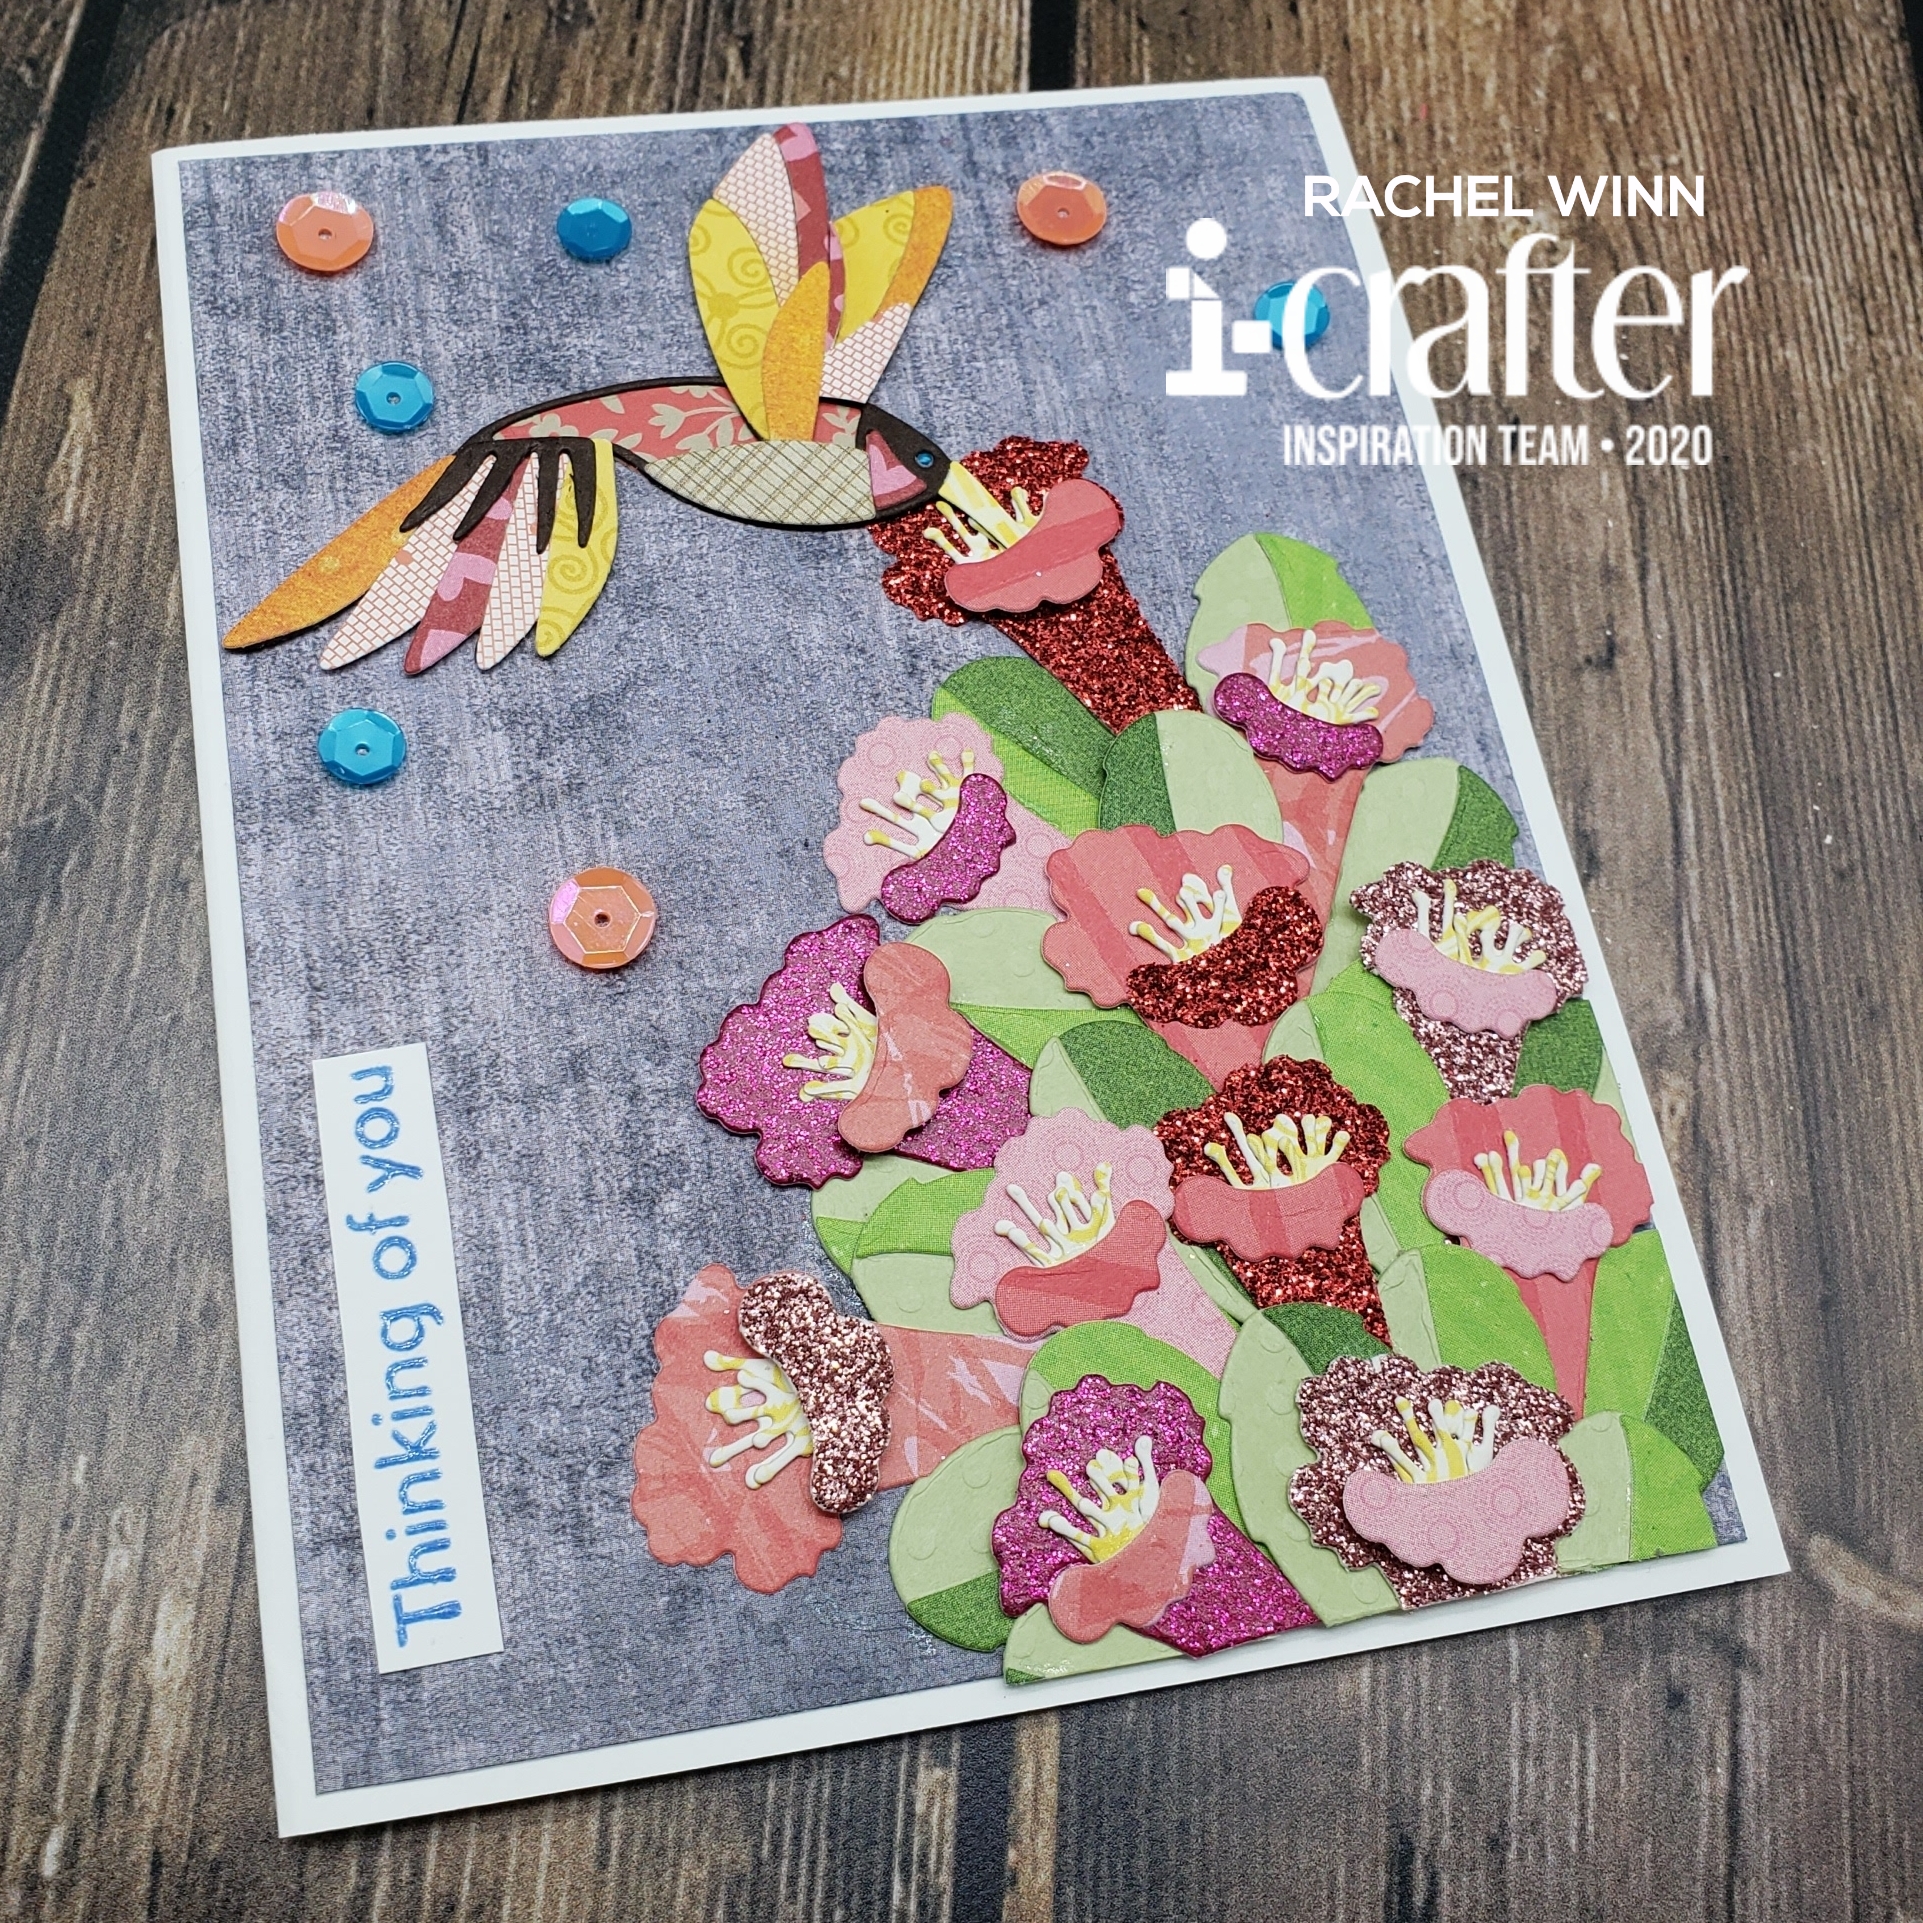
This card was a bit of a labor of love for me, using the new Hummingbird Happiness dies. I typically am more of a colorist, and don't use many intricate dies, but as soon as I saw the Hummingbird Happiness die I knew what I wanted to do with it... use up some scraps! I have these 8.5"x11" clear pockets FULL of scraps, organized by color of course.

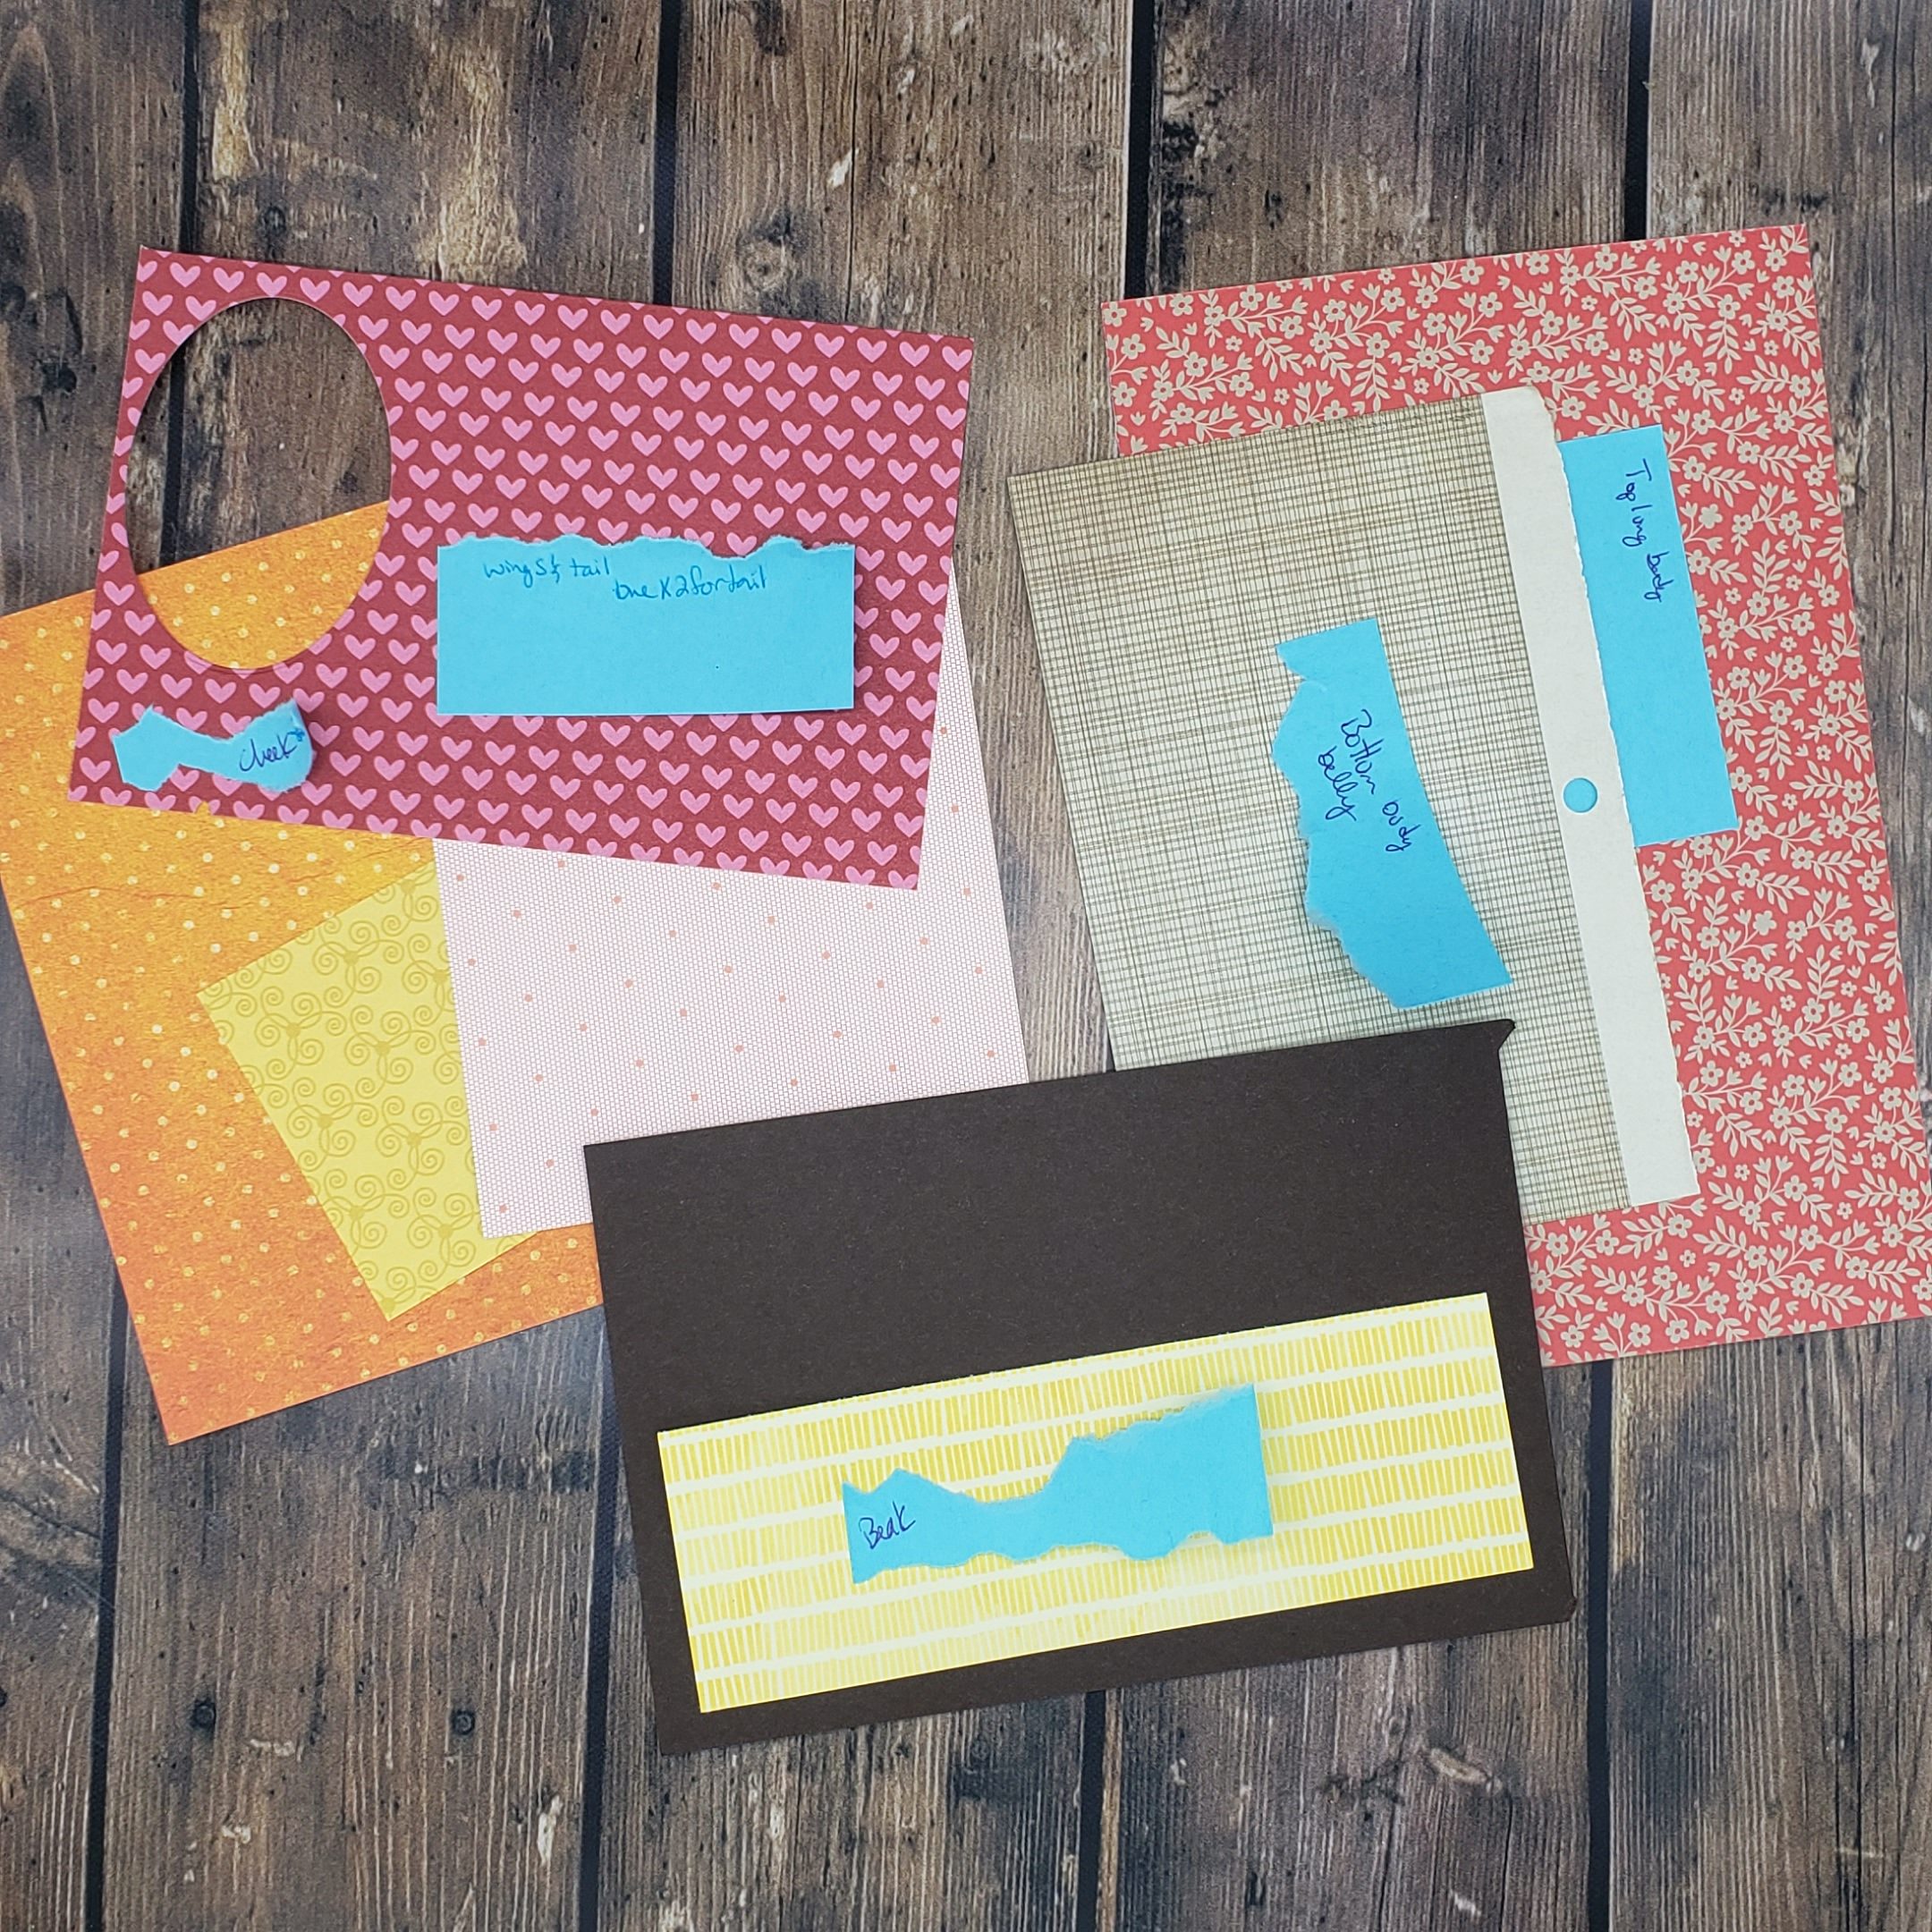
I started by pulling down the Patterned Paper scraps that I have, because I find ways to use the solid colors constantly, but Patterned Paper is harder for to use in general. I pulled out several pieces to decide which I liked together.  I labelled them with how I thought I wanted it all to go with sticky notes.

20200604_110241

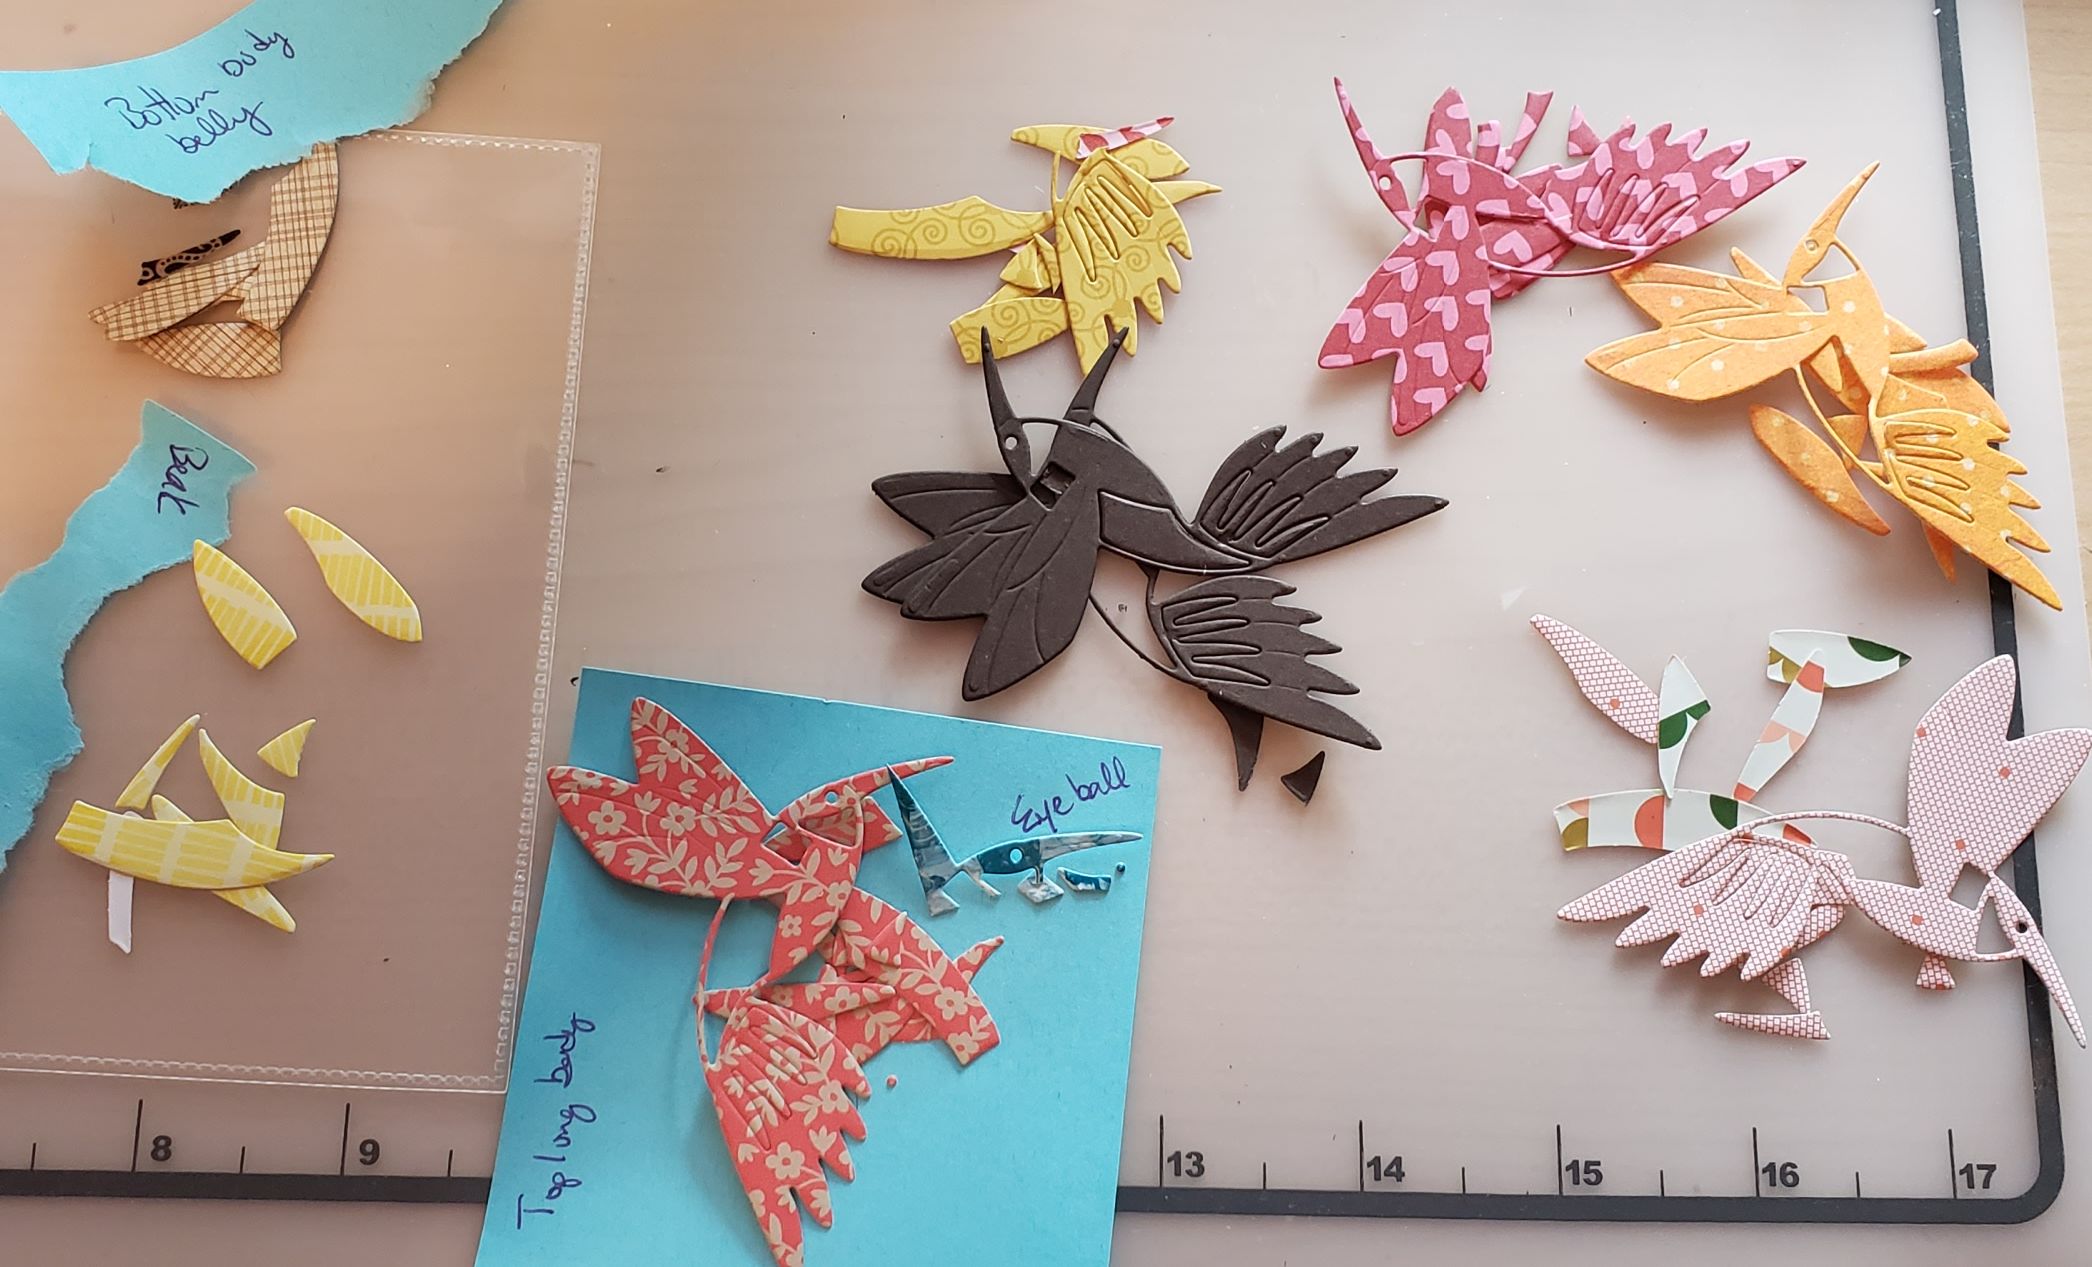
After I was happy, I started to die cut. This set takes a lot of cutting. I ended up pulling my mini die cutter out after a bit so I didn't have to keep getting up and down. HA! I inevitably still ended up needing to do more cutting to have all the pieces necessary. 

20200604_124134 (2020-06-06T19_24_11.634)

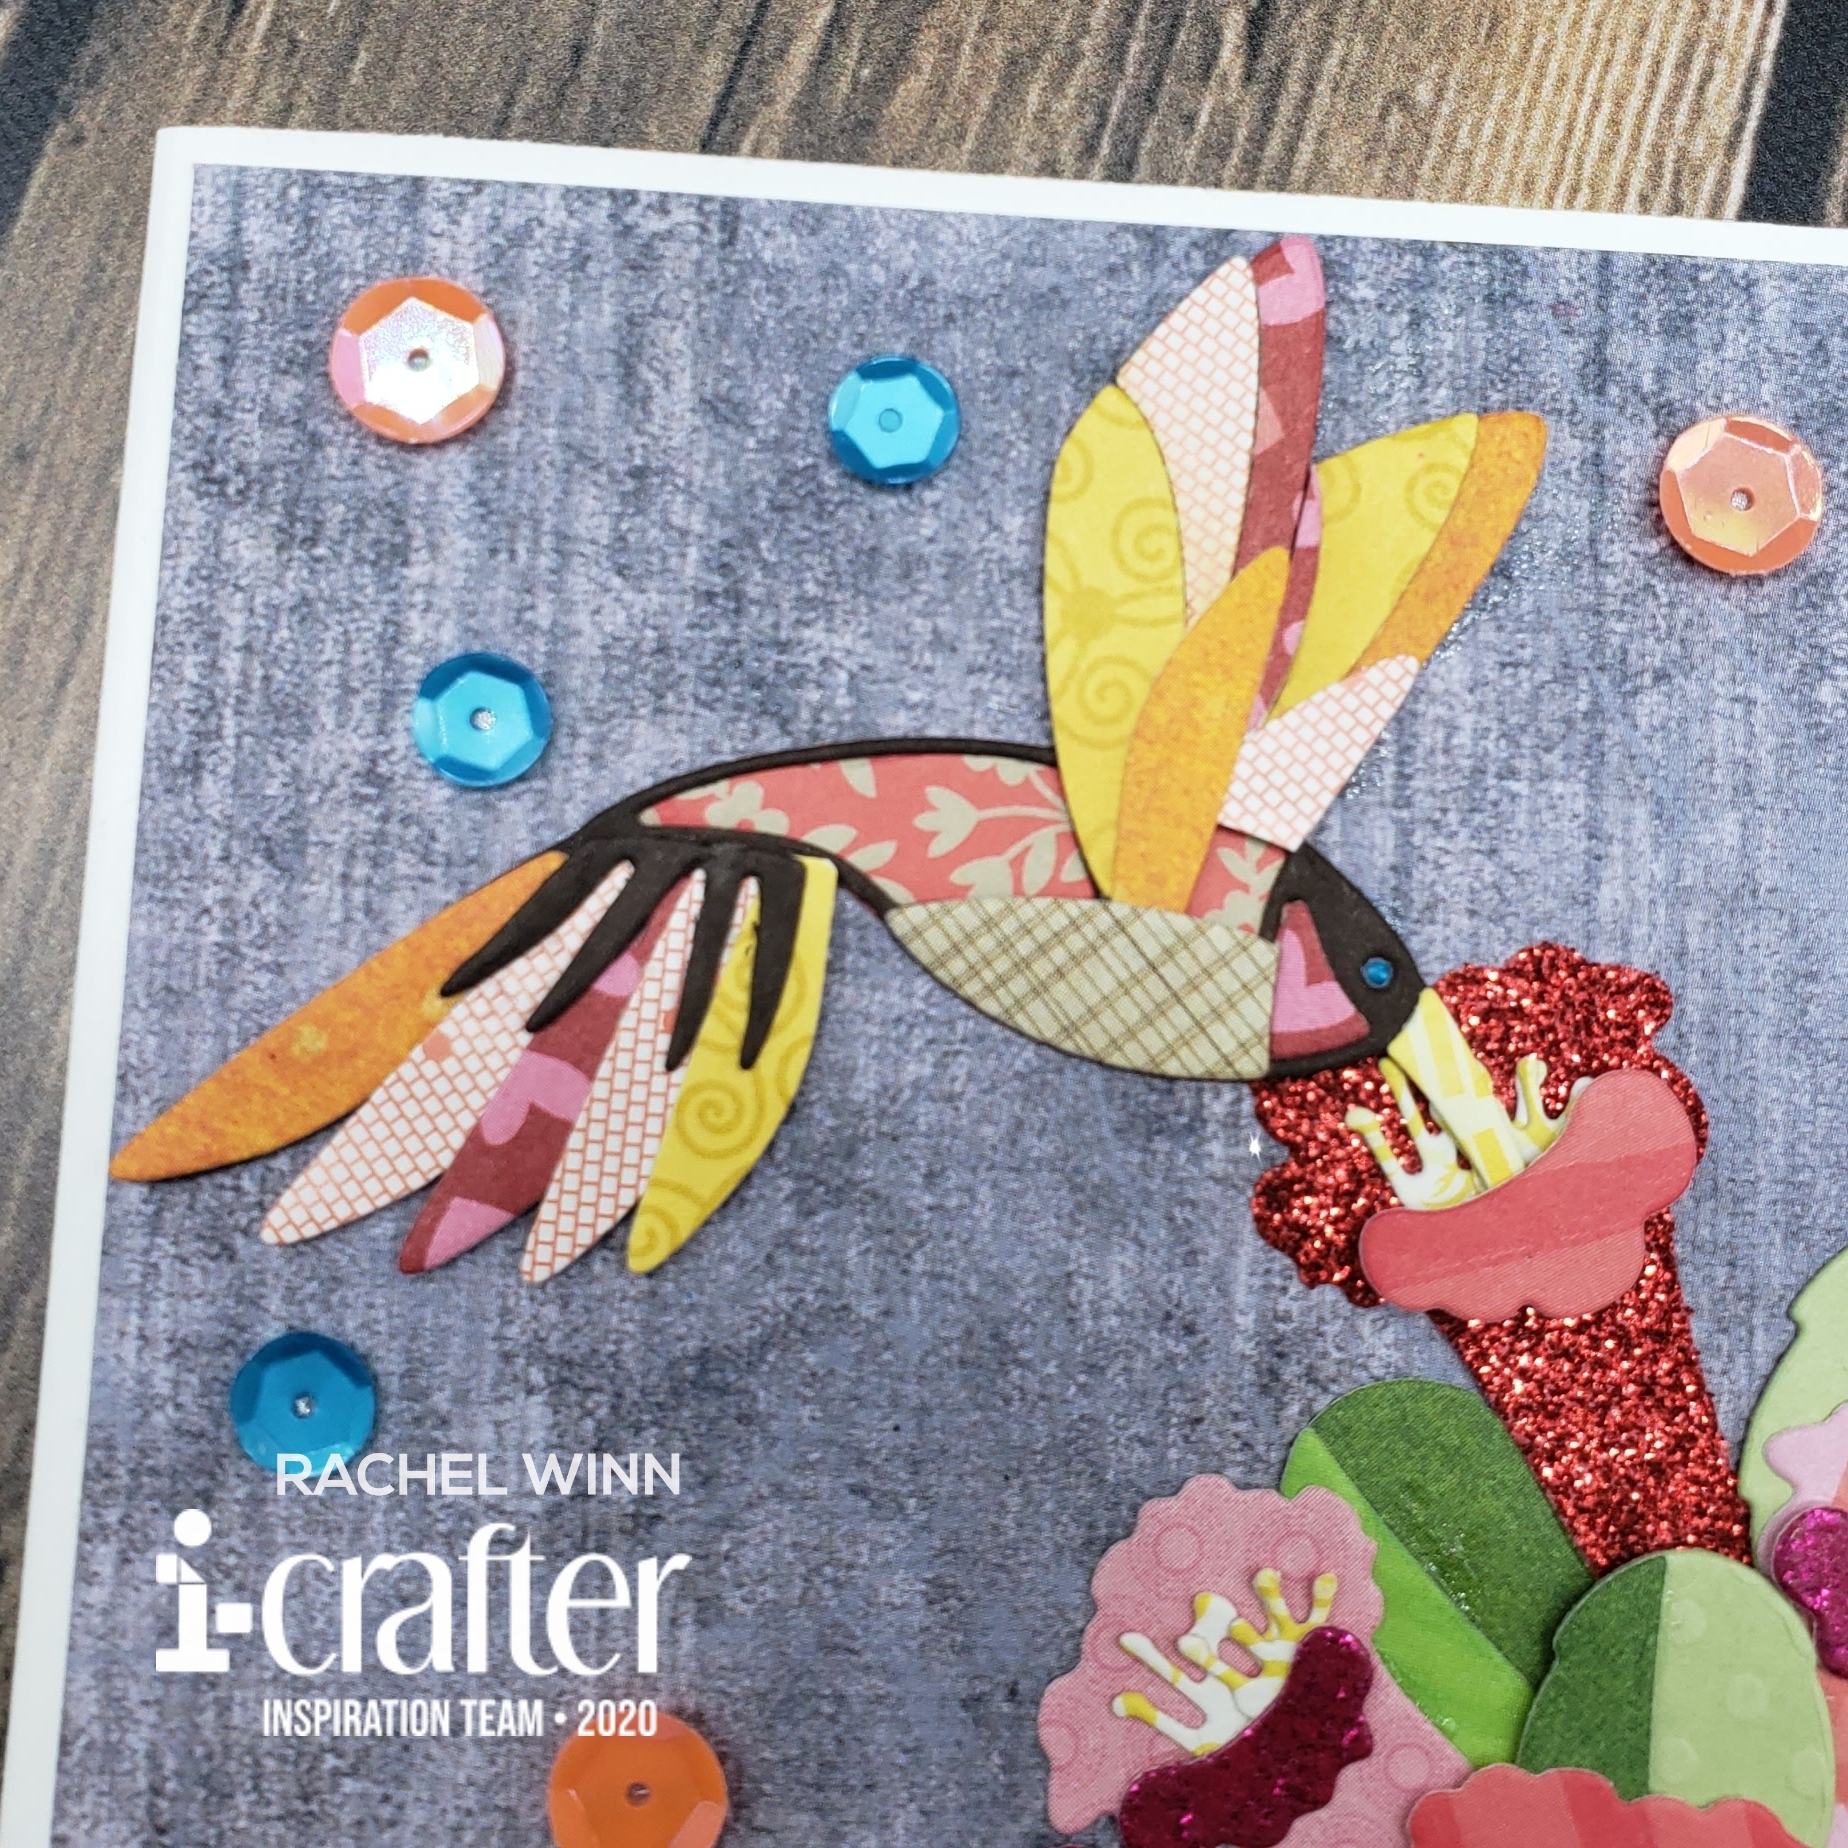
I followed the picture tutorial for Hummingbird Happiness because complex dies are NOT my forte. Starting with a wing, and building from there. I am not one for worrying about does this side match that side, because in nature, the same color may not be in the same place.  

received_3185441498143143 (2020-06-06T19_37_04.137)

Next, I die cut a million (ok, that's an exaggeration) little trumpet flowers and leaves out of more scrap paper. For the flowers, I focused on pinks and reds, using both patterned and glitter papers. For the leaves, I used more solid or stubble patterns. 

Then I built. I cut down a large piece of purple scrap paper that started as a scrapbook paper for the background, took my hummingbird and one of the flowers that I had used foam tape to have the front petal lifted and stuck his little nose INTO the flower. I layered the leaves and flowers to created kind of a garden or bush look with the flowers. 

LogoLicious_20200606_102532

I kept my background handy and made sure that as I layered, the flowers stayed on the card base.  At the end, I trimmed just a few flowers and leaves on the bottom and right side that flowed over. I was ok with that since I didn't want it to look like the flowers just ended.

LogoLicious_20200606_102135

I stamped "Thinking of You" from the Scattered Thoughts Sentiment Stamps in Skysail Blue Hybrid ink using my Mini MISTI and heat embossed it using clear embossing powder. This was glued in the bottom left corner, then I added a few orange and blue sequins.  

I hope that this has given you some inspiration and that you will grab the Hummingbird Happiness dies, Scattered Thoughts Sentiment Stamps, and the Skysail Blue Hybrid Ink.  I can't wait to see what you make with them, come join our i-crafter Facebook Fan Club to show off your own scrap hummingbirds!

If you want to see more from me, my instagram is HERE, and my Facebook page is HERE!

You will get to see another project from me here on the i-crafter blog later this month!

~R. Winn 

Wednesday, March 18, 2020

Playing with EZ Lights

I am SO excited to share with you my project using Pear Blossom Press's new EZ Lights; I absolutely LOVE these little guys and think you will too! Pear Blossom Press invited me to participate in a blog hop to help introduce EZ Lights, and I was completely honored and thrilled!


The EZ Lights, are a set of 3 pre-strung LED lights attached to the base of the Power Packs by Pear Blossom Press. They make doing a light up card so simple, and they last for such a long time.

I started my card by blending some Catherine Pooler inks, focusing on a dusk/sunset palette, after I had it blended I used a hole punch to create a space for the lights to shine through. I wanted lots of layers on this card, I used die cut trees directly on top of my dusk sky and added grass die cuts to the bottom. 

I mapped out my EZ Lights after punching the hole, a simple pencil mark on the card base so I know where the lights go, then deciding where the best space for my button is. It's almost error proof, honestly. 


For my images, I used the Kindred Stamps "Kindred Camping" stamp set and colored up the tent, campfire, and two of the campers using Copics.  I wanted a scene that would be beautiful on it's own, and stunning lit up.

The awesome thing about the EZ Lights is how powerful they are, they shine bright even though I don't have any transparent vellum or acetate to help them.  My campfire is on XPress It Paper which is a nice heavy cardstock, then my campfire is colored with Copics, adding another layer. As you can see below, the lights still shine through perfectly, lighting up the campfire! In fact, the light shines through in the background as well, giving my dusk sky, a bit of a more realistic feel and look.


I stamped my sentiment onto a scrap of kraft cardstock using Ink On 3's Juicy Clear Embossing Ink. I heat embossed in a nice dark brown embossing powder. I arranged my girls and the tent onto my card and added the sentiment to the top right. My EZ Light button is on the top left, so I used a Lawn Fawn stamp that says "Push Here" stamped in a dusky blue to mark it.

Now... Who wants to win an awesome prize from Pear Blossom Press?? Two prizes will be awarded to two separate winners, chosen at random, from comments left on participating blogs and videos. 
No purchase necessary. Comments must be posted by 11:59 pm PST on March 25, 2020. Only one comment per blog or video will be counted, but you can comment on multiple blogs and videos in the hop for additional entries. (This is to prevent spam.) Contest open internationally to participants over 18 years of age. Void where prohibited by law. Any personal information collected will only be used for the purposes of contacting winners, your information will never be shared or sold. Comments left on YouTube videos must not violate community guidelines. This contest is not sponsored by YouTube. Winners will be announced on April 1, 2020 at pearblossompress.com and prizes must be claimed within thirty days of announcement, or new winners will be drawn.

Make sure to visit the rest of the hop for more chances to win, and to see some pretty amazing projects!

Rachel (You are here!)
Your next stop is Erin

Thank you for visiting me today, I can't wait to see what you dream up with EZ Lights!

Until next time,
~R. Winn

Sunday, September 15, 2019

Teen Detectives Box

Hi friends!

It's no mystery that we are excited about our newest Limited Edition box at Kindred Stamps! The theme this time around? Teen Detectives! This box includes a 6"x8" stamp set, a custom paper pack, a custom washi tape, a loose glitter pot, and an amazing stencil; there are a few other things, I just can't think of them right now.

Any who, I created 3 fun projects using this set, take a look...

My first project involves two of the detectives, and their furry counterpart! I colored the girl using Copics, but the boy and the dog were colored using Chameleon Markers. 


For the background, I started with a grey paper, for a dusky sky feel. The trees are different shades of green scrap paper I had in my overflowing scrap drawer, cut out using an old Stampin' Up Christmas tree die set. I layered the different sizes and shades to feel like a forest.  I had planned on just placing the kids and dog in front of the trees, but because I had used different dimensional adhesives to layer, there was an odd gap beneath them. I decided a road using Tonic Expanding Mousse, I mixed about 5 different colors, attempting to make brown. I ended up with more of a gray, and it looked like a gravel road after heating it with the heat gun!

I typically leave the insides of my cards blank, but... this sentiment just seemed perfect to me! I used Catherine Pooler Orange Twist (which matches the girl's sweater!) and stamped it out right in the center of my card.


Next, I wanted to use the awesome tie dye stencil included in the Teen Detectives Box. Brianne had done an awesome background on white, so I decided to go with a black background and used Distress Oxide inks and my toothbrush makeup brushes to create a tie dye background. Next, I used a Stampin' Up Star die to cut out the center of the card to let the blue base show through.


I always felt these two kiddos had that "young love" thing going on so they felt perfect to make a "love card!" I used banner dies from The Stamp Doctor to cut out the two sentiment banners, and placed them in opposite corners. I finished my card off with a few sequins from the box.

My last card, I had no more teens left to use, nor the energy to color up more. I did have this fantastic star cut out from my other card though... and the custom washi tape included in the Teen Detectives box! I layered 5 strips of the washi tape onto my white cardstock, then used foam adhesive to pop up my tie dye star. 


On my star, I used Brutus Monroe Alabastar Embossing Powder to emboss my sentiment from the Teen Detectives stamp set. Then I took a small brush and Tonic Crystal Glaze and brushed it over and around the sentiment, I used the loose glitter in the box to dust over it. The glaze really allowed the glitter to stay put and not fall off!

I finished the card with some of the sequins in the Shaker Pack included in this box!

I hope you've enjoyed my cards, and cannot wait to see what you make with your own Teen Detectives Box!

~R. Winn


Wednesday, June 26, 2019

Making a Splash with Kindred Summer!

 Long time no see! I'm excited to see you again!

Today, I get to share with you, our Kindred Summer stamp set! We have a fun little tradition where Audra has custom images of the team made up to celebrate new seasons, holidays, etc. Our pool party images were such a hit when we shared them that we thought they would be a perfect stamp set for summer!
My first card is featuring Molly, my best friend, and her amazing hair, sliding into the pool. I wanted to create one layer on this card that was full of details and a simple hand drawn background. I see all sort of people making AMAZING backgrounds by hand, that's outside of my comfort zone, so I figured I could start somewhere, by creating a pool scene.

While I knew I wanted to make Molly my star, I also used Audra on her ducky floaty, hanging out in the pool. I placed sunbathing Marcia on the pool deck, catching some rays. After these 3 were stamped, I took a pencil and a straight edge and created the pool/deck separation line. I started by coloring in my people, I tried to create depth in their colors, next, I did the cement, I used several shades of gray Copics to get depth and shadow. I added the water, again, several shades of blue were used. Last, I used a red Copic to add in the depth markers on the pool deck!


Normally, I stamp my sentiment and then die cut it and put it on the card, for this one, stamping directly on the scene just felt right! I used a WOW embossing powder that I picked up from Kraftgali to make "Hope Your Birthday is a Splash" really pop.  Finally, I used a sheet of the new Kindred Stamps Pool Party Paper Pack to back my "masterpiece" and mounted it on a white card base!

Next, I created a fairly simple, and quick card. I LOVE this sun paper from the Pool Party Paper Pack, and the sentiment "Here Comes the Sun" from Kindred Summer together. I added the 
I stamped my sentiment out using Catherine Pooler Something Borrowed ink, then used Ink On 3 Embossing Ink over top of it, and heat embossed with Lindy's Gang powder. It has a slight iridescent shimmer to it. I die cut the sentiment using a Tonic Oval.


My sun paper was amazing, but I felt like the Memeory Box die cut took it to the next level. I layered my die cut sun paper onto a piece of blue paper from Stampin' Up that matched my Catherine Pooler ink well. I loved the card, but felt like a blue SPARKLY ribbon down the center of the card, below the sentiment really finished it off.

My last card was an adventure! My little sister, Addison, feels that she should ALWAYS be made into a stamp. So, I decided to do a mirror image stamp of the Rachel stamp, this allowed me to create a pool scene with the two of us.

I colored myself first, I used lighter hair colors, and then finished myself off with a bit of R20 and created a sunburn look. (I don't tan, I lobster). I chose a colorful, yet clean look for my unicorn, and added sparkle with Wink of Stella. 

For Addison, my mirror image skills... well they don't exist... it took me a few tries to be ok with my stamped image. I went ahead and colored her with a slightly darker skin and hair color, she tans, well. I didn't love the thought of my baby sister in a bikini, so I went ahead and colored the belly area giving her a tankini instead! For her unicorn, I did an obnoxious pink, because she has a BRIGHT personality! My lines were not as crisp as I would have liked, so I went over them with a black marker after I finished coloring... her nose may have been compromised...


Again, this Pool Party Paper Pack... it's amazing. I loved the pool water sheet and felt like a double slider be fun. I used Lawn Fawn Slider dies and pennies to allow us to float back and forth. I used a few purple and white sequins from a Kindred Shaker Pack to add a little pizzazz to the card. 

Last, I stamped "Float On" onto the beach ball paper using Stazon Purple Pigment and then heat embossed using Brutus Monroe's Fairy Dust embossing powder. I placed my beach ball onto a wobbler and it bounces around when you bop it!


Now that you've stuck with me through three cards, please make sure you leave a comment! I get to give away a $10 store credit and I'm hoping it's you. Leave a comment here and make sure you include your email address so I know where to reach you. 

The entire Kindred Stamps June release will be available Friday, June 28th at 8am PST/11am EST. Be sure to subscribe to the Kindred Stamps blog to see a daily line up of sneak peeks from our amazing Design Team and see the full product release on Friday! Come join the Fan Club and release event to be part of the release fun, and you may just win some Kindred Stamps credit!!
  
Thank you for visiting me, I hope you have a fantastic summer!

~R. Winn
Monday, March 18, 2019

Let's Stick Together!

Hello again friends!

I'm absolutely in love with this month's Kindred Stamps new release line up. I got to play with "Stick Together", which features two adorable hedgehogs! The sentiments on this set cover all sorts of occasions too.

I made two cards, my first card is fairly simple, I used Kraft paper on top of a white base. On the craft paper, I used the heart from "Stick Together" and stamped it randomly about halfway up the card using a red Distress Oxide ink.

I used the hedgehog on his back and colored him using Copic Earth tones. I also colored up a heart using light pinks then cut them both out and had the little guy hold the heart. 


I picked the "I love you even when you're prickly" sentiment and stamped it on a white banner. To finish the card off, I added a few Queen & Co pokey embellishments. Like I said, simple, but I think whomever ends up receiving this card will smile!

My next card is a little... more! I love this little sitting hedgehog, and the butterfly is just so cute. I colored this hedgehog up a little lighter. I colored the butterfly orange and had him land on the hedgehog's nose. I bent the butterfly in the middle so one wing was up. 

To create the background, I used the Witt & Sass Hill Builder Stencil (no longer in business 😞). For the grass, I blended Catherine Pooler Mardi Gras and Eucalyptus. The sky is a blend of Catherine Pooler Baby Boy and Skylight.


I took Memory Box Stitched Cloud dies and covered them in Ink On 3's Liquid Pixie Dust using a paint brush (I covered 4 clouds with only 2 drops, and while the picture doesn't show it well, they are heavily covered in sparkles). Next, I took my Tag #1 die from The Stamp Doctor, and die cut my sentiment, which I stamped in Catherine Pooler Mandarin Spice ink. I mounted my card onto a gold foiled base from Michaels.

I hope that you've enjoyed my take on "Stick Together" and cannot wait to see what you dream up with this set! The entire Kindred Stamps March release will be available Friday, March 22nd at 8am PST/11am EST. Be sure to check out the Kindred Stamps blog on Friday for the full product release as well as the complete line up of all the Kindred Stamps Design Team projects from release week! If you visit and comment on all of the designers' blogs this week, you could win $15 in Kindred Stamps shop credit! So join the Fan Club and release event, show the design team some love, and get ready to empty those wallets this Friday!

~R. Winn
Wednesday, January 23, 2019

Science Geeks

Hi friends! It's been a while, and for that, I'm sorry! I am SUPER excited about the set that I get to share today. "Science Geeks" is full of cute characters, unique sentiments, and so much fun! I managed four cards with this set for you today.

My first features a cutie in a floral dress. I used some Lawn Fawn Sparkle Cardstock with our Kindred Stamps Sprinkles Stencil and created a sparkly background using Catherine Pooler inks. 


I colored my cutie with Copics, then paper pierced her dress using a floral paper from Simple Stories. I finished her off with a little Nuvo Glaze on her glasses. I layered the card with turquoise and pale yellow cardstock, and added a few enamel drops. I thought this was the perfect birthday card, so I added this awesome sentiment to finish it off.

My next card features two cute lovebirds. I used some retired Stampin' Up DSP, then layered on top of it with some grey card stock that I patterned myself by off-setting the Kindred Stamps Comic Dots stencil with two Catherine Pooler inks. 


My lovebirds are again, colored with Copic markers, and the mister is finished with Nuvo Glaze on his glasses. My sentiment, I decided on the "you matter" stamp, because I freaking love it. I put the sentiment on the Lawn Fawn "say what? gift tags die, it fit perfectly... so why not! 

My next card has the awkward couple... who personally, I think rock! I started with the Catherine Pooler Peppermint Stick background stamp, I wanted to show how "Christmas" items can be used throughout the year. I used the Be Mine ink, to make it perfect for a Valentine's Day card. 


I used a retired Unity stamp set with a couch to create a spot to give. I kept the theme of soft colors with the patterned paper and added the sentiment to a banner on Kraft paper on top of them. My couple is colored with Copic markers, and again, Nuvo Glaze for the finishing touches on her glasses. My card was finished using the Kindred Stamps Sweet Love Shaker Pack.

My last card it one cool dude. I colored him with Copics, and wanted to keep the card fairly simple. I used the Kindred Stamps Spaceship Paneling Stencil with blue and black Catherine Pooler inks. I wanted it to look like an atom... I'm probably totally off though haha.


I added the cool dude to the center of my "atom" after coloring him with Copics. I finished it off with a red square and this super fun sentiment which I popped up foam tape to add some dimension. I hope that you enjoyed my take on Kindred Stamps Science Geeks.

The entire Kindred Stamps January release will be available Friday, January 25th at 8am PST/11am EST. Be sure to check out the Kindred Stamps blog on Friday for the full product release as well as the complete line up of all the Kindred Stamps Design Team projects from release week! If you visit and comment on all of the designers' blogs this week, you could win $15 in Kindred Stamps shop credit! So join the Fan Club and release event, show the design team some love, and get ready to empty those wallets this Friday!

Until next time,
~R. Winn