Showing posts with label Gift Card Box. Show all posts

Sunday, January 3, 2021

Koi Pillow Boxes by Rachel Winn

 Hello friends,

I am excited to be joining the i-crafter Inspiration Team! Today, I am showing you my take on the new i-crafter Koi Pillow Box die set! I spent some time researching what different colors meant in Japanese culture, and used that as the inspiration in the colors I used. I settled on creating fish that were blue, black, and gold.

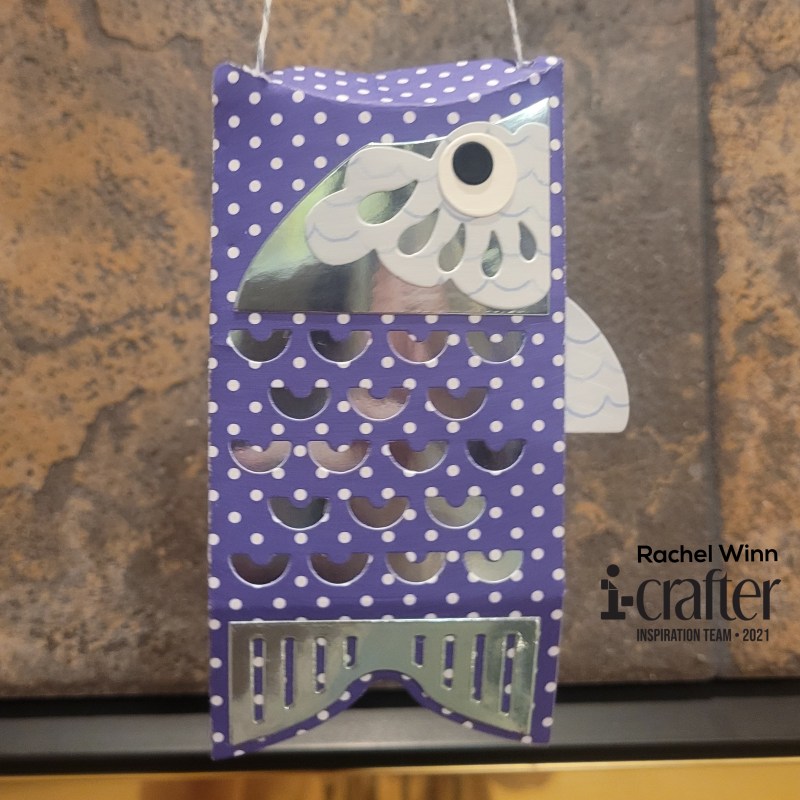
I started with the blue Koi Pillow Box, blue representing peace and tranquility, seemed like an excellent hidden meaning to a gift. I decided on using a combination of patterned papers, and a pretty shiny metallic paper. For the body, I used a 6"x6" dotted patterned paper. I decided that I wasn't a fan of the gills being open, so I backed the gills with a piece of the metallic paper. I used the same metallic paper for the back of the face and the tail fin. For the top fin and front, kinda frilly piece of the face, I used a paper that looked like waves to me. I finished with plain white paper for the eyeball, and plain black for the pupil.

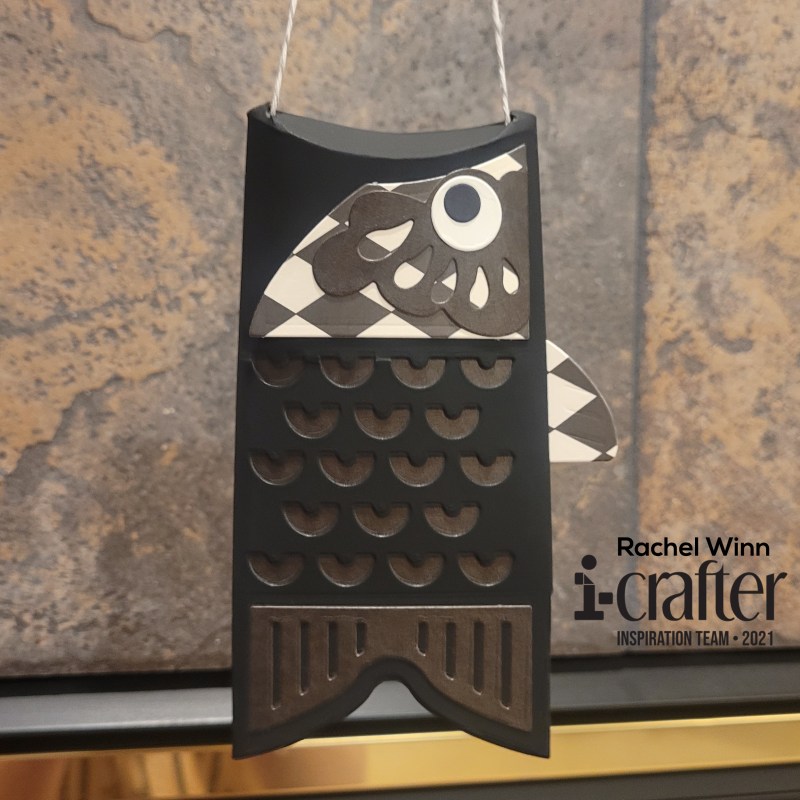
My next Koi Pillow Box is black, which represents overcoming an obstacle, which is another excellent time to receive a gift. I started with a black chalkboard cardstock, this cardstock has a bit of a smooth, soft texture to it, and is really nice and thick. Next, I used a cardstock that was black on kraft paper for behind the gills, the top of the face, and the tail fin. The back of the face and the top fin, I used a black and white diamond patterned paper, I chose this to break up the black a touch since I didn't have 3 different shades of black papers to use. I used the same white for the eyeball and black for the pupil as on the first fish.

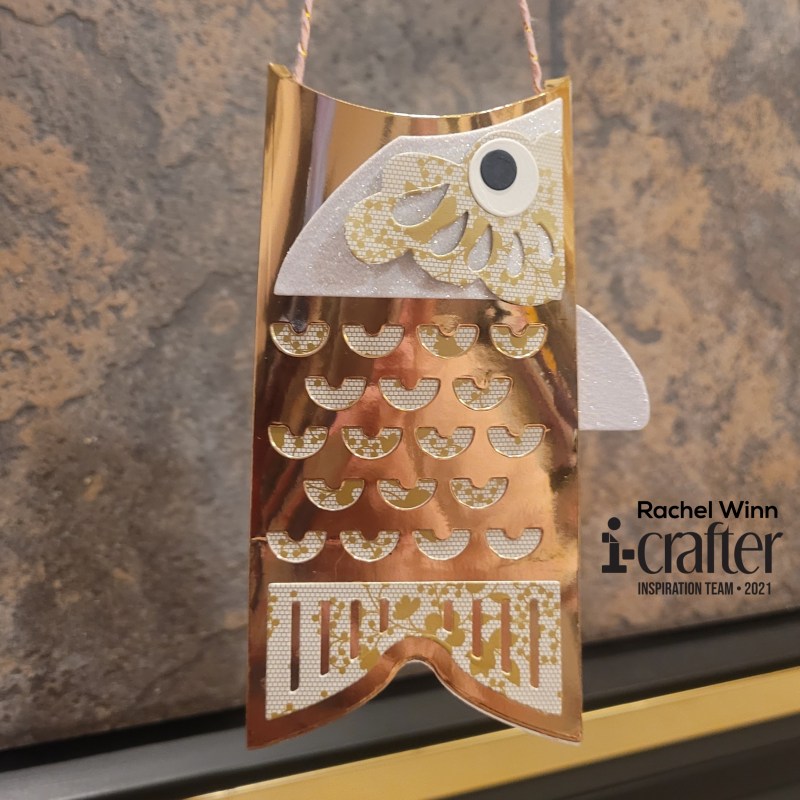
My final Koi Pillow Box is gold, which represents wealth and fortune. For this, I used a metallic gold cardstock for this one, it is thicker and would handle a little more weight than the regular cardstock fishies! I found a gold lace/floral patterned paper to use behind the gills, top face piece, and tail fin. For the bottom face piece and top fin, I used a white glitter paper. I finished this one up with the same white eyeball and back pupil.

I hope you've enjoyed my take on this fantastic die set and look forward to seeing how you create some fishes! If you'd like to follow me, here is my blog, Instagram, and Facebook page. Be sure to join the i-crafter Facebook Fan Club, then follow us on Instagram, and Pinterest too! We love to see your creations using the i-crafter products.


Until next time,

Rachel

Thursday, May 21, 2020

Blonde and Ambitious

Welcome back!

I am sharing two projects using the new Kindred Stamps stamp set, "Blonde and Ambitious." I love how sassy and smart this set is and just had to make a few things that really felt "RIGHT" for it. 

I started with a bookmark, I bought a big pack of plain white bookmarks on Amazon a while back, and used one as the base for this project. I used i-crafter's pink i-brush blending brush to dust Radiant Neon Electric Pink Ink around the edges of the bookmark. 

Next, I colored up my brilliant fashionista using Copic markers on X-Press It card stock. I fussy cut her out and set her aside. Next, I used scrap black and gray card stocks with Frantic Stamper's Stack of Books die and cut just the top book off of 3, the whole stack was a bit overwhelming for the bookmark. 


There are some really cute sentiments in the "Blonde and Ambition" set, but for the bookmark, I felt like "You're like really smart" was perfect for a bookmark though! I stamped that in i-crafter's Hushed Darkness Black ink using my Mini MISTI. I finished the project off by adding some fun pink ribbon to the top.

My next project, I wanted to do a gift card holder. I have a Sizzix Bigz die, and used it to cut out my base with some bold pink card stock, then a white inner piece for the gift card holder. 


Again, I stamped my expert shopper from "Blonde and Ambitious" out and colored her with Copic Markers, then fussy cut her. 

I used a Sweet Stamp Shop die to cut out a cityscape in gray, then a Sizzix die to cut out a film negative in black and layered these both over a white piece of cardstock. I tilted it and cut it down a bit, then glued it to the top of the box. 

I added the "Snaps to you!" sentiment from "Blonde and Ambitious" stamped on the same pink card stock as the box in a Circle die cut from The Stamp Doctor.


The last step for this gift card box, was stamping the sassy shopper from "Blonde and Ambitious" using Ink on 3's Fade Out ink for a second generation stamping look, and the "You're legally awesome" sentiment from "Blonde and Ambitious" in a bright pink Catherine Pooler ink.


"Blonde and Ambitious" and the entire Kindred Stamps May release will be available Friday, May 22 at 8am PST/11am EST. Be sure to subscribe to the Kindred Stamps blog to see a daily line up of sneak peeks from our amazing Design Team and see the full product release on Friday! Come join the Fan Club and release event to be part of the release fun, and you may just win some Kindred Stamps credit!!

I hope you enjoyed my projects, and will see you next time!
~R. Winn

Wednesday, November 15, 2017

Made in the 80's!


Hi all!

It's that time again, release week at Kindred Stamps! This week's release is all kinds of wonderful and I have two super cute projects I'm SO excited to share with you!

I was lucky enough to get to use the new set "80's Girls" to make my projects.  These little cuties were made in the 80's, and so was I!  I had to share this picture of little Rachel rocking the pink jumpsuit, with a character that looks suspiciously like one of these new babes!
*wink, wink*

So, now for the exciting new projects with this exciting new set!


My first project is a Caddy Bag! I used the Sizzix Scoreboard XL Die - Bag, Caddy to get the base of my project.

I knew I wanted the adorable little lady to shine, but I also had a few new "toys" I wanted to play with, so I colored her up using Copic markers and cut her out using my Brother Scan n Cut (we had a little fight about who was the boss that resulted in me tossing my worn out mat, so there is a small slice of the hat that is missing *tears!*).

Next, I grabbed my brand new Plaid Background stamp from Concord & 9th and decided a yellow base with red lines was the way I wanted to go (ps. I also learned that VersaFine Red ink smells like Oreos. I. Kind. You. Not.) Thank goodness for my MISTI because, I tried lining up my lines for the first attempt... Not pretty, MISTI allowed me to create clean, even lines with no guess work or missed spots!

Next, I heat embossed the adorable little strawberry that comes with "80's Girls" repeatedly over the base and front panel of my Caddy Bag. The Recollections Red Tinsel Embossing Powder gives a touch of sparkle, because clearly, everything needs to sparkle.

Next, I mounted my little strawberry gal on the front panel using Stampin' Up Dimensionals.  The sentiments on this set are buildable, so I built a "You're So Sweet" sentiment and stamped it using VersaFine Black, it's my favorite for getting clear words with a fine font. Last I used the Stampin' Up  Label Punch (retired)  to give it shape and mounted it with more Dimensionals.  Last, I had found these adorable little red ribbon bows in the Target "Dollar Spot" with the Christmas stuff, (looked like a good any time product to meeeeee!) and finished this project off with one!


My next project, was so fun to conceive and make!  I have all these diecuts I never use, including Sizzix 659722, a Gift Card Box, so I pulled it out and set to work making my first ever gift card box!


I kept my box fairly neutral using Stampin' Up Crumb Cake. Now, I didn't know at the time I wanted to stamp my sentiment around the box top's side edges, so I went ahead and glue the box together... but what I should have done was take my time to stamp the sentiments that ended up there. This time, I built my sentiment to say "You make my world bright"! I used VersaFine again, like I said, it's amazing for fine fonts, and getting crisp lines.


Next I colored my girl! I wanted her to be fun, and bright, and full of color! So again, I busted out my Copic markers, and my Stampin' Up Blendabilities to make her as bright as a rainbow! For the super fine details, I used my Copic Atyou Spica Glitter Pens, this also allowed me to squeeze some glitter into this project! After I finished coloring her, I gave her a little purple star on her cheek using the Lavender Glitter Pen.

Behind her, I built a background using plain white paper, the little star from "80's Girls", and a rainbow of bright colored embossing powders.

After the star colors were set with heat, I went back with Stampin Up Write n Stamp markers and did a quick color in of them.

The finished background, mounted it on to the box, then used Dimensionals to make my girl POP off the box!


I hope you've enjoyed these projects as much as I enjoyed creating them! If you haven't already hop on to Kindred Stamps website, using my link, you'll get 10% off your first purchase and start earning reward stars towards future discounts!

As always, we've got a fun blog hop for you to see what the other sets releasing are, and a chance to win a shop credit from Kindred Stamps (this means even if you're a planner girl who doesn't stamp you still want to enter!!)! Make sure you hop along and comment on each blog to be entered!  We want to know which is your favorite set of this release. Are you Old School, like our 80's Girl set? Are you Retro, with our Strange Friends set? Or are you Pop Culture with our Annoyed Boss set? What will you be snagging on Friday?

One lucky person will win a $10 credit to the shop! Will that be you?

All you have to do, in order to win, is to visit the following blogs and comment on the posts! Easy Peasy!

Kindred Stamps

R Winn Creates - You're Here!

See ya later alligator!

~R. Winn