Showing posts with label Heat Emboss. Show all posts

Tuesday, July 20, 2021

Crabby Card

Hello again friends,

I am so excited to show you my card for today! I played with Sassy and Crafty's Sassy but Sweet Stamp set. This set features an adorable mermaid and fantastic "king" crab along with some amazing sentiments.

I decided to stamp the crab from Sassy but Sweet for my card today. I stamped him using Ink On 3's Fade Out Ink and colored him with Copics. To add a bit of extra fun, for the gems on his crown, I used clear rhinestones colored red using a Copic. I also stamped each of the shells from Sassy but Sweet a few times to color in different fun bright shades, again using Copic markers.

Once I had finished coloring, I focused on the background next. I used black cardstock and the Mermaid Tails Stencil for this. I used my i-Brush Blender Brushes and Distress Oxide inks in various shades of blue and one purple to create a watery feel. I added a few spritzes of watered down Ink on 3 Liquid Pixie Dust to add some shimmer to the background.


Next, I cut out Kindred Stamps "Sorry" word die. For the bottom layer I used a purple scrap with a kind of watercolor or bubbled look to it, and for the top layer I used a blue glitter cardstock scrap. The sentiment I stamped on to a silver cardstock scrap and heat embossed it with a metallic light purple WOW embossing powder. I trimmed this down.

When it came time to build my card, I layered my dark watery sheet over a light purple card base. TIP: I like to buy card bases and envelopes in bulk from box stores when I find them on sale, this saves my energy so I'm not constantly cutting and scoring card bases. Once the card front was adhered to the card base, I glued the "sorry" layers toward the top center of the card. I added a strip of Thin Double Thick Foam Tape to the back of my "I've been crabby" sentiment strip and positioned it under but crossing into the "sorry" layers.


I added my king crab to a mini wobbler to give him a fun little interactive element and positioned him towards the center(ish) of the card. To finish the card, I added the shells that I had previously colored up and a few clear sequins.

Here is a short video of the crab in action!


Well, I hope that I've inspired you to check out Sassy and Crafty for yourself and look forward to seeing what you create next! 

Until next time,

R. Winn

Thursday, July 23, 2020

Pixie Dust

It's release week at Kindred Stamps and I have 3 cards that I am so excited to share with you! 

My first card shows off the new Pixie Dust Slimline Stencil paired with the Kindred Stamps Happily Ever After Glitter Gloss. I used Pixie Spray to hold my stencil down while I added the Glitter Gloss which allowed me to easily reposition the stencil from the top edge to the bottom edge. 

I used Catherine Pooler Blue Suede Shoes ink to stamp a sentiment from the new Pixie Dust stamp set and placed it in the center of the trails of pixie dust. 


For the adorable fairy from the Pixie Dust stamp set, I colored her up with Copic markers and added blue Wink of Stella to her wings which made them SO sparkly! I stamped out the "I believe in you" sentiment onto dark blue paper, and heat embossed it with gold embossing powder. Then I added the "pixie dust" above that and mixed a sparkly embossing powder with WOW Opaque Bright White powder. I positioned my fairy over the dust.


Next, I started to build my TV using the amazing new TV Time Die from Kindred Stamps. I began by blending brown ink over a burgundy piece of card stock to darken the paper to a "cherry wood" color. Then I used a darker brown ink smudged into a Tim Holtz 3D Woodgrain Embossing folder and put it through my die cut machine. I was REALLY happy with the end results.

Next, I used roughed up some gold foiled paper to make it look aged. I used this for the "dials" and other details of the TV. For the TV antenna, I pushed the ball end of the i-press in small circles on the back which made the paper kinda rounded like an old timey antenna! I went a head and repeated that process the entire TV, 


I wanted this to pop up on the inside of the card the i-crafter Hello Sunshine wiper die and mounted the TV to the front of it.


Next, I used these two adolecents from "Pixie Dust" for a slimline card using the Kraftgali Stitched Scallop Slimline dies I created a starry sky using Color Burst Powders and Crafter Companion glittery watercolors for them to fly off into.


For my last card, I paired the Kindred Stamps Dragon Scale Stencil with the crocodile from the Pixie Dust stamp set. To start, I dry embossed a bright green cardstock using the Dragon Scale stencil, then ink blended 2 darker shades of green over top.


I colored the crocodile from the Pixie Dust stamp set using Copic markers and put him on a circle die cut from The Stamp Doctor. I layered this over a 1.75" strip of dark brown that I had heat embossed "after a while crocodile" from the Pixie Dust stamp set.


I wrapped a bit of plain white twine around the brown strip. To finish the card off I used a few Hazelnut DoubleClickSkittles sprinkled across the stenciled scales!

The entire Kindred Stamps July release will be available Friday, July 24 at 8am PST/11am EST.  Be sure to subscribe to the Kindred Stamps blog to see a daily line up of sneak peeks from our amazing Design Team and see the full product release on Friday!  Come join the Fan Club and release event to be part of the release fun, and you may just win some Kindred Stamps credit!!

I hope you enjoyed my cards as much as I enjoy this set! See you next time.

~R. Winn

Monday, June 8, 2020

Scrap buster with i-crafter Hummingbird Happiness

Hello friends!

I have a card up on the i-crafter blog for the first time today! 

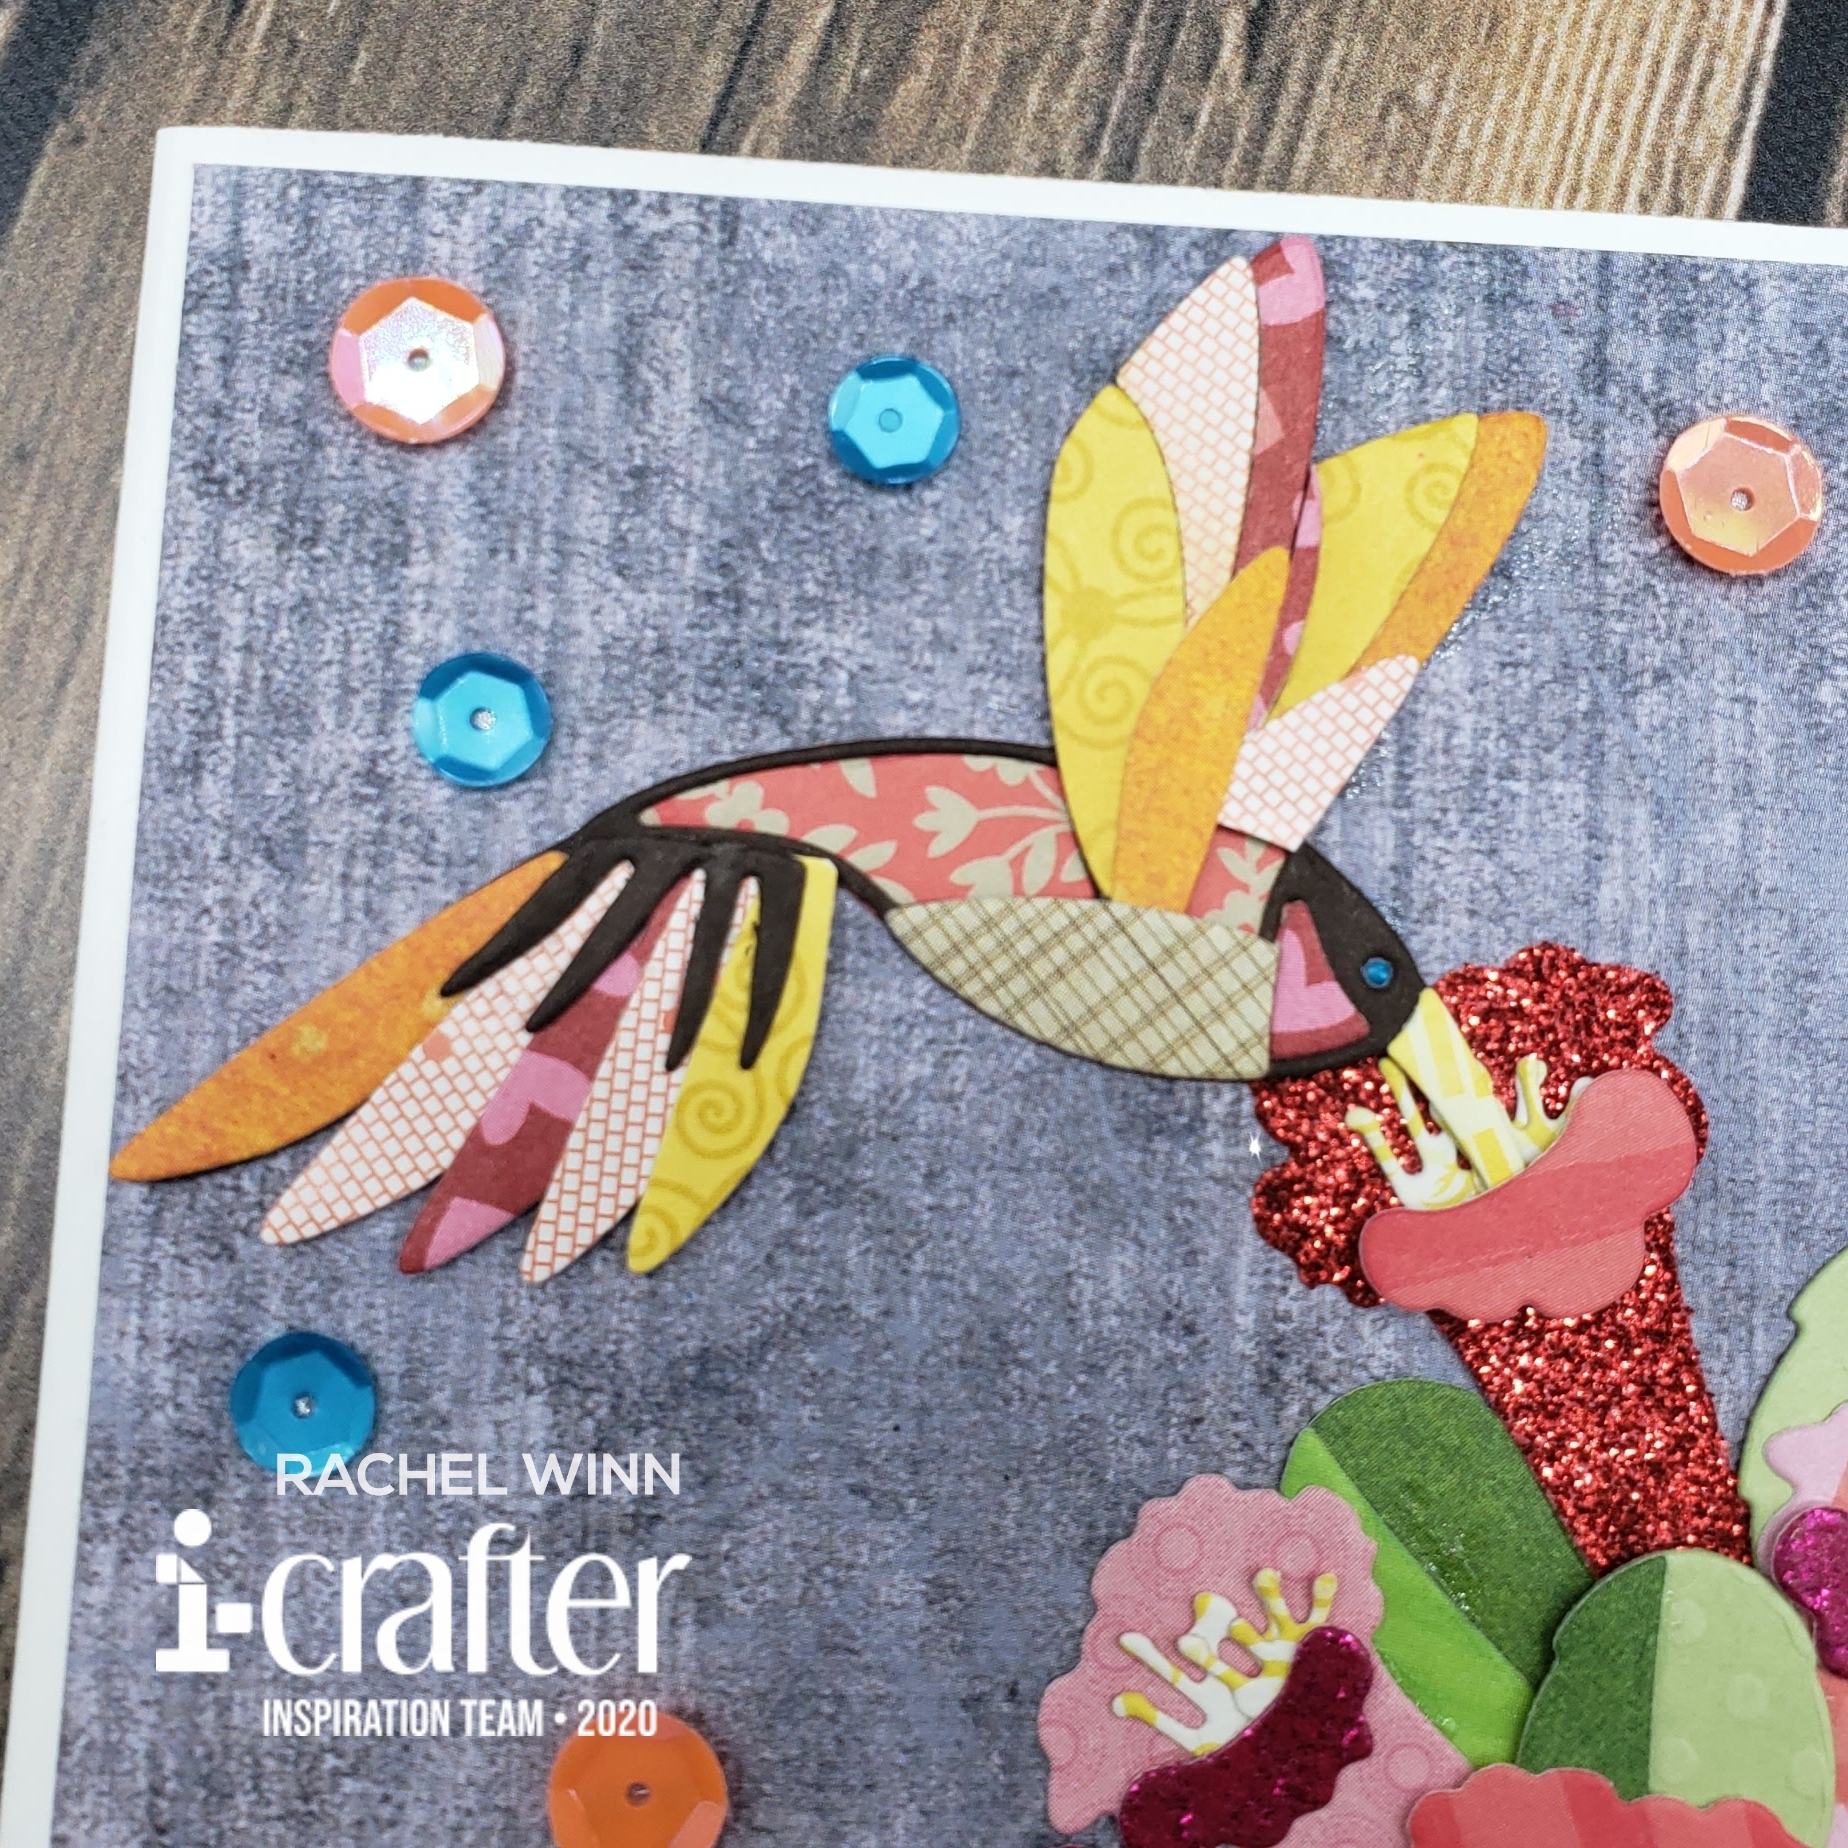
This card was a bit of a labor of love for me, using the new Hummingbird Happiness dies. I typically am more of a colorist, and don't use many intricate dies, but as soon as I saw the Hummingbird Happiness die I knew what I wanted to do with it... use up some scraps! I have these 8.5"x11" clear pockets FULL of scraps, organized by color of course.

I started by pulling down the Patterned Paper scraps that I have, because I find ways to use the solid colors constantly, but Patterned Paper is harder for to use in general. I pulled out several pieces to decide which I liked together.  I labelled them with how I thought I wanted it all to go with sticky notes.
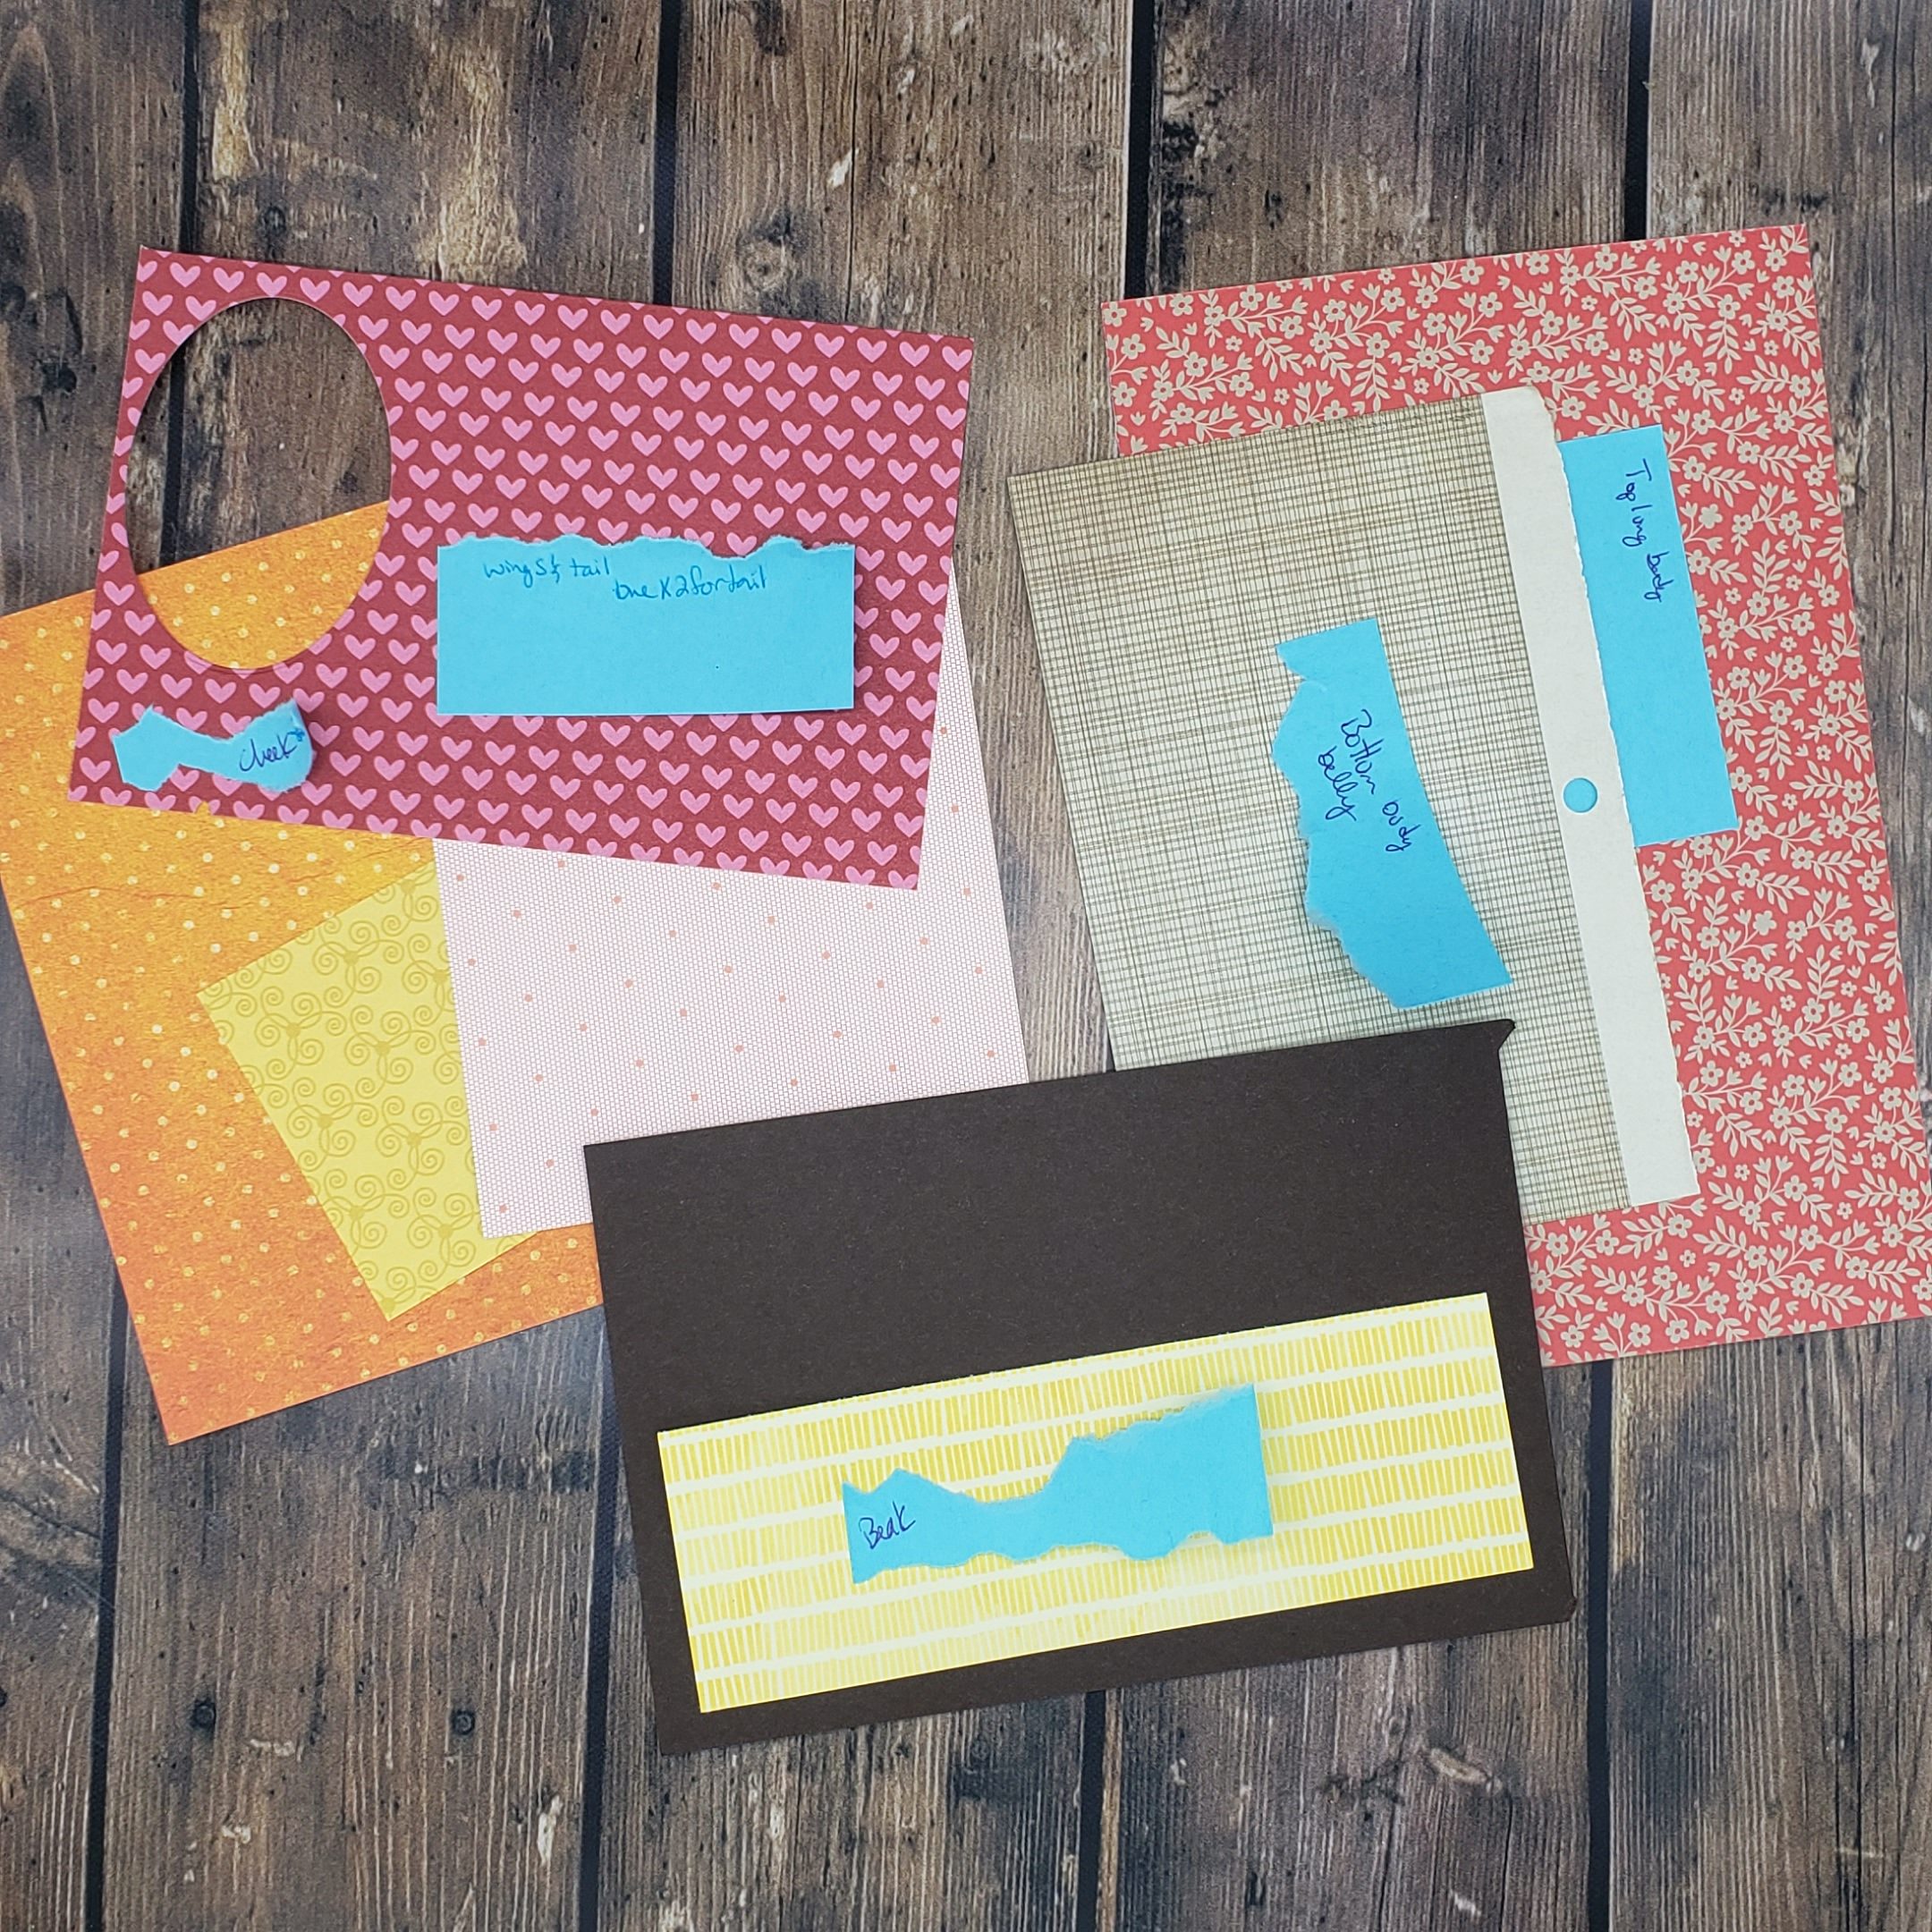
20200604_110241

After I was happy, I started to die cut. This set takes a lot of cutting. I ended up pulling my mini die cutter out after a bit so I didn't have to keep getting up and down. HA! I inevitably still ended up needing to do more cutting to have all the pieces necessary. 
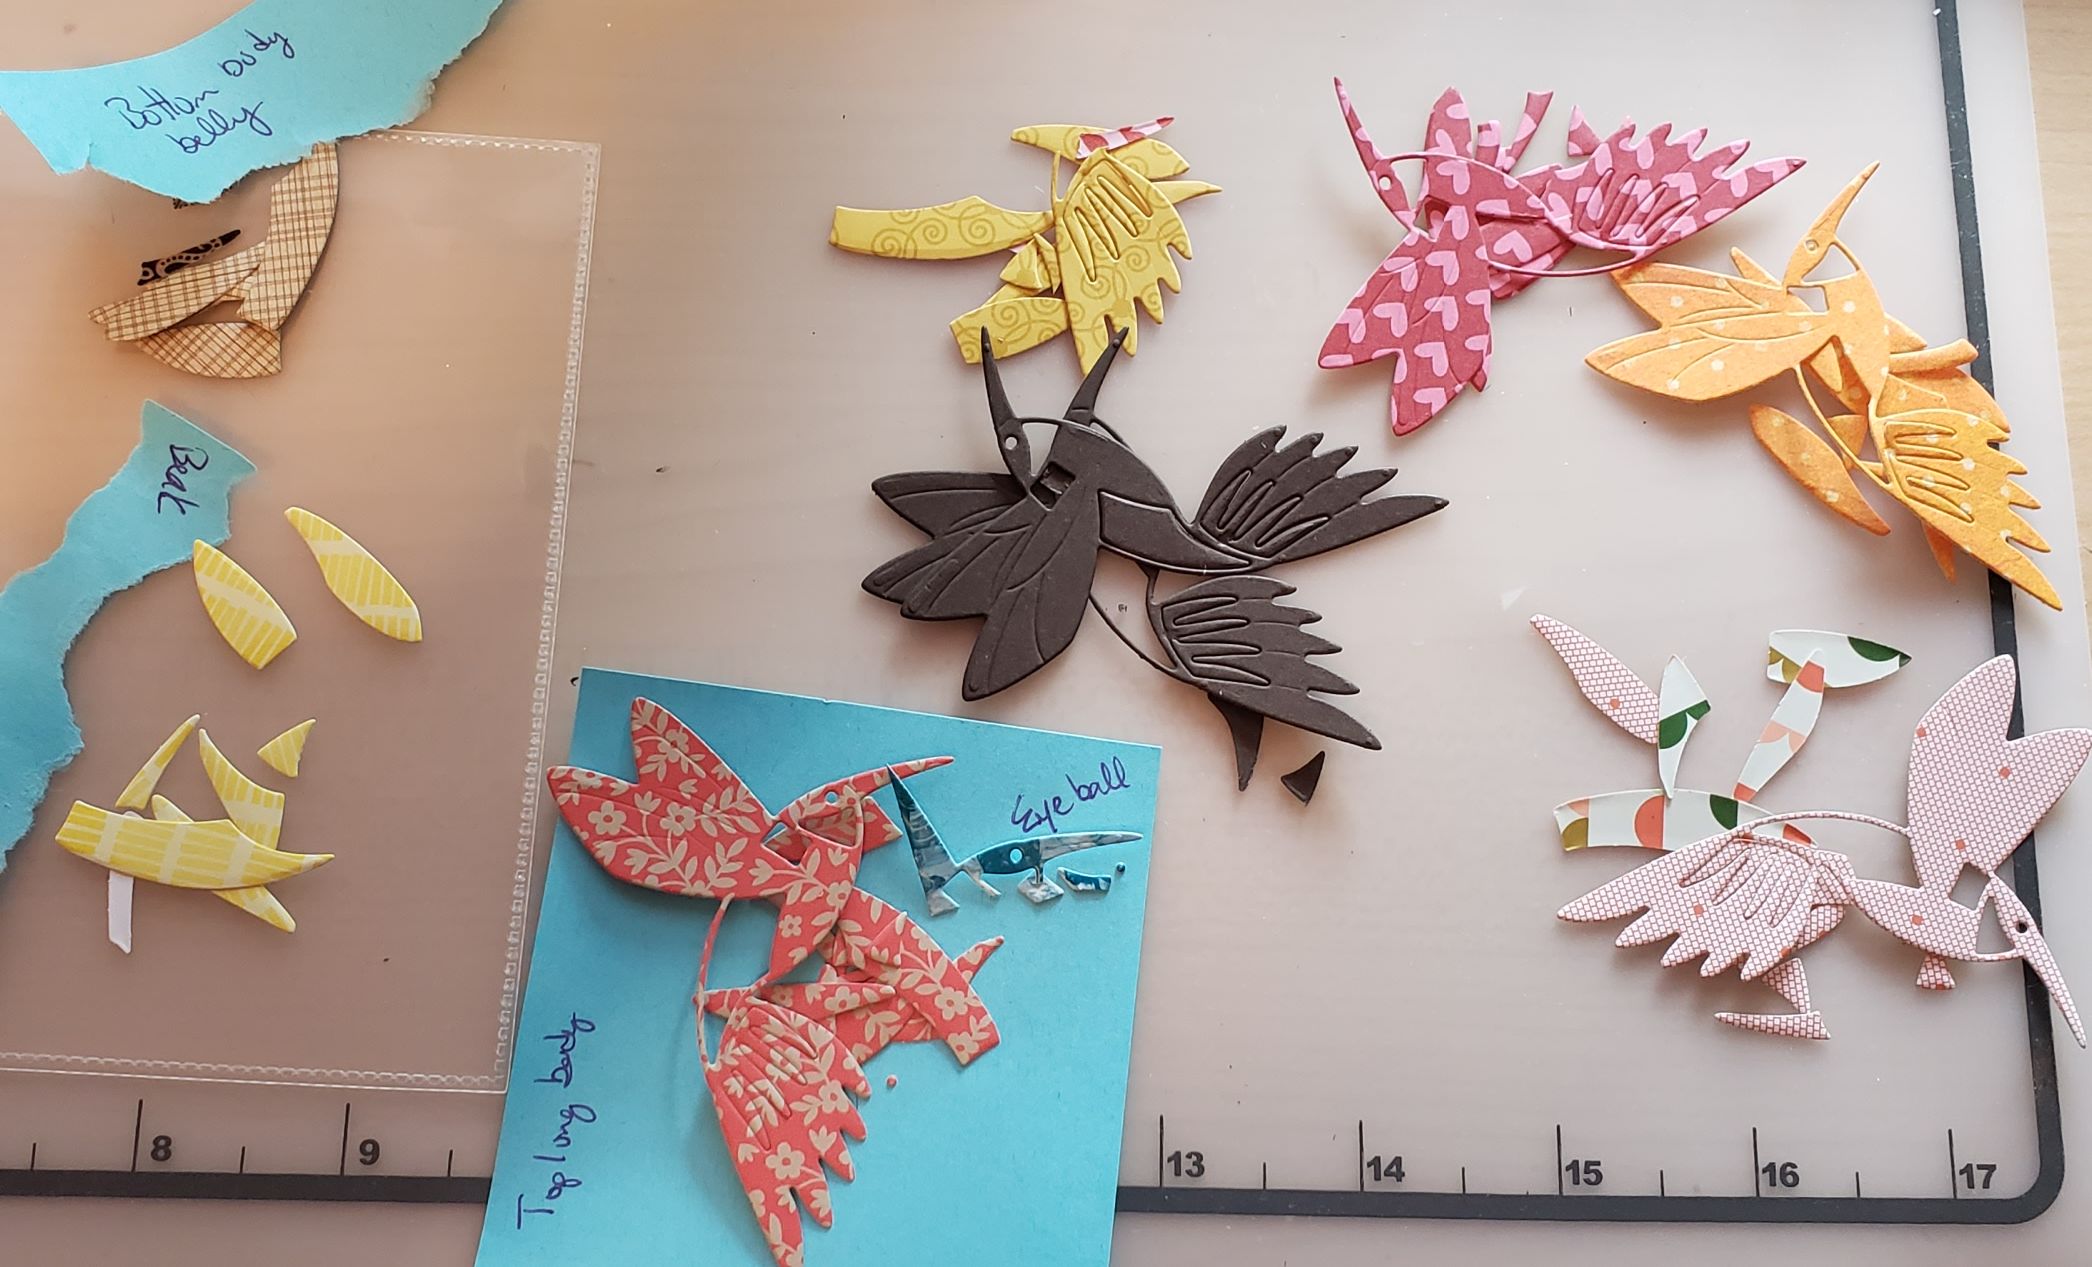
20200604_124134 (2020-06-06T19_24_11.634)

I followed the picture tutorial for Hummingbird Happiness because complex dies are NOT my forte. Starting with a wing, and building from there. I am not one for worrying about does this side match that side, because in nature, the same color may not be in the same place.  
received_3185441498143143 (2020-06-06T19_37_04.137)

Next, I die cut a million (ok, that's an exaggeration) little trumpet flowers and leaves out of more scrap paper. For the flowers, I focused on pinks and reds, using both patterned and glitter papers. For the leaves, I used more solid or stubble patterns. 

Then I built. I cut down a large piece of purple scrap paper that started as a scrapbook paper for the background, took my hummingbird and one of the flowers that I had used foam tape to have the front petal lifted and stuck his little nose INTO the flower. I layered the leaves and flowers to created kind of a garden or bush look with the flowers. 
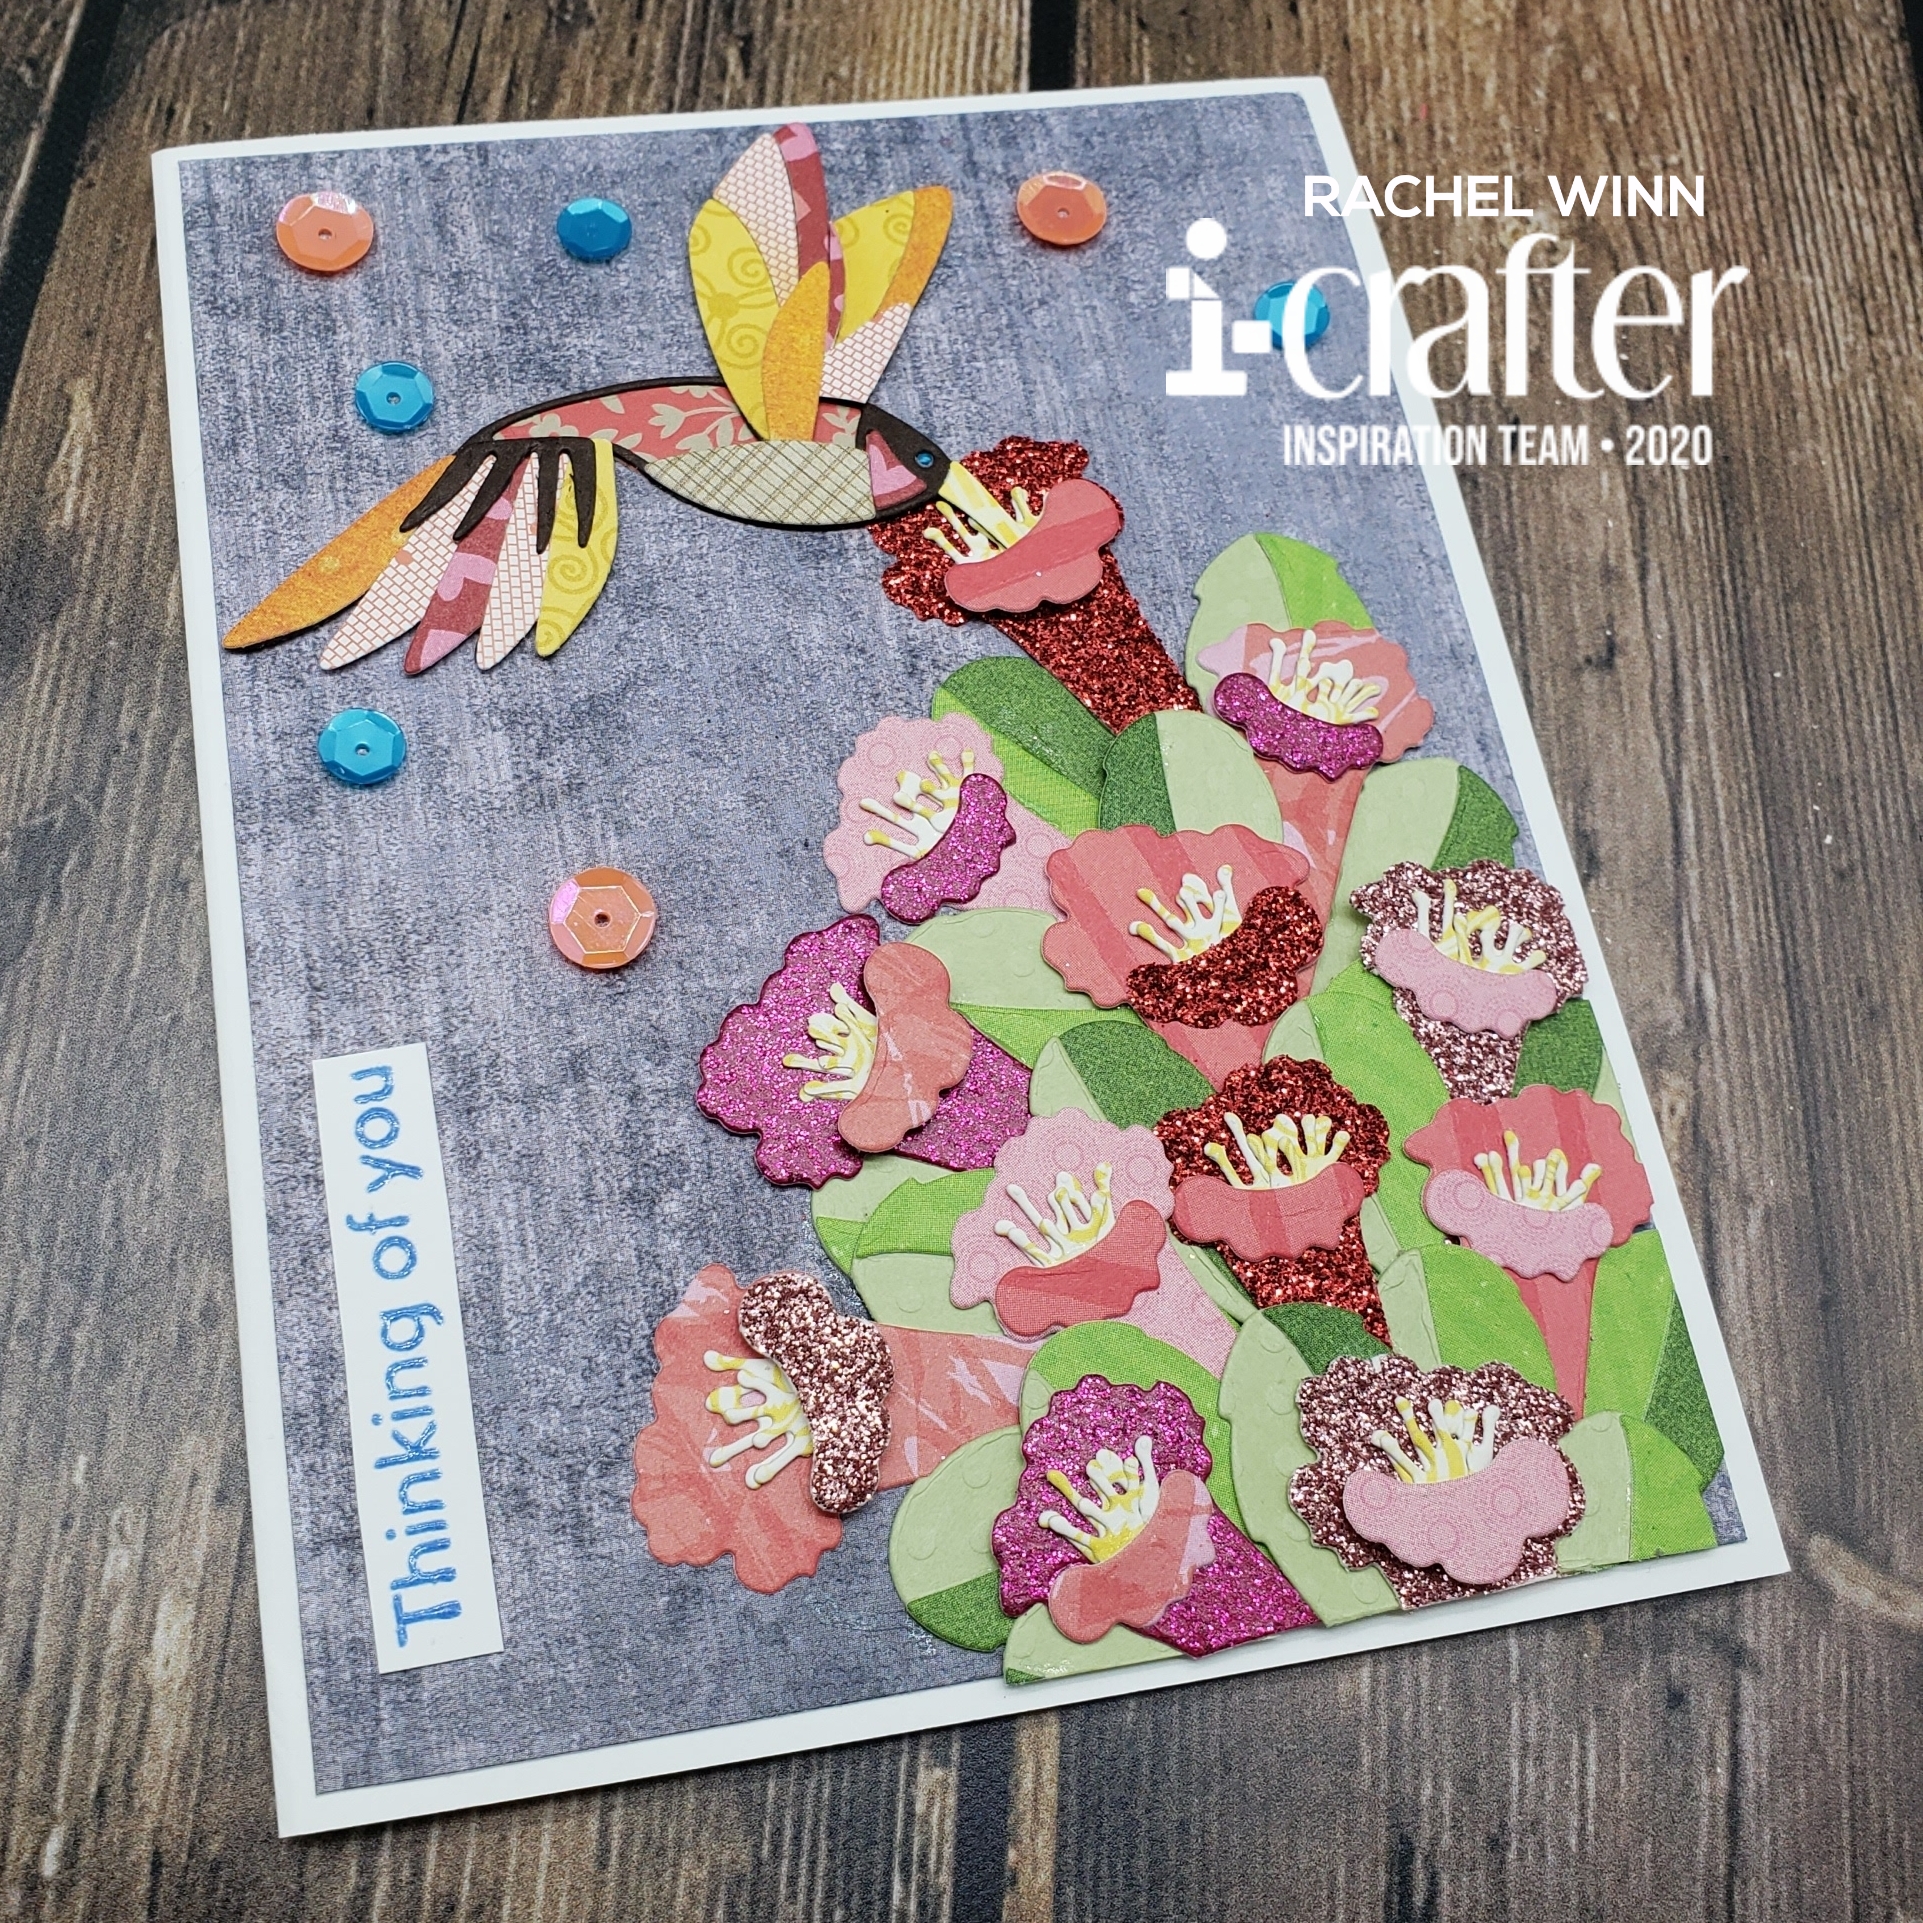
LogoLicious_20200606_102532

I kept my background handy and made sure that as I layered, the flowers stayed on the card base.  At the end, I trimmed just a few flowers and leaves on the bottom and right side that flowed over. I was ok with that since I didn't want it to look like the flowers just ended.
LogoLicious_20200606_102135

I stamped "Thinking of You" from the Scattered Thoughts Sentiment Stamps in Skysail Blue Hybrid ink using my Mini MISTI and heat embossed it using clear embossing powder. This was glued in the bottom left corner, then I added a few orange and blue sequins.  

I hope that this has given you some inspiration and that you will grab the Hummingbird Happiness dies, Scattered Thoughts Sentiment Stamps, and the Skysail Blue Hybrid Ink.  I can't wait to see what you make with them, come join our i-crafter Facebook Fan Club to show off your own scrap hummingbirds!

If you want to see more from me, my instagram is HERE, and my Facebook page is HERE!

You will get to see another project from me here on the i-crafter blog later this month!

~R. Winn 

Monday, October 21, 2019

Full of Pride

Hello again friends!

I'm so excited to share my cards using Kindred Stamps new "Full Of Pride" stamp set! This set is all about love and Gay Pride, it makes me happy. I honestly could keep playing with it, and if I had more time, I probably would have.

My first card that I just had to make, used the "Love is Love is Love" sentiment, which was inspired by my friend Kelli's ideas. I began by picking a paper to use, I chose a sheet from Sunny Studio's Rainbow Bright paper. The hearts felt ideal for this card. I used The Stamp Doctor Nested Oval Dies and Stitched Oval Dies to create a space for my sentiment and then stamped using Stazon's Purple Pigment Ink.


I finished it off by using Nuvo Dream drops on a few of the hearts, which don't show up well on the picture but give a little shimmer in person.

Next, I made a card for a "Mr. & Mr." wedding! I wanted it to make it super classy so I went with a white and silver color scheme. I started by using Gina K Designs Foil Mates in Elegant Damask and Silver Therm O Web Foil. 

I added a strip of solid white ribbon on the lower part of the card. Then I layered that onto a silver cardstock and then a white card base.


I heat embossed using WOW Bright White powder and Ink on 3's Embossing Ink onto more silver cardstock that I die cut using a stitched rectangle, that I layered onto a white piece of cardstock.

Clearly, I also needed a Mrs. & Mrs. wedding card too! I used the other pattern from the Elegant Damask Foil Mates and gold Therm O Web foil this time. 

I had a card base from a Michael's pack that had a foiled edge that I layered my foiled damask onto. I used some Love From Lizi black Peel Offs and added a few on two opposing corners to give a bit of a framed feel.


I have a bunch of random pieces from different kits over the years and that includes some foiled gold envelope liners, I cut one down and stamped my "Mrs. & Mrs." onto it and used Recollections Detail Black Embossing powder and Ink On 3's Embossing Ink to heat emboss with. Finally, I backed that with some black cardstock and popped it onto my card.

I hope you've enjoyed my cards, I have loved making them. There are two others that I didn't blog about but you can find them in the Kindred Stamps Release event! Make sure you drop a comment here to be entered into my $10 Kindred Stamps Gift Certificate drawing, in order to enter, make sure you include your email address!

The entire Kindred Stamps October release will be available Friday, October 25th at 8am PST/11am EST. Be sure to subscribe to the Kindred Stamps blog to see a daily line up of sneak peeks from our amazing Design Team and see the full product release on Friday! Come join the Fan Club and release event to be part of the release fun, and you may just win some Kindred Stamps credit!!

~R. Winn

Tuesday, August 27, 2019

Time to Celebrate with Kindred Birthday!

Hi friends! I absolutely love this new set from Kindred Stamps!  We felt like we needed a good birthday set, enter "Kindred Birthday".  This is a 6"x8" set that has something for everyone. 

I decided to throw Audra a birthday party with Molly and Evan for this card.  I stamped these three friends out using my Catherine Pooler Midnight ink. I wanted to create my own background, so I left them on one piece of cardstock rather than cutting them out.  They were colored using Copics and Spica markers, then accented a bit using Wink of Stella.  My background is simple using Copics. 


For my sentiment, I decided to use two from "Kindred Birthday" instead of just one. "Happy birthday" is heat embossed using WOW purple embossing powder.  Next, I used "Not A Day Over Amazing" down below my peeps, this was heat embossed using WOW Opaque Bright White embossing powder.  I added a few Studio Katia Iridescent Crystals throughout the card to accent and give something to catch your eye.

I layered the card front onto a piece of retired Stampin' Up DSP that has a fun candle pattern. Lastly, I put all of this on a white cardbase.

I hope you've enjoyed my take on "Kindred Birthday" make sure you leave a comment that includes your email address to be entered into my drawing for a $10 Kindred Stamps Gift Certificate! I will draw for a winner on September 3rd! Be sure to check out the rest of the team's blogs for more opportunities to win some Kindred spending money!😉

The entire Kindred Stamps August release will be available Friday, August 30th at 8am PST/11am EST. Be sure to subscribe to the Kindred Stamps blog to see a daily line up of sneak peeks from our amazing Design Team and see the full product release on Friday! Come join the Fan Club and release event to be part of the release fun, and you may just win some Kindred Stamps credit!!

See you later gators!
~R. Winn


Monday, July 22, 2019

Nuts About You

Hello again friends! I'm back with the newest Kindred Stamps release! Today, I have 3 cards using "Nuts About You" which will be available on Friday, July 26th at 8am PST/11am EST.  This 3"x4" set features two adorable chipmunks, and some punny sentiments that make me happy!

I used Ink On 3's Fade-Out ink with my MISTI to stamp out two pairs of these little dudes. Then I colored them with Prismacolor Colored Pencils. I am absolutely smitten with how they turned out.

My first card features the sentiment "I'm nuts about you". I picked one of my little guys and built the card around him. First, I went ahead and heat embossed a strip of acorns on pink cardstock using Brutus Monroe Sand Castle powder. This was cut down to a thin strip and layered it onto a piece of Stampin Up Crumb Cake cardstock for my card base. On the base, I heat embossed a little "Aww" using a Lindy's Gang pink powder, below where I wanted to put my chipmunk.

 I used the new Kindred Stamps Sunshine Glitter Gloss on white cardstock over the Kindred Stamps Hearts and Dots Stencil to create a textured patterned paper. I cut out pieces of this using a set of The Stamps of Life heart dies after it had dried. I layered these around the card using foam tape and Therm O Web Ultra Bond glue. 


To finish this card up, I layered the base onto a bright yellow cardstock that matches that Sunshine Glitter Gloss to form my card, I really like using colored cardstock for cards, I feel like it's a nice change from the typical white. For my sentiment, I heat embossed "I'm nuts about you" in the same Sand Castle embossing powder on the same pink cardstock as I had done the acorns. I layered that onto a piece of the yellow cardstock after die cutting them both to create a little layered banner. Finally, I placed the chipmunk in the midst of it all for him to shine.


My next card didn't turn out exactly how I had hoped. I wanted to create an alcohol ink background and use Ink Lift to pull up acorns in the background. Unfortunately, I'm not an expert with alcohol inks and ended up layering it too thick for this to work well! So, instead, I cut my background down into three smaller squares. I layered these onto a piece of Echo Park's Fall paper pad. I arranged the squares over a strip of gold glitter cardstock so it just barely peeks through with a bit of shine. 

Next, I used Alcohol Lift-Ink to pull up acorns and then stamped them onto white cardstock. I created a little stack of them creating a background. These look faint in the photo, but in person, they look great! I put all of this onto another piece of the same Echo Park paper, I just flipped it over so the other side's pattern showed instead of the cool blue.


 I love the buildable sentiments in this set, they are fun, and a bit punny, which is completely my sense of humor! "Sorry for driving you nuts" was my pick for this card, I stamped it onto a banner from an old card kit. Last, I put my little guy on a piece of brown scrap and trimmed around him to create a border, I placed him off to the side a bit so you could still see the acorn stack. 


My last card, is my favorite! I wanted to work in the Christmas in July concept. I used both chipmunks for this card. I started by stamping a tree from an old Stampin' Up set in Catherine Pooler Sage ink on to a piece of patterned paper from Echo Park. I added a few rhinestones to the tree for decorations, some I left clear, some I colored using a blue Sharpie, I feel like they look like little crystal ornaments. I used a Uchida Snow Marker to create a thin layer of snow on the ground below the tree.

I placed a chipmunk on either side of the tree, added some adorable Santa hat stickers from Michael's, and then the Candy Cane die set from The Stamp Doctor to place a candy cane in each of their hands.


Next, I stamped the family sentiment onto a tag from an old card kit using Catherine Pooler Samba ink. I strung the tag onto a sliver ribbon, and added a few large glue dots to the back of the tag to hold it in place. I wanted to add "Merry Christmas" to the card so I used The Stamp Doctor's new Tiny Alphabet dies to cut the letters from a piece of glitter cardstock that I ink blended Samba onto and arranged them on the other side of the tree.

My final touch was a layer of Wink of Stella clear onto the snow to add a bit of sparkle to the card! The card turned out better than I had originally imagined it, which doesn't happen often for me.

Now, be sure to leave a comment including your email address, I'd love to know which card is your favorite! I will be drawing a name from everyone who comments, the winner will get a $10 Kindred Stamps store credit. Make sure you check our entire team's blogs because they each are going to give away $10 store credits too!

The entire Kindred Stamps July release will be available Friday, July 26th at 8am PST/11am EST. Be sure to subscribe to the Kindred Stamps blog to see a daily line up of sneak peeks from our amazing Design Team and see the full product release on Friday! Come join the Fan Club and release event to be part of the release fun, and you may just win some Kindred Stamps credit!!

Thank you so much for visiting me today, I will see you again soon!
~R. Winn


Thursday, November 15, 2018

Adventures Abroad Continues, In Italy!

Hi friends! I hope you've enjoyed the Beth Duff Designs Winter Release so far! I get to share the newest in the Adventures Abroad line, Italy. I absolutely adore this line, and this newest set is a fantastic addition.

I was shown a tutorial about for a card that was super 3D with floating floor. I started by creating the background using a MFT brick stencil, two gray Distressed Oxide inks, and Tonic Expanding Mousse.  In the future I would cut it down to be smaller than the cardbase like a card front layer would normally be, but this was still a bit of trial and error for me!


The floor is cardstock cut to 4 1/4" x 6 1/4" and is scored at 3/8", 4 3/8", and 4 6/8". The short score ends up attaching to the back wall, while the longer end is used at the front of the card. I used a Pen Blade to cut small pieces out of the floor where I wanted my pieces to stand. 


I chose to use 4 pillars, 2 scooters, and of course, the chef! They were colored using Copic markers. I can't remember all of the colors I used, but the pillars are W-1, W-5, and W-7! They are standing up by using small paper "L brackets", to create these I cut several small strips of cardstock and folded them in half. I glued them to the underside of the floor first, then the back of my pieces. 


I staggered the pillars, then I put the scooters in front of the back set. I wanted my chef front and center. I finished my card off using the "Grazie" sentiment, which I love the font of! I heat embossed this in a Wow Gold Pearl powder.


As a bonus, I made a bookmark, I used the small pieces from the set in different light colors, stamped at random. Next, I stamped my favorite sentiment from the sent in black VersaFine Clair ink. I finished this quick project off with a light blue ribbon, knotted simply at the top.

I hope you've enjoyed my take on this set, and cannot wait to see what you make with it! If you want to see more of our team's creations, you're always welcome to visit the Beth Duff Designs blog! Make sure you join us at Unicorn Crafts on Facebook to share your own projects, and see a bit more of all of us, and of course, like the Beth Duff Designs page to see when new and exciting things are happening.

And don't forget to go shopping with Beth Duff Designs!

~R. Winn

Tuesday, October 23, 2018

Magical Friendship Week

Good to see you again! I'm so excited you're joining us for the Kindred Stamps & Witt and Sass Stamp Company "Magical Friendship Week" Collaboration! Our teams have put together some absolutely magical cards for you and today, I get to share mine!

I used the lion from Witt and Sass's Magical Creature stamp set and colored him up with Copics. He is paired with a boy and owl from the Kindred Stamps Student's of Magic stamp set which are also colored with Copics. For the owl, I used very little color, but did chose to dot the wing and a few other small sections to imitate a Snowy Owl. 


Next, I used a retired stencil from Clarity Stamps of a gnarly tree with a square from to create a background. I used Catherine Pooler inks for the grass and sky, from bottom to top, the colors are Eucalyptus, Skyline, Juniper Mist, Black Jack, and finally, Midnight. After lifting the stencil, I did go back and blend some color into the square frame of the stencil to diffuse the bright white that was left behind.

I didn't love the tree being white either, so I took two shades of brown Distress Crayons and colored it in, after coloring it in, I used a dry paint brush to kinda blend the colors together and soften the look. I placed my owl on a tree branch, and the lion and boy in the grass below. To add depth to the card, I glued to owl down with Tombow Mono Glue, but used dimensionals to pop the boy and lion up a touch.

I absolutely love this sentiment from Students of Magic, so I had to use it. I found an off white paper in a Graphic 45 stack to heat emboss the sentiment on to. I used a Lindy's Gang embossing powder (seriously fantastic powder!!) Looking through my die cuts I wasn't finding a shape or style that I loved so I opted to just fussy cut around the sentiment. 
I mounted my card face onto a sheet of patterned vellum that looked like stars, then mounted them both to a purple card base. To finish the card off, I added a few sequins from the Kindred Stamps Galaxy Shaker Pack

Hopefully, you've enjoyed my project, and hopefully you go pick up a few magical stamp sets of your own. I feel so lucky to have become friends with Audra of Kindred Stamps, and Amy of Witt and Sass Stamp Company. These are kind, genuine women who work their hind ends off to deliver exceptional products to their customers. I'm proud to have the chance to work with each of them, and truly value having both of them in my life.

I want to invite you to become part of our communities, you can join the Kindred Stamps Fan Club and become a Sassy in the Witt & Sass Stamp Company Facebook group. Make sure you check out all of the products that both Witt and Sass and Kindred Stamps have to offer as well! We can't wait to see what you make!

Thanks for stopping by,
~R. Winn

Tuesday, July 24, 2018

You Slay Me

Every once in a while, I get a stamp set that makes me feel like a giddy teenager who lives off of soda, sitcoms, and any food I can find (had to fill that hollow leg!) Well, now my leg is no longer hollow and I can't drink soda without getting sick, but I still love a good sitcom!

This month, I received "Slay" from Kindred Stamps's July Release to showcase! This set takes me back to when vampire hunters and their friends could entertain me for hours.


My first project, I decided to go a bit Goth. I used a Sizzix embossing folder and dry embossed a sheet of grey cardstock. Next, I ran Ink On 3's embossing pad over the embossed paper and used Brutus Monroe's Ebony Embossing Powder to heat emboss the dry embossed sheet.


I colored my vampire hunter and her boyfriend (who happens to be a vampire!) with Copic markers. I've really been working on coloring blonde hair in more realistic shades, fewer yellows, more earth tones. I built a scene using some Halloween die cuts, the creepy tree and the gravestones really felt right for me. To finish the card, I used a die cut from Stampin' Up's Project Life set and picked out this perfect sentiment which was heat embossed with Brutus Monroe Alabaster powder.

My next project, I used my characters in planner, I kept it simple with just some washi tape between days, the characters and a few star stickers.


It is clean enough to see what I have on my plate, but still makes me smile when I see it!

Last, I had to showcase the hunter's sidekicks. Sidekicks come in all shapes and sizes. Sometimes they are mentors that are always willing to step in and help kick butt, sometimes they're your best friend who may look sweet and innocent, but will shank a vamp to keep you safe.


I used some Graphic 45 paper that I received from a friend for the background. I found some pretty orange twine and another patterned paper that was orange to build my layout, the sidekicks went on Stampin' Up Layering Square die cuts. 

I pulled the other banners from the Stampin' Up Project Life die cut pack and used them for the sentiment. You know that my favorite sentiments are buildable, this set does not disappoint on that front! Catherine Pooler's Manderine Spice ink matched the oranges on the card already, so I used it to stamp out the sentiment.

The sets from this month are a bit of a throwback, and we hope you enjoyed the trip down memory lane with us. The Kindred Stamps team, myself included, hope that you've enjoyed reading about my card makes for this release. 

If you would like an opportunity to win shop credit please go and comment on everyone's blog post! One random winner will win a $10 shop credit, they will be contacted privately and announced in our Fan Club, Kindred Stamps Fan Club!


R. Winn Creates (You are Here!)

Until next time,

R. Winn

Saturday, February 17, 2018

Spoonie Squad

So, if you don't know me well, you may not know that I am a "Spoonie". I have Fibromyalgia, simplified this means I suffer from overactive nerves, anxiety, depression, migraines, stomach problems, mid to extreme pain at any given time... the list goes on. Audra at Kindred Stamps, (that's my referral link, you'll get 10% off your first order and I will be rewarded too), was excited to create a stamp set to celebrate and give voice to myself, and those like me, the Spoonie community. "Spoonie" is a term used by those of us with chronic illnesses, chronic pain, and limited energy.

"Spoonie Squad" was released by Kindred Stamps last month, and it features an excellent assortment of sentiments, spoons, and a couple little leaves. I created 4 cards myself for the release.


First, I used silver embossing powder and the four unique spoons to create a border on both the top and bottom of the card, next I chose the sentiment. I felt like this one was a great celebration for my friends who suffer like me, I kept this card in cool colors, silver, white, and a little turquoise.  

My next card, I used the Tim Holtz Distress Oxide Inks and layered the colors light to dark to create a simple, but beautiful background. I felt a bit snarky, so I thought "you can just fork off" was perfect here.  I sandwiched the saying between two silver spoons.


Typically, I find myself doing a lot of layering but I wanted to keep this one simple so I used a corner punch to add a touch of elegance and finished it with dimensional tape to make the featured part pop from the base.

My next card, again, I kept simple but used more layers again. The black background makes the red and touches of green and silver pop. I used a single spoon with this sentiment to make the impact that much more powerful. I wanted to show off the leaves and put it in the corner.


My last card was a little more work. I chose a nice green base and used these beautiful roses from So Suzy Stamps to create a pretty little card. I colored them in using Copic and StyleFile Markers by Brutus Monroe.


I felt like the glitter tape behind the sentiment makes the impact of the sentiment a little better. This sentiment is super powerful for me. My anxiety, energy, and pain levels are always putting a kibosh on my plans. My friends and family always seem to have to move on without me.

It's been a while since I was able to create a blog post just because I wanted to. I am SO happy that I was able to finally get these up for all to see! My disease means a lot of missed events, laying around in pain, trying all sorts of medicines, both homeopathic and prescription, little to no answers, glares from people that think I'm faking, concerned looks from strangers, and so much more. I am beyond grateful to have crafting in my little world. Being able to create something beautiful makes my life qualify infinitely better, the friends that I've made in this community, and the friends I've brought to this community keep me going even on the hardest of days.

I hope you've enjoyed this post and please remember that not all disabilities are visible, you can't the pain some people live with daily.

~R. Winn