Wednesday, January 11, 2023

Catherine Pooler Love & Lace Release!

 Hi friends,


It's been quite a while since you've seen me! My creativity took a hit when my depression spiked, the new Catherine Pooler sparked my creativity and I couldn't be more excited to show you what I created!


Today's card was inspired by the Roses are Red Stamp Set. I love this layering roses set, it's difficult to mess up honestly. I decided to stamp out 3 of the roses and several of the stems and leaves to create a pretty bundle then fussy cut them out, I recommend that you get the die set though since this was a little tedious!


Ink Colors used:

Rose Petals

Rouge

Garden Party

In the Park

Mardi Gras

Sage

Eucalyptus

Midnight


I used the Double Duty Circle Dies to cut a circle in a rosy pink cardstock, the another out of white cardstock to stamp the "Happy Birthday" from the Roses are Red Stamp Set.


I taped a Halo Light to the back of the card face and centered it on the backside of the white circle and used Double Thick Foam Tape to hold the card face up when I adhered it to the card base. 


I finished it off with a few enamel dots and I think the end result is pretty illuminating! Be sure to check out the entire new release from Catherine Pooler! I hope my card inspires you as much as this stamp set inspired me!


Stop by tomorrow for another new card using the Catherine Pooler new release!

Love,

R. Winn

Thursday, November 11, 2021

Light Up Christmas Card with i-crafter Dies and Pear Blossom Press Halo Lights

 Hello again friends,

It's Rachel here showing off my take on the new i-crafter Christmas Treat Lantern Add-On die set! I wanted to light this die set up since I first saw it. Since I just did a light up lantern, I thought it would be fun to create a Christmas card instead this time. 

I started with the i-crafters's Buffalo Plaid Stencil and used Catherine Pooler's Cranberry Fizz ink over a vanilla cardstock. Next, I used the lights die from the Christmas Treat Lantern Add-On die set in the bottom center of the panel that I stenciled on. Used Catherine Pooler's Deck the Halls ink on the vanilla cardstock and ink smooshed the pad directly onto the cardstock, then used the lights die again to get the center pieces of the image. To create a yellow glow for the lights, I ink smooshed Catherine Pooler's Chiffon, a bright yellow ink onto vellum and glued it the back of the plaid panel. Once that was glued down, I added the green center pieces back into the image.

 I used the "Merry & Bright" word dies and the snowflake from the i-crafters's Holiday Dovetail Card die set to decorate the card. Again, I ink smooshed Catherine Pooler's Juniper Mist ink directly onto the vanilla cardstock. I cut out the words and five snowflakes. I cut two down so that I could position them on the edges.

I then took the holly and berries from the i-crafters's Christmas Treat Lantern Add-On die set and positioned them over the button to my Pear Blossom Press Halo Lights, which is what I used to light up the card. I should have taken a picture of the back of the panel before I glued it down. I wanted something quick and easy and the Pear Blossom Press Halo Lights were perfect, they have 4 built in LED lights. I positioned the lights so they hit the corners of the box instead of positioning it straight up and down.

You cane see how perfectly the lights from the Pear Blossom Press Halo Lights worked with the box when it's lit up.

I couldn't be happier with how it turned out!

Here is a short video with the card in action! I hope that you enjoy it as much as I do!

If you’d like to see more of my projects, you can follow me here: Instagram, and Facebook page.

 
Until next time,
Rachel
 
For more inspiration, updates, and news make sure to check out these awesome places!
 
 
Thank you so much for stopping by today!

Sunday, October 31, 2021

Halloween Wreath with the i-crafter Folded Maple Leaf

 Happy Halloween Witches and Warlocks!

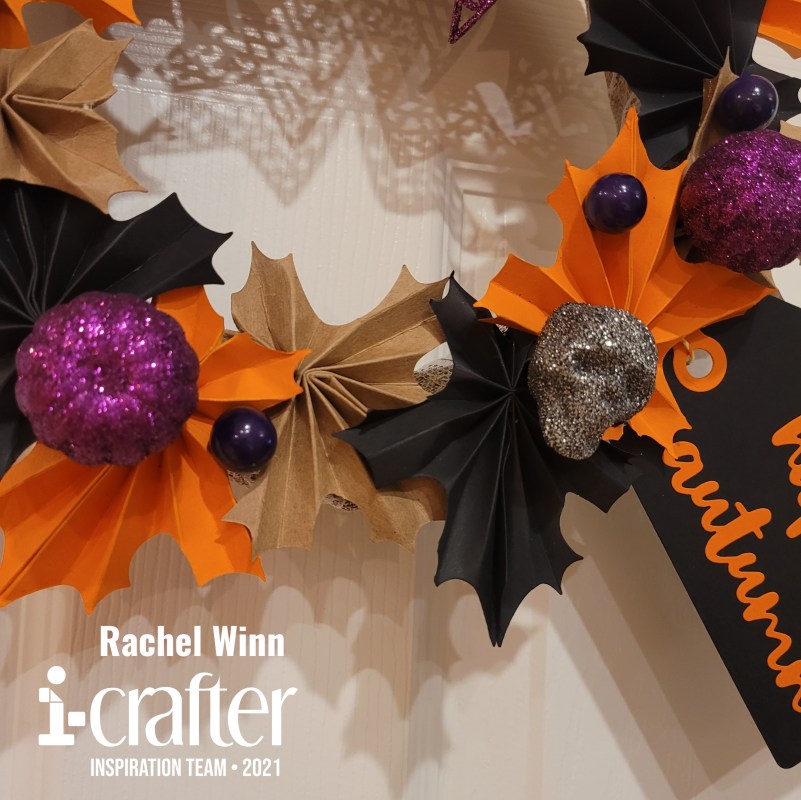
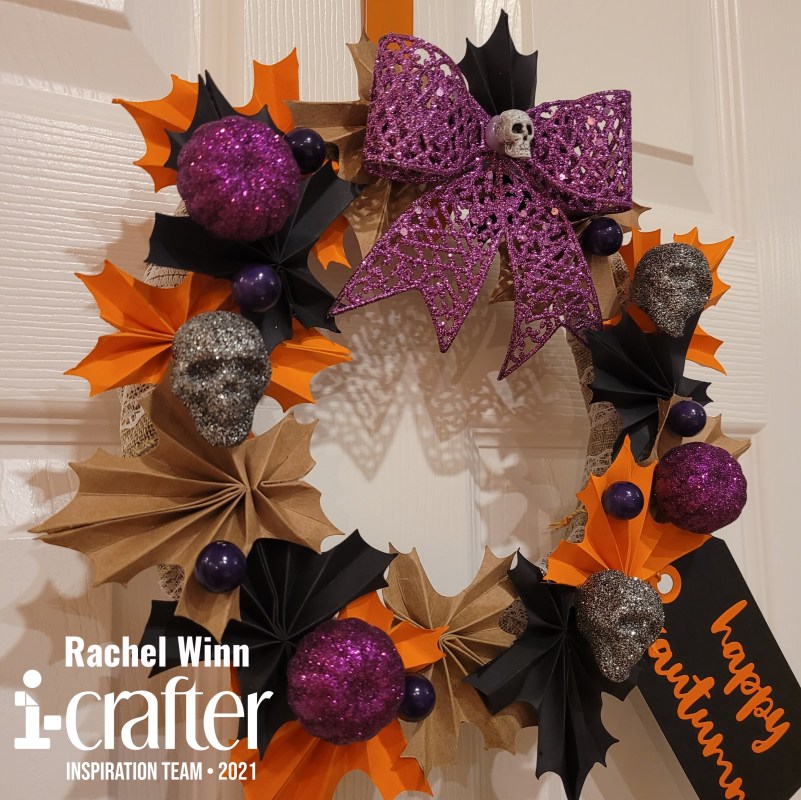
I am so excited to show you the Halloween Wreath that I created using i-crafter's Folded Maple Leaf die set and Tags and Labels die set! My best friend, Molly, and I made this project together, she helped save me time and energy by folding and burnishing the leaves using the i-Press while I die cut them, glued them, and then adhered them to my wreath frame. I used a solid black cardstock, kraft cardstock, and orange cardstock for the Folded Maple Leaves, I cut out at least 5 of each color. 


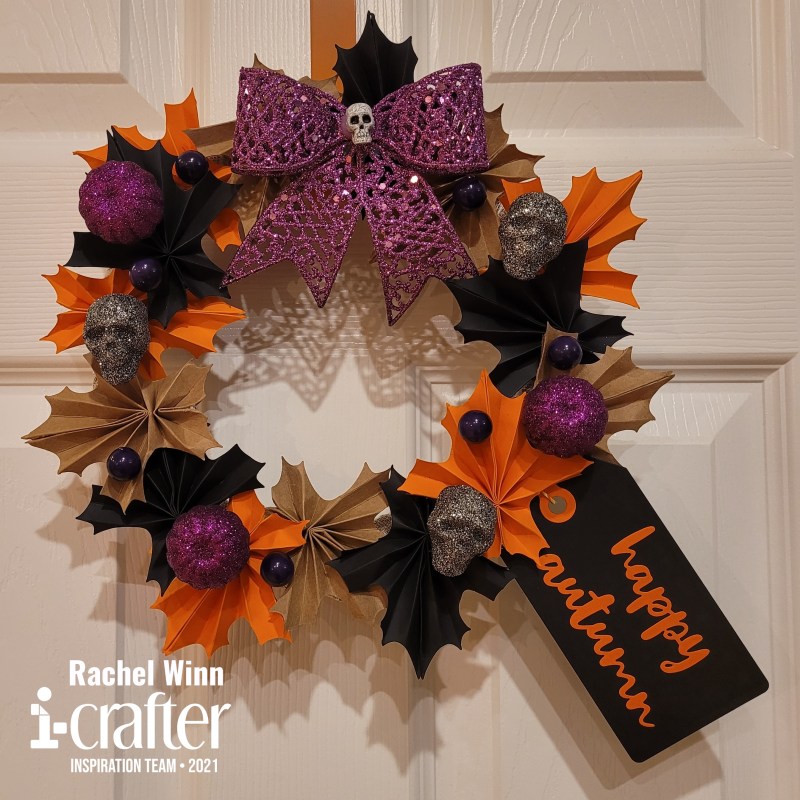
When gluing the leaves, I used a small clothes pin embellishment and a binder clip to keep the sides together while the glue dried, normally I use my i-Grip tweezers to do this job, but I had forgotten them at home when I left to visit for Molly and Evan's birthdays! 

Once I had several leaves glued together, I started to build my wreath, I used a frame from the Dollar Tree wrapped in a burlap and lace ribbon from the Dollar Tree as well. I wanted a solid base that if there were any gaps didn't look funky, no random chunks of green spoiling my project! Next, I used hot glue and glued down my leaves. I wanted to turn them every which way and overlap them as I went.

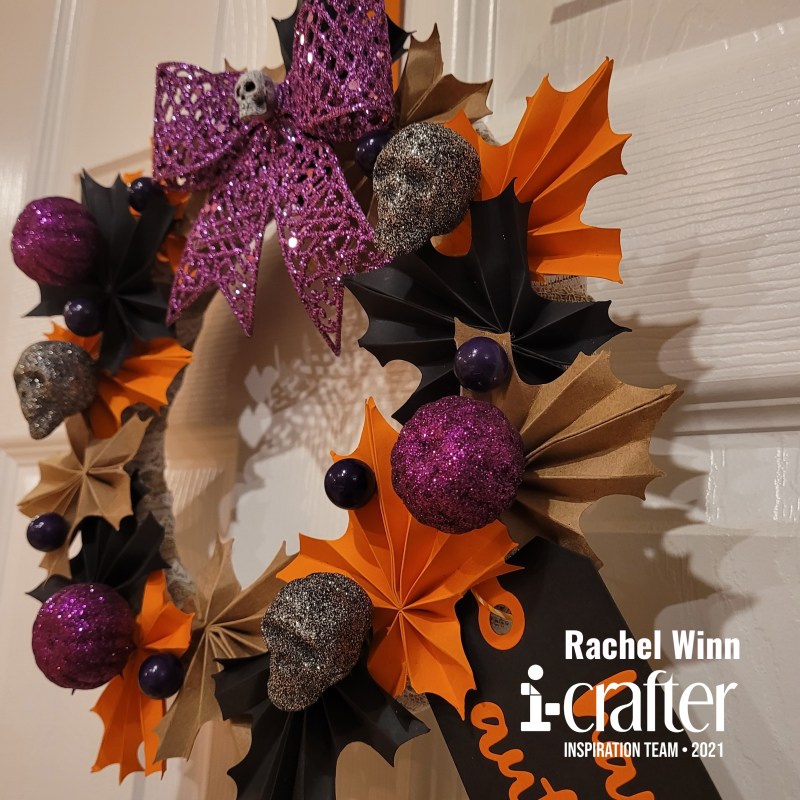
After the leaves were all in place, I began adding the embellishments that I had picked up at the Dollar Tree. I started with a purple ribbon with a skull in the center at the top of the wreath. Then I used purple pumpkins, silver skulls, and purple berries mixed all over the wreath.

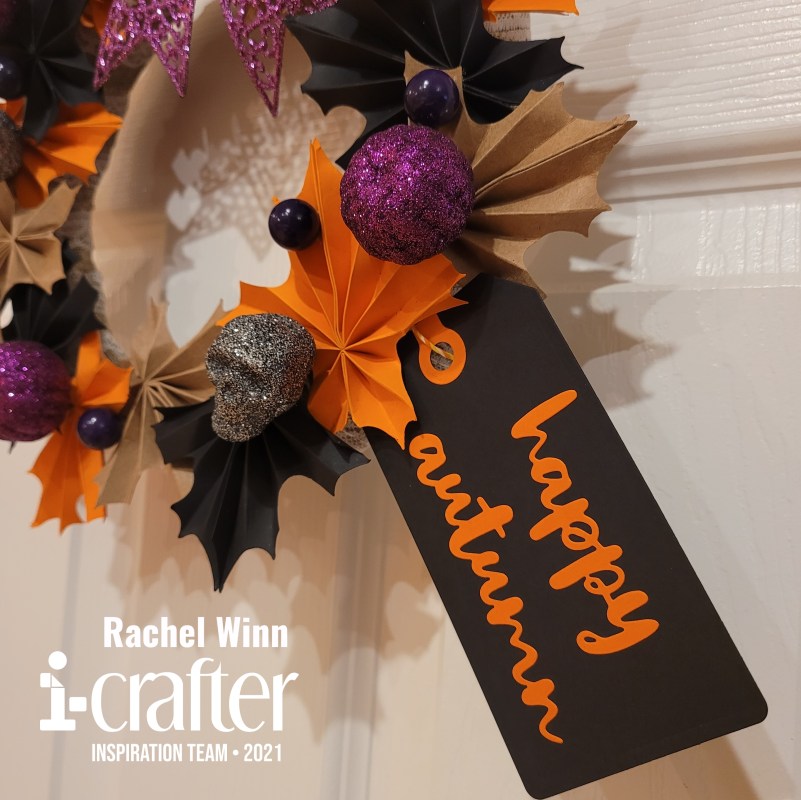
My last piece was to add a "Happy Autumn" tag! The Folded Maple Leaf die set has a beautiful cursive "Happy Autumn" that I though would look so nicely added to the wreath. I thought about putting it on a wooden tag or sign of some sort, then realized that the Tags and Labels die set would be the perfect addition to this project. So, I cut the largest tag out of black cardstock, and cut out the hole reinforcers and the sentiment out of the same orange as the leaves. I used orange and yellow twine to tie it onto the wreath form.

This project was so simple and it was so much fun to make with Molly! It could be done for any holiday or just for fun. I hope that you enjoyed my take on i-crafter's Folded Maple Leaf die set and Tags and Labels die set

If you’d like to see more of my projects, you can follow me here: Instagram, and Facebook page.
 
Until next time,
Rachel
 
For more inspiration, updates, and news make sure to check out these awesome places!
 
 
Thank you so much for stopping by today!